Dovremmo prendere in considerazione l'installazione di ProxySQL sui nodi client per una gestione efficiente del carico di lavoro nel cluster senza alcuna modifica alle applicazioni che generano query. Questa è la soluzione consigliata per la disponibilità elevata per Percona XtraDB Cluster.
Alcune delle funzionalità più diffuse di ProxySQL sono:
- Alte prestazioni
- Gestione efficiente del carico di lavoro
- Memorizzazione delle query nella cache
- Routing delle query
- Supporta il failover
- Configurazione avanzata con 0 tempi di inattività
- Proxy a livello di applicazione
- Multipiattaforma
- Supporto avanzato per la topologia
- Firewall
Specifiche ambientali:
192.168.56.115
cento
Prerequisiti:
Dobbiamo aprire sotto le porte su tutti i server
firewall-cmd --zone=public --add-service=mysql --permanent

firewall-cmd --zone=public --add-port=3306/tcp --permanent
firewall-cmd --zone=public --add-port=4567/tcp --permanent
firewall-cmd --zone=public --add-port=4568/tcp --permanent
firewall-cmd --zone=public --add-port=4444/tcp --permanent
firewall-cmd --zone=public --add-port=4567/udp --permanent
Consenti la porta del servizio ProxySQL 6033/tcp (è l'inverso della porta 3306 predefinita di MySQL) in Linux Firewall.
firewall-cmd --permanent --add-port=6033/tcp

firewall-cmd --reload
Installazione di ProxySQL Load Balancer per Percona XtraDB Cluster su CentOS 7
ProxySQL v2 supporta nativamente Percona XtraDB Cluster, per installare ProxySql installarlo dal repository percona
sudo yum install proxysql2
Per connettersi all'interfaccia di amministrazione di ProxySQL, è necessario un client MySQL.
yum install Percona-XtraDB-Cluster-client-57
Ora avvia il servizio proxysql
[example@sqldat.com ~]# systemctl start proxysql.service
Per controllare la porta sul nodo del cluster, utilizzare la query seguente.
mysql -uroot -p -e "SHOW GLOBAL VARIABLES LIKE 'PORT'";
Ora connettiti al pannello di amministrazione di ProxySQL e configura il sistema di bilanciamento del carico.
mysql -u admin -p123 -h 127.0.0.1 -P6032 --prompt='ProxySQL> '

INSERT INTO mysql_servers(hostgroup_id, hostname, port) VALUES (0,'192.168.56.110',3306);
INSERT INTO mysql_servers(hostgroup_id, hostname, port) VALUES (0,'192.168.56.113',3306);
INSERT INTO mysql_servers(hostgroup_id, hostname, port) VALUES (0,'192.168.56.114',3306);

ProxySQL> SELECT * FROM mysql_servers;
+--------------+----------------+------+-----------+--------+--------+-------------+-----------------+---------------------+---------+----------------+---------+
| hostgroup_id | hostname | port | gtid_port | status | weight | compression | max_connections | max_replication_lag | use_ssl | max_latency_ms | comment |
+--------------+----------------+------+-----------+--------+--------+-------------+-----------------+---------------------+---------+----------------+---------+
| 0 | 192.168.56.110 | 3306 | 0 | ONLINE | 1 | 0 | 1000 | 0 | 0 | 0 | |
| 0 | 192.168.56.113 | 3306 | 0 | ONLINE | 1 | 0 | 1000 | 0 | 0 | 0 | |
| 0 | 192.168.56.114 | 3306 | 0 | ONLINE | 1 | 0 | 1000 | 0 | 0 | 0 | |
+--------------+----------------+------+-----------+--------+--------+-------------+-----------------+---------------------+---------+----------------+---------+
3 rows in set (0.00 sec)
Configura il monitoraggio dei nodi ProxySQL:
Accedi all'istanza del database MySQL ed esegui i seguenti comandi per creare l'utente di monitoraggio con il privilegio USAGE
su qualsiasi percona NODO:
CREATE USER 'proxysql'@'%' IDENTIFIED BY 'ProxySQL';
GRANT USAGE ON *.* TO 'proxysql'@'%';

mysql> CREATE USER 'proxysql'@'%' IDENTIFIED BY 'ProxySQL';
Query OK, 0 rows affected (0.01 sec)

mysql> GRANT USAGE ON *.* TO 'proxysql'@'%';
Query OK, 0 rows affected (0.02 sec)

UPDATE global_variables SET variable_value='proxysql' WHERE variable_name='mysql-monitor_username';

UPDATE global_variables SET variable_value='ProxySQL' WHERE variable_name='mysql-monitor_password';

LOAD MYSQL VARIABLES TO RUNTIME;

SAVE MYSQL VARIABLES TO DISK;

ProxySQL> UPDATE global_variables SET variable_value='proxysql' WHERE variable_name='mysql-monitor_username';
Query OK, 1 row affected (0.01 sec)

ProxySQL> UPDATE global_variables SET variable_value='ProxySQL' WHERE variable_name='mysql-monitor_password';
Query OK, 1 row affected (0.00 sec)

ProxySQL> LOAD MYSQL VARIABLES TO RUNTIME;
Query OK, 0 rows affected (0.00 sec)

ProxySQL> SAVE MYSQL VARIABLES TO DISK;
Query OK, 136 rows affected (0.01 sec)

ProxySQL> LOAD MYSQL SERVERS TO RUNTIME;
Query OK, 0 rows affected (0.01 sec)
Creazione di un utente client ProxySQL
Provide read/write access to the cluster for ProxySQL, add this user on one of the Percona XtraDB Cluster nodes:

CREATE USER 'lbuser'@'192.168.56.115' IDENTIFIED BY 'lbpass';

GRANT ALL ON *.* TO 'lbuser'@'192.168.56.115';
Creazione dell'utente client ProxySQL:
ProxySQL> INSERT INTO mysql_users (username,password) VALUES ('lbuser','lbpass');
Query OK, 1 row affected (0.00 sec)
ProxySQL> LOAD MYSQL USERS TO RUNTIME;
Query OK, 0 rows affected (0.00 sec)
ProxySQL> SAVE MYSQL USERS TO DISK;
Query OK, 0 rows affected (0.02 sec)
conferma che l'utente è stato configurato correttamente, puoi provare ad accedere:
[example@sqldat.com ~]# mysql -u lbuser -plbpass -h 127.0.0.1 -P 6033
mysql: [Warning] Using a password on the command line interface can be insecure.
Welcome to the MySQL monitor. Commands end with ; or \g.
Your MySQL connection id is 4
Server version: 5.5.30 (ProxySQL)

Copyright (c) 2009-2019 Percona LLC and/or its affiliates
Copyright (c) 2000, 2019, Oracle and/or its affiliates. All rights reserved.

Oracle is a registered trademark of Oracle Corporation and/or its
affiliates. Other names may be trademarks of their respective
owners.
Type 'help;' or '\h' for help. Type '\c' to clear the current input statement.
mysql>
Vediamo a quale nodo si collegherà il nostro client del cluster.
[example@sqldat.com ~]# mysql -u lbuser -plbpass -h 127.0.0.1 -P 6033 -e "select @@hostname;";
mysql: [Warning] Using a password on the command line interface can be insecure.
+----------------------+
| @@hostname |
+----------------------+
| percona3.localdomain |
+----------------------+
puoi vedere che il server proxy è connesso a percona3
Ho provato da un'altra sessione di stucco, quindi si collega a percona2:
[example@sqldat.com ~]# mysql -u lbuser -plbpass -h 127.0.0.1 -P 6033 -e "select @@hostname;";
mysql: [Warning] Using a password on the command line interface can be insecure.
+----------------------+
| @@hostname |
+----------------------+
| percona2.localdomain |
+----------------------+
Dopo alcune sessioni multiple si collega a percona1:
[example@sqldat.com ~]# mysql -u lbuser -plbpass -h 127.0.0.1 -P 6033 -e "select @@hostname;";
mysql: [Warning] Using a password on the command line interface can be insecure.
+----------------------+
| @@hostname |
+----------------------+
| percona1.localdomain |
+----------------------+
Connessione da MySQL Workbench:
Di seguito sono riportate le configurazioni della mia sessione in MySQL workbench:
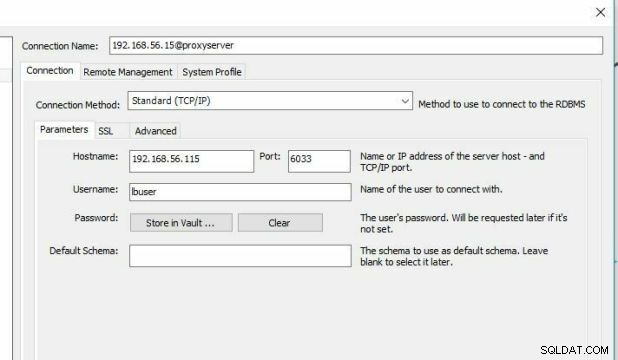
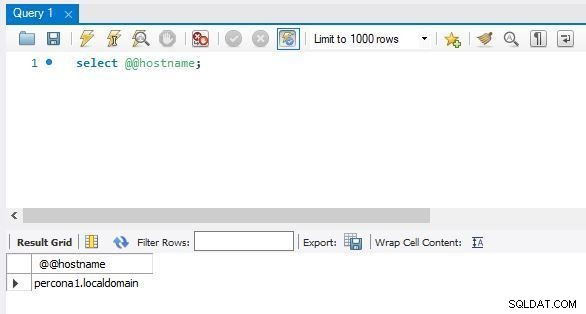
Ho provato a vedere quale nodo si connetterà da MySQL Workbench
Failover:
Ora verificheremo come questo eseguirà il failover
[example@sqldat.com mysql]# service mysql stop
Redirecting to /bin/systemctl stop mysql.service

ProxySQL> select hostgroup_id,hostname,port,status from runtime_mysql_servers;
+--------------+----------------+------+---------+
| hostgroup_id | hostname | port | status |
+--------------+----------------+------+---------+
| 0 | 192.168.56.110 | 3306 | ONLINE |
| 0 | 192.168.56.114 | 3306 | SHUNNED |
| 0 | 192.168.56.113 | 3306 | ONLINE |
+--------------+----------------+------+---------+
3 rows in set (0.01 sec)
Ora avvia nuovamente mysql sul nodo 3 e controlla di nuovo lo stato del cluster dal server proxy
[example@sqldat.com mysql]#systemctl start mysql.service

ProxySQL> SELECT hostgroup_id hg,count(status) cnt from main.runtime_mysql_servers WHERE status = "ONLINE" GROUP BY hg having cnt ;
+----+-----+
| hg | cnt |
+----+-----+
| 0 | 3 |
+----+-----+
1 row in set (0.00 sec)

ProxySQL> select hostgroup_id,hostname,port,status from runtime_mysql_servers;
+--------------+----------------+------+--------+
| hostgroup_id | hostname | port | status |
+--------------+----------------+------+--------+
| 0 | 192.168.56.110 | 3306 | ONLINE |
| 0 | 192.168.56.114 | 3306 | ONLINE |
| 0 | 192.168.56.113 | 3306 | ONLINE |
+--------------+----------------+------+--------+
3 rows in set (0.00 sec)
NOTA: Se vedi lo stato del nodo come SHUNNED quindi prova a connetterti più volte in modo che il client ottenga lo stato più recente del cluster poiché runtime_mysql_servers archivia lo stato più recente del nodo quando è stato tentato di connettersi l'ultima volta.
Test del cluster con sysbench:
yum install sysbench
sysbench richiede le credenziali utente del client ProxySQL che hai creato (lbuser/lbpass) in Creazione di un utente client ProxySQL.
sysbench /usr/share/sysbench/oltp_read_only.lua --threads=4 --mysql-host=127.0.0.1
--mysql-user=lbuser --mysql-password=lbpass --mysql-port=6033 --tables=10 --table-size=10000 prepare

sysbench /usr/share/sysbench/oltp_read_only.lua --threads=4 --events=0 --time=300 --mysql-host=27.0.0.1
--mysql-user=lbuser --mysql-password=lbpass --mysql-port=6033 --tables=10
--table-size=10000 --range_selects=off --db-ps-mode=disable --report-interval=1 run
Per vedere il numero di comandi eseguiti sul cluster:
proxysql> SELECT * FROM stats_mysql_commands_counters;