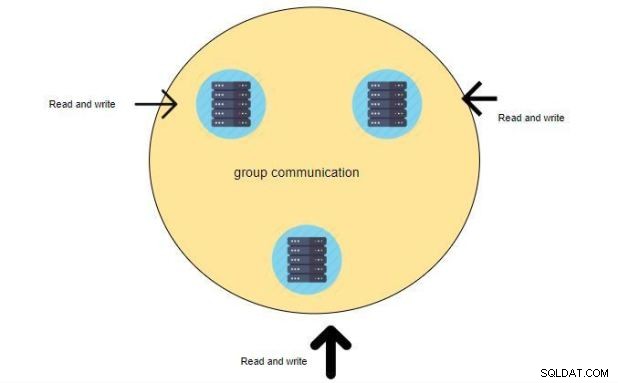
Benvenuto in un altro blog. Questa volta sono qui per mostrarvi come configurare il cluster percona XtraDB. Ok, quindi cos'è percona XtraDB? XtraDB è una soluzione di clustering MySQL, garantisce un'elevata disponibilità, previene i tempi di inattività e la perdita di dati e fornisce scalabilità lineare per un ambiente in crescita. Quando si esegue una query, questa viene eseguita localmente sul nodo. Tutti i dati sono disponibili localmente, non è necessario l'accesso remoto. Una buona soluzione per ridimensionare un carico di lavoro di lettura. Puoi inserire query di lettura su qualsiasi nodo. Dopo aver installato percona XtraDB non è necessario installare MySQL separatamente, XtraDB lo otterrà dal repository percona e sarai in grado di preparare il cluster dopo aver letto questo articolo.

prerequisito:
Per configurare un cluster percona XtraDB su server Linux abbiamo bisogno di tre server, le informazioni sono le seguenti:
server percona1:192.168.56.110
server percona2:192.168.56.113
Server percona3:192.168.56.114
Sistema operativo:CentOS 7
puoi anche usare due server ma il documento ufficiale consiglia un numero dispari di server. ad esempio 3,5,7 e così via. semplicemente non scegliere un numero pari di nodi, lo chiamano split-brain. Uno split-brain è uno stato in cui i nodi perdono il contatto tra loro e quindi entrambi cercano di assumere il controllo delle risorse condivise o di fornire contemporaneamente il servizio cluster
NOTA:Abbiamo bisogno dell'accesso come root sul nodo in cui installeremo Percona XtraDB Cluster
(accedere come utente con privilegi di root o essere in grado di eseguire comandi con Sudo
Controlli preliminari:
Aggiungi le voci sottostanti nel tuo file /etc/hosts ——> su tutti i server (percona1,percona2,percona3)
192.168.56.110 percona1.localdomain percona1
192.168.56.113 percona2.localdomain percona2
192.168.56.114 percona3.localdomain percona3
Aprire le porte del firewall:
Dobbiamo aprire sotto le porte su tutti i server (percona1,percona2,percona3)
3306
4444
4567
4568
firewall-cmd --zone=public --add-service=mysql --permanent
firewall-cmd --zone=public --add-port=3306/tcp --permanent
firewall-cmd --zone=public --add-port=4567/tcp --permanent
firewall-cmd --zone=public --add-port=4568/tcp --permanent
firewall-cmd --zone=public --add-port=4444/tcp --permanent
firewall-cmd --zone=public --add-port=4567/udp --permanent
firewall-cmd --reload
firewall-cmd --list-all
[example@sqldat.com ~]# firewall-cmd --list-all
public (active)
target: default
icmp-block-inversion: no
interfaces: enp0s3 enp0s8
sources:
services: ssh dhcpv6-client mysql
ports: 3306/tcp 4567/tcp 4568/tcp 4444/tcp 4567/udp
protocols:
masquerade: no
forward-ports:
source-ports:
icmp-blocks:
rich rules
Disabilita SELinux:——->su tutti i server(percona1,percona2,percona3)
[example@sqldat.com ~]# setenforce 0
Questo metterà SELinux in modalità permissiva per la sessione corrente, ma è necessario disabilitarlo in modo permanente.
edit /etc/sysconfig/selinux file imposta la variabile selinux come disabilitata su tutti i server (percona1,percona2,percona3):
vi /etc/sysconfig/selinux
SELINUX=disabled
Tutti i server dovrebbero essere accessibili tra loro, per verificare l'accessibilità esegui il ping di ciascun server.
Installa sotto prereq RPM:——->su tutti i server(percona1,percona2,percona3)
epel-release
libev
socat
[example@sqldat.com ~]# yum -y install epel-release
Installed:
epel-release.noarch 0:7-11

[example@sqldat.com yum.repos.d]# yum -y install libev
Installed:
libev.x86_64 0:4.15-7.el7

[example@sqldat.com Desktop]# yum -y install socat
Installed:
socat.x86_64 0:1.7.3.2-2.el7
Aggiungi repository Percona:——->su tutti i server(percona1,percona2,percona3)
Ora aggiungeremo il repository percona in tutti e tre i server (percona1,percona2,percona3):
[example@sqldat.com ~]# sudo yum -y install https://repo.percona.com/yum/percona-release-latest.noarch.rpm
Installed:
percona-release.noarch 0:1.0-13
Complete!
Installa Percona-XtraDB-Cluster:——->su tutti i server(percona1,percona2,percona3)
[example@sqldat.com ~]# yum install -y Percona-XtraDB-Cluster-57
Loaded plugins: fastestmirror, langpacks
Loading mirror speeds from cached hostfile
.
.
.

Installed:
Percona-XtraDB-Cluster-57.x86_64 0:5.7.27-31.39.1.el7 Percona-XtraDB-Cluster-shared-57.x86_64 0:5.7.27-31.39.1.el7
Percona-XtraDB-Cluster-shared-compat-57.x86_64 0:5.7.27-31.39.1.el7

Dependency Installed:
Percona-XtraDB-Cluster-client-57.x86_64 0:5.7.27-31.39.1.el7 Percona-XtraDB-Cluster-server-57.x86_64 0:5.7.27-31.39.1.el7
percona-xtrabackup-24.x86_64 0:2.4.17-1.el7 perl-DBD-MySQL.x86_64 0:4.023-6.el7
perl-Digest.noarch 0:1.17-245.el7 perl-Digest-MD5.x86_64 0:2.52-3.el7
qpress.x86_64 0:11-1.el7

Replaced:
mariadb-libs.x86_64 1:5.5.60-1.el7_5
Complete!
Verifichiamo che Percona XtraDB sia installato o meno.
[example@sqldat.com ~]# yum search Percona-XtraDB

NOTE: Till here all above steps should be perfomed on all servers (percona1,percona2,percona3)
Configurazione dei nodi per la replica dei set di scrittura
ON Percona1:
Avviamo il server MySQL e cambiamo la password di root solo su percona1 server
[example@sqldat.com ~]# systemctl start mysql
[example@sqldat.com ~]# grep password /var/log/mysqld.log
2019-12-11T10:35:12.135133Z 1 [Note] A temporary password is generated for example@sqldat.com: hJ(l8ySe>f>E

Note : copy the password "hJ(l8ySe>f>E" we are going to change this password :

[example@sqldat.com ~]# mysql_secure_installation ------->on all server(percona1,percona2,percona3)

Securing the MySQL server deployment.
Enter password for user root:

The existing password for the user account root has expired. Please set a new password.

New password:

Re-enter new password:

VALIDATE PASSWORD PLUGIN can be used to test passwords
and improve security. It checks the strength of password
and allows the users to set only those passwords which are
secure enough. Would you like to setup VALIDATE PASSWORD plugin?

Press y|Y for Yes, any other key for No:
Using existing password for root.
Change the password for root ? ((Press y|Y for Yes, any other key for No) :

... skipping.
By default, a MySQL installation has an anonymous user,
allowing anyone to log into MySQL without having to have
a user account created for them. This is intended only for
testing, and to make the installation go a bit smoother.
You should remove them before moving into a production
environment.

Remove anonymous users? (Press y|Y for Yes, any other key for No) : yes
Success.

Normally, root should only be allowed to connect from
'localhost'. This ensures that someone cannot guess at
the root password from the network.

Disallow root login remotely? (Press y|Y for Yes, any other key for No) : yes
Success.

By default, MySQL comes with a database named 'test' that
anyone can access. This is also intended only for testing,
and should be removed before moving into a production
environment.

Remove test database and access to it? (Press y|Y for Yes, any other key for No) :

... skipping.
Reloading the privilege tables will ensure that all changes
made so far will take effect immediately.

Reload privilege tables now? (Press y|Y for Yes, any other key for No) : yes
Success.

All done!
Ora ferma il server MySQL su percona1.
[example@sqldat.com ~]# systemctl stop mysql
Ora configureremo la nostra replica, aggiungeremo le informazioni sulla replica nel file my.cnf.
Configura le impostazioni di replica su percona1:
cat >>/etc/my.cnf<<EOF
[mysqld]
wsrep_provider=/usr/lib64/galera3/libgalera_smm.so
wsrep_cluster_name=perconacluster
wsrep_cluster_address=gcomm://192.168.56.110,192.168.56.113,192.168.56.114
wsrep_node_name=percona1
wsrep_node_address=192.168.56.110
wsrep_sst_method=xtrabackup-v2
wsrep_sst_auth=perconarep:perconapasswd
pxc_strict_mode=ENFORCING
binlog_format=ROW
default_storage_engine=InnoDB
innodb_autoinc_lock_mode=2
EOF
Ora inizializza il cluster eseguendo il bootstrap del primo nodo. Questo deve essere il nodo con il tuo database principale, che verrà utilizzato come origine dati per il cluster nel nostro caso è percona1 server
[example@sqldat.com ~]# systemctl start example@sqldat.com

Before configuring replication we need to create a separate user for replication which will be used for the replication process. why we need replication user? when you add a new node to the cluster it dumps the current node configuration and transfers it to the second node for that reason we need a separate user.
NOTA: Assicurati che l'utente sia lo stesso menzionato rispetto alla variabile "wsrep_sst_auth" nella configurazione di replica utilizzata nel file my.cnf.
[example@sqldat.com ~]#mysql -u root -p
mysql>create user example@sqldat.com'%' identified by 'perconapasswd';
mysql>grant all on *.* to example@sqldat.com'%';
mysql>flush privileges;
ON Percona2:
Configura le impostazioni di replica su percona2:
cat >>/etc/my.cnf<<EOF
[mysqld]
wsrep_provider=/usr/lib64/galera3/libgalera_smm.so
wsrep_cluster_name=perconacluster
wsrep_cluster_address=gcomm://192.168.56.110,192.168.56.113,192.168.56.114
wsrep_node_name=percona2
wsrep_node_address=192.168.56.113
wsrep_sst_method=xtrabackup-v2
wsrep_sst_auth=perconarep:perconapasswd
pxc_strict_mode=ENFORCING
binlog_format=ROW
default_storage_engine=InnoDB
innodb_autoinc_lock_mode=2
EOF
Ora avvia mysql e questo aggiungerà questo nodo al cluster.
[example@sqldat.com ~]# systemctl start mysql
ON Percona3:
Configura le impostazioni di replica su percona3:
cat >>/etc/my.cnf<<EOF
[mysqld]
wsrep_provider=/usr/lib64/galera3/libgalera_smm.so
wsrep_cluster_name=perconacluster
wsrep_cluster_address=gcomm://192.168.56.110,192.168.56.113,192.168.56.114
wsrep_node_name=percona3
wsrep_node_address=192.168.56.114
wsrep_sst_method=xtrabackup-v2
wsrep_sst_auth=perconarep:perconapasswd
pxc_strict_mode=ENFORCING
binlog_format=ROW
default_storage_engine=InnoDB
innodb_autoinc_lock_mode=2
EOF
Ora avvia mysql e questo aggiungerà questo nodo al cluster.
[example@sqldat.com ~]# systemctl start mysql
osserverai tali messaggi nel log di mysql (var/log/mysqld.log)
(percona2):trasferimento statale da 0,0 (percona1) completato
1.0 (percona3):trasferimento statale da 0.0 (percona1) completato
Per assicurarti che il cluster sia stato inizializzato, esegui quanto segue:
mysql> show status like 'wsrep%';
+----------------------------------+-------------------------------------------------------------+
| Variable_name | Value |
+----------------------------------+-------------------------------------------------------------+
| wsrep_local_state_uuid | 6d95cd36-1c1a-11ea-999a-83631204f6e3 |
| wsrep_protocol_version | 9 |
| wsrep_last_applied | 6 |
.
.
.
| wsrep_flow_control_recv | 0 |
| wsrep_flow_control_interval | [ 173, 173 ] |
| wsrep_flow_control_interval_low | 173 |
| wsrep_flow_control_interval_high | 173 |
| wsrep_flow_control_status | OFF |
.
.
| wsrep_local_state | 4 |
| wsrep_local_state_comment | Synced |
| wsrep_cert_index_size | 1 |
| wsrep_cert_bucket_count | 22 |
| wsrep_gcache_pool_size | 2384 |
.
.
| wsrep_incoming_addresses | 192.168.56.110:3306,192.168.56.114:3306,192.168.56.113:3306 |
| wsrep_cluster_weight | 3 |
| wsrep_desync_count | 0 |
| wsrep_evs_delayed | |
| wsrep_evs_evict_list | |
| wsrep_evs_repl_latency | 0/0/0/0/0 |
| wsrep_evs_state | OPERATIONAL |
| wsrep_gcomm_uuid | 1d16f574-1c1b-11ea-b5dd-574c9a653584 |
| wsrep_cluster_conf_id | 3 |
| wsrep_cluster_size | 3 |
| wsrep_cluster_state_uuid | 6d95cd36-1c1a-11ea-999a-83631204f6e3 |
| wsrep_cluster_status | Primary |
| wsrep_connected | ON |
| wsrep_local_bf_aborts | 0 |
| wsrep_local_index | 0 |
| wsrep_provider_name | Galera |
| wsrep_provider_vendor | Codership Oy <example@sqldat.com> |
| wsrep_provider_version | 3.39(rb3295e6) |
| wsrep_ready | ON |
+----------------------------------+-------------------------------------------------------------+
71 rows in set (0.00 sec)
Come puoi vedere, la dimensione del cluster è 3 “wsrep_cluster_size | 3” e puoi anche vedere l'IP dei nostri tre nodi
wsrep_incoming_addresses | 192.168.56.110:3306,192.168.56.114:3306,192.168.56.113:3306
Testa il nostro cluster:
Sto creando un database su percona 1 e poi verificheremo su percoan 3 che sia stato replicato.
mysql> show databases;
+--------------------+
| Database |
+--------------------+
| information_schema |
| mysql |
| performance_schema |
| sys |
+--------------------+
4 rows in set (0.03 sec)
mysql> CREATE DATABASE perconatest;
Query OK, 1 row affected (0.03 sec)
Ora controlliamo su percona3 vedremo che verrà creato il DB 'perconatest'
[example@sqldat.com ~]# mysql -uroot -p -e "show databases"
Enter password:
+--------------------+
| Database |
+--------------------+
| information_schema |
| mysql |
| perconatest |
| performance_schema |
| sys |
+--------------------+


