Tutti i programmi elaborano i dati in una forma o nell'altra e molti devono essere in grado di salvare e recuperare quei dati da un'invocazione all'altra. Python, SQLite e SQLAlchemy offrono ai tuoi programmi funzionalità di database, consentendoti di archiviare i dati in un unico file senza la necessità di un server di database.
Puoi ottenere risultati simili utilizzando file flat in qualsiasi numero di formati, inclusi CSV, JSON, XML e persino formati personalizzati. I file flat sono spesso file di testo leggibili dall'uomo, sebbene possano anche essere dati binari, con una struttura che può essere analizzata da un programma per computer. Di seguito, esplorerai l'utilizzo di database SQL e file flat per l'archiviazione e la manipolazione dei dati e imparerai come decidere quale approccio è giusto per il tuo programma.
In questo tutorial imparerai a usare:
- File flat per l'archiviazione dei dati
- SQL per migliorare l'accesso ai dati persistenti
- SQLite per l'archiviazione dei dati
- SQLAlchemy per lavorare con i dati come oggetti Python
Puoi ottenere tutto il codice e i dati che vedrai in questo tutorial facendo clic sul link sottostante:
Scarica il codice di esempio: Fai clic qui per ottenere il codice che utilizzerai per conoscere la gestione dei dati con SQLite e SQLAlchemy in questo tutorial.
Utilizzo di file flat per l'archiviazione dei dati
Un file piatto è un file contenente dati senza gerarchia interna e di solito senza riferimenti a file esterni. I file flat contengono caratteri leggibili e sono molto utili per creare e leggere dati. Poiché non devono utilizzare larghezze di campo fisse, i file flat spesso utilizzano altre strutture per consentire a un programma di analizzare il testo.
Ad esempio, i file con valori separati da virgola (CSV) sono righe di testo normale in cui il carattere virgola separa gli elementi di dati. Ogni riga di testo rappresenta una riga di dati e ogni valore separato da virgole è un campo all'interno di quella riga. Il delimitatore di caratteri virgola indica il confine tra i valori dei dati.
Python eccelle nella lettura e nel salvataggio su file. Essere in grado di leggere i file di dati con Python consente di ripristinare un'applicazione in uno stato utile quando la si esegue nuovamente in un secondo momento. La possibilità di salvare i dati in un file consente di condividere le informazioni del programma tra utenti e siti in cui viene eseguita l'applicazione.
Prima che un programma possa leggere un file di dati, deve essere in grado di comprendere i dati. Di solito, questo significa che il file di dati deve avere una struttura che l'applicazione può utilizzare per leggere e analizzare il testo nel file.
Di seguito è riportato un file CSV denominato author_book_publisher.csv , utilizzato dal primo programma di esempio in questo tutorial:
first_name,last_name,title,publisher
Isaac,Asimov,Foundation,Random House
Pearl,Buck,The Good Earth,Random House
Pearl,Buck,The Good Earth,Simon & Schuster
Tom,Clancy,The Hunt For Red October,Berkley
Tom,Clancy,Patriot Games,Simon & Schuster
Stephen,King,It,Random House
Stephen,King,It,Penguin Random House
Stephen,King,Dead Zone,Random House
Stephen,King,The Shining,Penguin Random House
John,Le Carre,"Tinker, Tailor, Soldier, Spy: A George Smiley Novel",Berkley
Alex,Michaelides,The Silent Patient,Simon & Schuster
Carol,Shaben,Into The Abyss,Simon & Schuster
La prima riga fornisce un elenco di campi separati da virgole, che sono i nomi delle colonne per i dati che seguono nelle righe rimanenti. Il resto delle righe contiene i dati, con ogni riga che rappresenta un singolo record.
Nota: Sebbene autori, libri ed editori siano tutti reali, le relazioni tra libri ed editori sono fittizie e sono state create ai fini di questo tutorial.
Successivamente, darai un'occhiata ad alcuni dei vantaggi e degli svantaggi dell'utilizzo di file flat come il CSV sopra per lavorare con i tuoi dati.
Vantaggi dei file flat
Lavorare con i dati in file flat è gestibile e semplice da implementare. Avere i dati in un formato leggibile dall'uomo è utile non solo per creare il file di dati con un editor di testo, ma anche per esaminare i dati e cercare eventuali incongruenze o problemi.
Molte applicazioni possono esportare versioni di file flat dei dati generati dal file. Ad esempio, Excel può importare o esportare un file CSV da e verso un foglio di calcolo. I file flat hanno anche il vantaggio di essere autonomi e trasferibili se desideri condividere i dati.
Quasi tutti i linguaggi di programmazione dispongono di strumenti e librerie che semplificano il lavoro con i file CSV. Python ha il built-in csv e il potente modulo Panda disponibili, rendendo il lavoro con i file CSV una soluzione potente.
Svantaggi dei file flat
I vantaggi di lavorare con file flat iniziano a diminuire man mano che i dati diventano più grandi. I file di grandi dimensioni sono ancora leggibili dall'uomo, ma modificarli per creare dati o cercare problemi diventa un compito più difficile. Se la tua applicazione cambierà i dati nel file, una soluzione sarebbe quella di leggere l'intero file in memoria, apportare le modifiche e scrivere i dati in un altro file.
Un altro problema con l'utilizzo di file flat è che dovrai creare e mantenere in modo esplicito qualsiasi relazione tra parti dei tuoi dati e il programma applicativo all'interno della sintassi del file. Inoltre, dovrai generare codice nella tua applicazione per utilizzare tali relazioni.
Un'ultima complicazione è che le persone con cui vuoi condividere il tuo file di dati dovranno anche conoscere e agire sulle strutture e le relazioni che hai creato nei dati. Per accedere alle informazioni, tali utenti dovranno comprendere non solo la struttura dei dati ma anche gli strumenti di programmazione necessari per accedervi.
Esempio di file flat
Il programma di esempio examples/example_1/main.py utilizza il author_book_publisher.csv file per ottenere i dati e le relazioni in esso contenuti. Questo file CSV mantiene un elenco di autori, i libri che hanno pubblicato e gli editori per ciascuno dei libri.
Nota: I file di dati utilizzati negli esempi sono disponibili in project/data directory. C'è anche un file di programma in project/build_data directory che genera i dati. Tale applicazione è utile se modifichi i dati e desideri tornare a uno stato noto.
Per accedere ai file di dati utilizzati in questa sezione e durante il tutorial, fare clic sul collegamento seguente:
Scarica il codice di esempio: Fai clic qui per ottenere il codice che utilizzerai per conoscere la gestione dei dati con SQLite e SQLAlchemy in questo tutorial.
Il file CSV presentato sopra è un file di dati piuttosto piccolo che contiene solo pochi autori, libri ed editori. Dovresti anche notare alcune cose sui dati:
-
Gli autori Stephen King e Tom Clancy compaiono più di una volta perché nei dati sono rappresentati più libri che hanno pubblicato.
-
Gli autori Stephen King e Pearl Buck hanno lo stesso libro pubblicato da più di un editore.
Questi campi di dati duplicati creano relazioni tra altre parti dei dati. Un autore può scrivere molti libri e un editore può lavorare con più autori. Autori ed editori condividono relazioni con i singoli libri.
Le relazioni nel author_book_publisher.csv file sono rappresentati da campi che compaiono più volte in diverse righe del file di dati. A causa di questa ridondanza dei dati, i dati rappresentano più di una singola tabella bidimensionale. Vedrai di più quando usi il file per creare un file di database SQLite.
Il programma di esempio examples/example_1/main.py utilizza le relazioni incorporate nel author_book_publisher.csv file per generare alcuni dati. Presenta prima un elenco degli autori e il numero di libri che ciascuno ha scritto. Quindi mostra un elenco di editori e il numero di autori per i quali ciascuno ha pubblicato libri.
Utilizza anche treelib modulo per visualizzare una gerarchia ad albero di autori, libri ed editori.
Infine, aggiunge un nuovo libro ai dati e visualizza nuovamente la gerarchia ad albero con il nuovo libro in posizione. Ecco il main() funzione di ingresso per questo programma:
 1def main():
 2    """The main entry point of the program"""
 3    # Get the resources for the program
 4    with resources.path(
 5        "project.data", "author_book_publisher.csv"
 6    ) as filepath:
 7        data = get_data(filepath)
 8
 9    # Get the number of books printed by each publisher
10    books_by_publisher = get_books_by_publisher(data, ascending=False)
11    for publisher, total_books in books_by_publisher.items():
12        print(f"Publisher: {publisher}, total books: {total_books}")
13    print()
14
15    # Get the number of authors each publisher publishes
16    authors_by_publisher = get_authors_by_publisher(data, ascending=False)
17    for publisher, total_authors in authors_by_publisher.items():
18        print(f"Publisher: {publisher}, total authors: {total_authors}")
19    print()
20
21    # Output hierarchical authors data
22    output_author_hierarchy(data)
23
24    # Add a new book to the data structure
25    data = add_new_book(
26        data,
27        author_name="Stephen King",
28        book_title="The Stand",
29        publisher_name="Random House",
30    )
31
32    # Output the updated hierarchical authors data
33    output_author_hierarchy(data)
Il codice Python sopra segue i seguenti passaggi:
- Righe da 4 a 7 leggi il
author_book_publisher.csvfile in un DataFrame panda. - Righe da 10 a 13 stampa il numero di libri pubblicati da ciascun editore.
- Righe da 16 a 19 stampa il numero di autori associati a ciascun editore.
- Riga 22 restituisce i dati del libro come una gerarchia ordinata per autori.
- Righe da 25 a 30 aggiungi un nuovo libro alla struttura in memoria.
- Riga 33 restituisce i dati del libro come una gerarchia ordinata per autori, incluso il libro appena aggiunto.
L'esecuzione di questo programma genera il seguente output:
$ python main.py
Publisher: Simon & Schuster, total books: 4
Publisher: Random House, total books: 4
Publisher: Penguin Random House, total books: 2
Publisher: Berkley, total books: 2

Publisher: Simon & Schuster, total authors: 4
Publisher: Random House, total authors: 3
Publisher: Berkley, total authors: 2
Publisher: Penguin Random House, total authors: 1

Authors
├── Alex Michaelides
│   └── The Silent Patient
│       └── Simon & Schuster
├── Carol Shaben
│   └── Into The Abyss
│       └── Simon & Schuster
├── Isaac Asimov
│   └── Foundation
│       └── Random House
├── John Le Carre
│   └── Tinker, Tailor, Soldier, Spy: A George Smiley Novel
│       └── Berkley
├── Pearl Buck
│   └── The Good Earth
│       ├── Random House
│       └── Simon & Schuster
├── Stephen King
│   ├── Dead Zone
│   │   └── Random House
│   ├── It
│   │   ├── Penguin Random House
│   │   └── Random House
│   └── The Shining
│       └── Penguin Random House
└── Tom Clancy
    ├── Patriot Games
    │   └── Simon & Schuster
    └── The Hunt For Red October
        └── Berkley
La gerarchia degli autori sopra è presentata due volte nell'output, con l'aggiunta di The Stand di Stephen King , pubblicato da Random House. L'output effettivo sopra è stato modificato e mostra solo il primo output della gerarchia per risparmiare spazio.
main() chiama altre funzioni per eseguire la maggior parte del lavoro. La prima funzione che chiama è get_data() :
def get_data(filepath):
    """Get book data from the csv file"""
    return pd.read_csv(filepath)
Questa funzione prende il percorso del file CSV e usa i panda per leggerlo in un DataFrame panda, che poi passa di nuovo al chiamante. Il valore di ritorno di questa funzione diventa la struttura dati passata alle altre funzioni che compongono il programma.
get_books_by_publisher() calcola il numero di libri pubblicati da ciascun editore. La serie panda risultante utilizza la funzionalità panda GroupBy per raggruppare per editore e quindi ordinare in base a ascending bandiera:
def get_books_by_publisher(data, ascending=True):
    """Return the number of books by each publisher as a pandas series"""
    return data.groupby("publisher").size().sort_values(ascending=ascending)
get_authors_by_publisher() fa essenzialmente la stessa cosa della funzione precedente, ma per gli autori:
def get_authors_by_publisher(data, ascending=True):
    """Returns the number of authors by each publisher as a pandas series"""
    return (
        data.assign(name=data.first_name.str.cat(data.last_name, sep=" "))
        .groupby("publisher")
        .nunique()
        .loc[:, "name"]
        .sort_values(ascending=ascending)
    )
add_new_book() crea un nuovo libro in Pandas DataFrame. Il codice controlla se l'autore, il libro o l'editore esiste già. In caso contrario, crea un nuovo libro e lo aggiunge al DataFrame panda:
def add_new_book(data, author_name, book_title, publisher_name):
    """Adds a new book to the system"""
    # Does the book exist?
    first_name, _, last_name = author_name.partition(" ")
    if any(
        (data.first_name == first_name)
        & (data.last_name == last_name)
        & (data.title == book_title)
        & (data.publisher == publisher_name)
    ):
        return data
    # Add the new book
    return data.append(
        {
            "first_name": first_name,
            "last_name": last_name,
            "title": book_title,
            "publisher": publisher_name,
        },
        ignore_index=True,
    )
output_author_hierarchy() utilizza for nidificato loop per scorrere i livelli della struttura dati. Quindi utilizza treelib modulo per produrre un elenco gerarchico degli autori, dei libri che hanno pubblicato e degli editori che hanno pubblicato quei libri:
def output_author_hierarchy(data):
    """Output the data as a hierarchy list of authors"""
    authors = data.assign(
        name=data.first_name.str.cat(data.last_name, sep=" ")
    )
    authors_tree = Tree()
    authors_tree.create_node("Authors", "authors")
    for author, books in authors.groupby("name"):
        authors_tree.create_node(author, author, parent="authors")
        for book, publishers in books.groupby("title")["publisher"]:
            book_id = f"{author}:{book}"
            authors_tree.create_node(book, book_id, parent=author)
            for publisher in publishers:
                authors_tree.create_node(publisher, parent=book_id)

    # Output the hierarchical authors data
    authors_tree.show()
Questa applicazione funziona bene e illustra la potenza a tua disposizione con il modulo Panda. Il modulo fornisce funzionalità eccellenti per leggere un file CSV e interagire con i dati.
Procediamo e creiamo un programma che funzioni in modo identico utilizzando Python, una versione del database SQLite dei dati dell'autore e della pubblicazione e SQLAlchemy per interagire con tali dati.
Utilizzo di SQLite per mantenere i dati
Come hai visto prima, ci sono dati ridondanti in author_book_publisher.csv file. Ad esempio, tutte le informazioni su The Good Earth di Pearl Buck è elencato due volte perché due editori diversi hanno pubblicato il libro.
Immagina se questo file di dati contenesse più dati correlati, come l'indirizzo e il numero di telefono dell'autore, le date di pubblicazione e i codici ISBN per i libri, oppure indirizzi, numeri di telefono e forse entrate annuali per gli editori. Questi dati verrebbero duplicati per ogni elemento di dati radice, come autore, libro o editore.
È possibile creare dati in questo modo, ma sarebbe eccezionalmente ingombrante. Pensa ai problemi nel mantenere aggiornato questo file di dati. E se Stephen King volesse cambiare il suo nome? Dovresti aggiornare più record contenenti il suo nome e assicurarti che non ci siano errori di battitura.
Peggio della duplicazione dei dati sarebbe la complessità dell'aggiunta di altre relazioni ai dati. E se decidessi di aggiungere numeri di telefono per gli autori e loro avessero numeri di telefono per casa, lavoro, cellulare e forse altro? Ogni nuova relazione che desideri aggiungere per qualsiasi elemento radice moltiplicherà il numero di record per il numero di elementi in quella nuova relazione.
Questo problema è uno dei motivi per cui esistono relazioni nei sistemi di database. Un argomento importante nell'ingegneria dei database è la normalizzazione del database o il processo di scomposizione dei dati per ridurre la ridondanza e aumentare l'integrità. Quando una struttura di database viene estesa con nuovi tipi di dati, la sua normalizzazione preventiva riduce al minimo le modifiche alla struttura esistente.
Il database SQLite è disponibile in Python e, secondo la home page di SQLite, viene utilizzato più di tutti gli altri sistemi di database messi insieme. Offre un sistema di gestione di database relazionali (RDBMS) completo che funziona con un singolo file per mantenere tutte le funzionalità del database.
Ha anche il vantaggio di non richiedere un server di database separato per funzionare. Il formato del file di database è multipiattaforma e accessibile a qualsiasi linguaggio di programmazione che supporti SQLite.
Tutto questo è un'informazione interessante, ma come è rilevante per l'uso di file flat per l'archiviazione dei dati? Lo scoprirai qui sotto!
Creazione di una struttura di database
L'approccio della forza bruta per ottenere il author_book_publisher.csv dati in un database SQLite significherebbe creare una singola tabella che corrisponda alla struttura del file CSV. Ciò ignorerebbe gran parte del potere di SQLite.
Banca dati relazionali fornire un modo per archiviare dati strutturati nelle tabelle e stabilire relazioni tra tali tabelle. Di solito usano Structured Query Language (SQL) come modo principale per interagire con i dati. Questa è una semplificazione eccessiva di ciò che forniscono gli RDBMS, ma è sufficiente per gli scopi di questo tutorial.
Un database SQLite fornisce supporto per l'interazione con la tabella di dati tramite SQL. Non solo un file di database SQLite contiene i dati, ma ha anche un modo standardizzato per interagire con i dati. Questo supporto è incorporato nel file, il che significa che qualsiasi linguaggio di programmazione che può utilizzare un file SQLite può anche utilizzare SQL per lavorarci.
Interazione con un database con SQL
SQL è un linguaggio dichiarativo utilizzato per creare, gestire e interrogare i dati contenuti in un database. Un linguaggio dichiarativo descrive cosa deve essere realizzato piuttosto che come dovrebbe essere realizzato. Vedrai esempi di istruzioni SQL più avanti quando inizierai a creare tabelle di database.
Struttura di un database con SQL
Per sfruttare la potenza di SQL, dovrai applicare un po' di normalizzazione del database ai dati in author_book_publisher.csv file. Per fare ciò, separerai gli autori, i libri e gli editori in tabelle di database separate.
Concettualmente, i dati vengono archiviati nel database in strutture di tabelle bidimensionali. Ogni tabella è composta da righe di record e ogni record è costituito da colonne o campi , contenente dati.
I dati contenuti nei campi sono di tipo predefinito, inclusi testo, numeri interi, float e altro. I file CSV sono diversi perché tutti i campi sono testo e devono essere analizzati da un programma per avere un tipo di dati assegnato loro.
Ogni record nella tabella ha una chiave primaria definito per dare a un record un identificatore univoco. La chiave primaria è simile alla chiave di un dizionario Python. Il motore del database stesso spesso genera la chiave primaria come valore intero incrementale per ogni record inserito nella tabella del database.
Sebbene la chiave primaria sia spesso generata automaticamente dal motore di database, non è necessario che lo sia. Se i dati archiviati in un campo sono univoci rispetto a tutti gli altri dati nella tabella in quel campo, allora può essere la chiave primaria. Ad esempio, una tabella contenente dati sui libri potrebbe utilizzare l'ISBN del libro come chiave primaria.
Creazione di tabelle con SQL
Ecco come creare le tre tabelle che rappresentano gli autori, i libri e gli editori nel file CSV utilizzando le istruzioni SQL:
CREATE TABLE author (
    author_id INTEGER NOT NULL PRIMARY KEY,
    first_name VARCHAR,
    last_name VARCHAR
);

CREATE TABLE book (
    book_id INTEGER NOT NULL PRIMARY KEY,
    author_id INTEGER REFERENCES author,
    title VARCHAR
);

CREATE TABLE publisher (
    publisher_id INTEGER NOT NULL PRIMARY KEY,
    name VARCHAR
);
Si noti che non ci sono operazioni sui file, nessuna variabile creata e nessuna struttura che le contenga. Le affermazioni descrivono solo il risultato desiderato:la creazione di una tabella con attributi particolari. Il motore di database determina come farlo.
Dopo aver creato e popolato questa tabella con i dati dell'autore da author_book_publisher.csv file, è possibile accedervi utilizzando le istruzioni SQL. La seguente istruzione (chiamata anche query ) utilizza il carattere jolly (* ) per ottenere tutti i dati nel author tabella ed emetterla:
SELECT * FROM author;
Puoi usare sqlite3 strumento da riga di comando per interagire con author_book_publisher.db file di database nel project/data directory:
$ sqlite3 author_book_publisher.db
Una volta che lo strumento da riga di comando SQLite è in esecuzione con il database aperto, è possibile immettere i comandi SQL. Ecco il comando SQL sopra e il suo output, seguito da .q comando per uscire dal programma:
sqlite> SELECT * FROM author;
1|Isaac|Asimov
2|Pearl|Buck
3|Tom|Clancy
4|Stephen|King
5|John|Le Carre
6|Alex|Michaelides
7|Carol|Shaben

sqlite> .q
Si noti che ogni autore esiste solo una volta nella tabella. A differenza del file CSV, che aveva più voci per alcuni autori, qui è necessario un solo record univoco per autore.
Mantenimento di un database con SQL
SQL fornisce modi per lavorare con database e tabelle esistenti inserendo nuovi dati e aggiornando o eliminando i dati esistenti. Ecco un esempio di istruzione SQL per l'inserimento di un nuovo autore in author tabella:
INSERT INTO author
    (first_name, last_name)
VALUES ('Paul', 'Mendez');
Questa istruzione SQL inserisce i valori 'Paul ' e 'Mendez ‘ nelle rispettive colonne first_name e last_name dell'author tavolo.
Nota che il author_id la colonna non è specificata. Poiché quella colonna è la chiave primaria, il motore di database genera il valore e lo inserisce come parte dell'esecuzione dell'istruzione.
L'aggiornamento dei record in una tabella di database è un processo semplice. Per esempio, supponiamo che Stephen King volesse essere conosciuto con il suo pseudonimo, Richard Bachman. Ecco un'istruzione SQL per aggiornare il record del database:
UPDATE author
SET first_name = 'Richard', last_name = 'Bachman'
WHERE first_name = 'Stephen' AND last_name = 'King';
L'istruzione SQL individua il singolo record per 'Stephen King' usando l'istruzione condizionale WHERE first_name = 'Stephen' AND last_name = 'King' e quindi aggiorna il first_name e last_name campi con i nuovi valori. SQL utilizza il segno di uguale (= ) sia come operatore di confronto che come operatore di assegnazione.
Puoi anche eliminare i record da un database. Ecco un esempio di istruzione SQL per eliminare un record dall'author tabella:
DELETE FROM author
WHERE first_name = 'Paul'
AND last_name = 'Mendez';
Questa istruzione SQL elimina una singola riga dall'author tabella dove il first_name è uguale a 'Paul' e il last_name è uguale a 'Mendez' .
Fai attenzione quando elimini i record! Le condizioni impostate devono essere il più specifiche possibile. Un condizionale troppo ampio può portare all'eliminazione di più record di quelli previsti. Ad esempio, se la condizione fosse basata solo sulla riga first_name = 'Paul' , quindi tutti gli autori con un nome Paul verrebbero eliminati dal database.
Nota: Per evitare l'eliminazione accidentale dei record, molte applicazioni non consentono affatto l'eliminazione. Invece, il record ha un'altra colonna per indicare se è in uso o meno. Questa colonna potrebbe essere denominata active e contengono un valore che restituisce True o False, indicando se il record deve essere incluso quando si esegue una query sul database.
Ad esempio, la query SQL seguente otterrebbe tutte le colonne per tutti i record attivi in some_table :
SELECT
  *
FROM some_table
WHERE active = 1;
SQLite non ha un tipo di dati booleano, quindi active colonna è rappresentata da un numero intero con valore 0 o 1 per indicare lo stato del record. Altri sistemi di database possono avere o meno tipi di dati booleani nativi.
È del tutto possibile creare applicazioni di database in Python utilizzando istruzioni SQL direttamente nel codice. In questo modo i dati vengono restituiti all'applicazione come un elenco di elenchi o un elenco di dizionari.
L'utilizzo di SQL non elaborato è un modo perfettamente accettabile per lavorare con i dati restituiti dalle query al database. Tuttavia, invece di farlo, passerai direttamente all'utilizzo di SQLAlchemy per lavorare con i database.
Costruire relazioni
Un'altra caratteristica dei sistemi di database che potresti trovare ancora più potente e utile della persistenza e del recupero dei dati sono le relazioni . I database che supportano le relazioni consentono di suddividere i dati in più tabelle e stabilire connessioni tra di loro.
I dati nel author_book_publisher.csv file rappresenta i dati e le relazioni duplicando i dati. Un database gestisce questo suddividendo i dati in tre tabelle:author , book e publisher —e stabilire relazioni tra loro.
Dopo aver ottenuto tutti i dati desiderati in un'unica posizione nel file CSV, perché vorresti suddividerlo in più tabelle? Non sarebbe più lavoro da creare e rimontare? In una certa misura è vero, ma i vantaggi di suddividere i dati e rimontarli utilizzando SQL potrebbero convincerti!
Relazioni uno-a-molti
Un uno a molti la relazione è come quella di un cliente che ordina articoli online. Un cliente può avere più ordini, ma ogni ordine appartiene a un cliente. Il author_book_publisher.db il database ha una relazione uno-a-molti sotto forma di autori e libri. Ogni autore può scrivere molti libri, ma ogni libro è scritto da un autore.
Come hai visto nella creazione della tabella sopra, l'implementazione di queste entità separate consiste nel collocare ciascuna in una tabella del database, una per gli autori e una per i libri. Ma come viene implementata la relazione uno-a-molti tra queste due tabelle?
Ricorda, ogni tabella in un database ha un campo designato come chiave primaria per quella tabella. Ciascuna tabella sopra ha un campo chiave primaria denominato utilizzando questo modello:<table name>_id .
Il book la tabella mostrata sopra contiene un campo, author_id , che fa riferimento all'author tavolo. Il author_id campo stabilisce una relazione uno-a-molti tra autori e libri che assomiglia a questo:
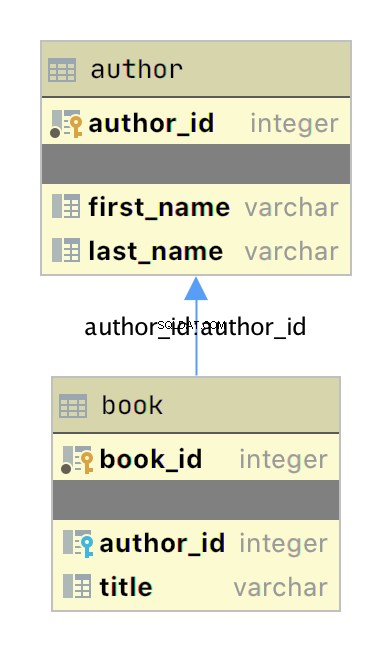
Il diagramma sopra è un semplice diagramma entità-relazione (ERD) creato con l'applicazione JetBrains DataGrip che mostra le tabelle author e book come caselle con la rispettiva chiave primaria e campi dati. Due elementi grafici aggiungono informazioni sulla relazione:
-
Le piccole icone chiave gialle e blu indicare rispettivamente la chiave primaria e quella esterna per la tabella.
-
La freccia che collega
bookaauthorindica la relazione tra le tabelle in base aauthor_idchiave esterna nelbooktabella.
Quando aggiungi un nuovo libro al book tabella, i dati includono un author_id valore per un autore esistente in author tavolo. In questo modo, tutti i libri scritti da un autore hanno una relazione di ricerca con quell'autore unico.
Ora che hai tabelle separate per autori e libri, come usi la relazione tra di loro? SQL supporta ciò che viene chiamato JOIN operazione, che è possibile utilizzare per indicare al database come connettere due o più tabelle.
La query SQL di seguito si unisce all'author e book tabella insieme utilizzando l'applicazione a riga di comando SQLite:
sqlite> SELECT
   ...> a.first_name || ' ' || a.last_name AS author_name,
   ...> b.title AS book_title
   ...> FROM author a
   ...> JOIN book b ON b.author_id = a.author_id
   ...> ORDER BY a.last_name ASC;
Isaac Asimov|Foundation
Pearl Buck|The Good Earth
Tom Clancy|The Hunt For Red October
Tom Clancy|Patriot Games
Stephen King|It
Stephen King|Dead Zone
Stephen King|The Shining
John Le Carre|Tinker, Tailor, Soldier, Spy: A George Smiley Novel
Alex Michaelides|The Silent Patient
Carol Shaben|Into The Abyss
La query SQL precedente raccoglie informazioni sia dall'autore che dalla tabella del libro unendo le tabelle utilizzando la relazione stabilita tra i due. La concatenazione di stringhe SQL assegna il nome completo dell'autore all'alias author_name . I dati raccolti dalla query sono ordinati in ordine crescente in base al last_name campo.
Ci sono alcune cose da notare nell'istruzione SQL. In primo luogo, gli autori sono presentati in base ai loro nomi completi in un'unica colonna e ordinati in base ai loro cognomi. Inoltre, gli autori vengono visualizzati nell'output più volte a causa della relazione uno-a-molti. Il nome di un autore viene duplicato per ogni libro che ha scritto nel database.
Creando tabelle separate per autori e libri e stabilendo la relazione tra di loro, hai ridotto la ridondanza nei dati. Ora devi solo modificare i dati di un autore in un posto e quella modifica appare in qualsiasi query SQL che accede ai dati.
Relazioni molti-a-molti
Molti a molti esistono relazioni nel author_book_publisher.db database tra autori ed editori, nonché tra libri ed editori. Un autore può lavorare con molti editori e un editore può lavorare con molti autori. Allo stesso modo, un libro può essere pubblicato da molti editori e un editore può pubblicare molti libri.
La gestione di questa situazione nel database è più complicata di una relazione uno-a-molti perché la relazione va in entrambe le direzioni. Many-to-many relationships are created by an association table acting as a bridge between the two related tables.
The association table contains at least two foreign key fields, which are the primary keys of each of the two associated tables. This SQL statement creates the association table relating the author and publisher tables:
CREATE TABLE author_publisher (
    author_id INTEGER REFERENCES author,
    publisher_id INTEGER REFERENCES publisher
);
The SQL statements create a new author_publisher table referencing the primary keys of the existing author and publisher tables. The author_publisher table is an association table establishing relationships between an author and a publisher.
Because the relationship is between two primary keys, there’s no need to create a primary key for the association table itself. The combination of the two related keys creates a unique identifier for a row of data.
As before, you use the JOIN keyword to connect two tables together. Connecting the author table to the publisher table is a two-step process:
JOINtheauthortable with theauthor_publishertavolo.JOINtheauthor_publishertable with thepublishertable.
The author_publisher association table provides the bridge through which the JOIN connects the two tables. Here’s an example SQL query returning a list of authors and the publishers publishing their books:
 1sqlite> SELECT
 2   ...> a.first_name || ' ' || a.last_name AS author_name,
 3   ...> p.name AS publisher_name
 4   ...> FROM author a
 5   ...> JOIN author_publisher ap ON ap.author_id = a.author_id
 6   ...> JOIN publisher p ON p.publisher_id = ap.publisher_id
 7   ...> ORDER BY a.last_name ASC;
 8Isaac Asimov|Random House
 9Pearl Buck|Random House
10Pearl Buck|Simon & Schuster
11Tom Clancy|Berkley
12Tom Clancy|Simon & Schuster
13Stephen King|Random House
14Stephen King|Penguin Random House
15John Le Carre|Berkley
16Alex Michaelides|Simon & Schuster
17Carol Shaben|Simon & Schuster
The statements above perform the following actions:
-
Line 1 starts a
SELECTstatement to get data from the database. -
Line 2 selects the first and last name from the
authortable using theaalias for theauthortable and concatenates them together with a space character. -
Line 3 selects the publisher’s name aliased to
publisher_name. -
Line 4 uses the
authortable as the first source from which to retrieve data and assigns it to the aliasa. -
Line 5 is the first step of the process outlined above for connecting the
authortable to thepublishertavolo. It uses the aliasapfor theauthor_publisherassociation table and performs aJOINoperation to connect theap.author_idforeign key reference to thea.author_idprimary key in theauthortable. -
Line 6 is the second step in the two-step process mentioned above. It uses the alias
pfor thepublishertable and performs aJOINoperation to relate theap.publisher_idforeign key reference to thep.publisher_idprimary key in thepublishertable. -
Line 7 sorts the data by the author’s last name in ascending alphabetical order and ends the SQL query.
-
Lines 8 to 17 are the output of the SQL query.
Note that the data in the source author and publisher tables are normalized, with no data duplication. Yet the returned results have duplicated data where necessary to answer the SQL query.
The SQL query above demonstrates how to make use of a relationship using the SQL JOIN keyword, but the resulting data is a partial re-creation of the author_book_publisher.csv CSV data. What’s the win for having done the work of creating a database to separate the data?
Here’s another SQL query to show a little bit of the power of SQL and the database engine:
 1sqlite> SELECT
 2   ...> a.first_name || ' ' || a.last_name AS author_name,
 3   ...> COUNT(b.title) AS total_books
 4   ...> FROM author a
 5   ...> JOIN book b ON b.author_id = a.author_id
 6   ...> GROUP BY author_name
 7   ...> ORDER BY total_books DESC, a.last_name ASC;
 8Stephen King|3
 9Tom Clancy|2
10Isaac Asimov|1
11Pearl Buck|1
12John Le Carre|1
13Alex Michaelides|1
14Carol Shaben|1
The SQL query above returns the list of authors and the number of books they’ve written. The list is sorted first by the number of books in descending order, then by the author’s name in alphabetical order:
-
Line 1 begins the SQL query with the
SELECTkeyword. -
Line 2 selects the author’s first and last names, separated by a space character, and creates the alias
author_name. -
Line 3 counts the number of books written by each author, which will be used later by the
ORDER BYclause to sort the list. -
Line 4 selects the
authortable to get data from and creates theaalias. -
Line 5 connects to the related
booktable through aJOINto theauthor_idand creates thebalias for thebooktable. -
Line 6 generates the aggregated author and total number of books data by using the
GROUP BYkeyword.GROUP BYis what groups eachauthor_nameand controls what books are tallied byCOUNT()for that author. -
Line 7 sorts the output first by number of books in descending order, then by the author’s last name in ascending alphabetical order.
-
Lines 8 to 14 are the output of the SQL query.
In the above example, you take advantage of SQL to perform aggregation calculations and sort the results into a useful order. Having the database perform calculations based on its built-in data organization ability is usually faster than performing the same kinds of calculations on raw data sets in Python. SQL offers the advantages of using set theory embedded in RDBMS databases.
Entity Relationship Diagrams
An entity-relationship diagram (ERD) is a visual depiction of an entity-relationship model for a database or part of a database. The author_book_publisher.db SQLite database is small enough that the entire database can be visualized by the diagram shown below:
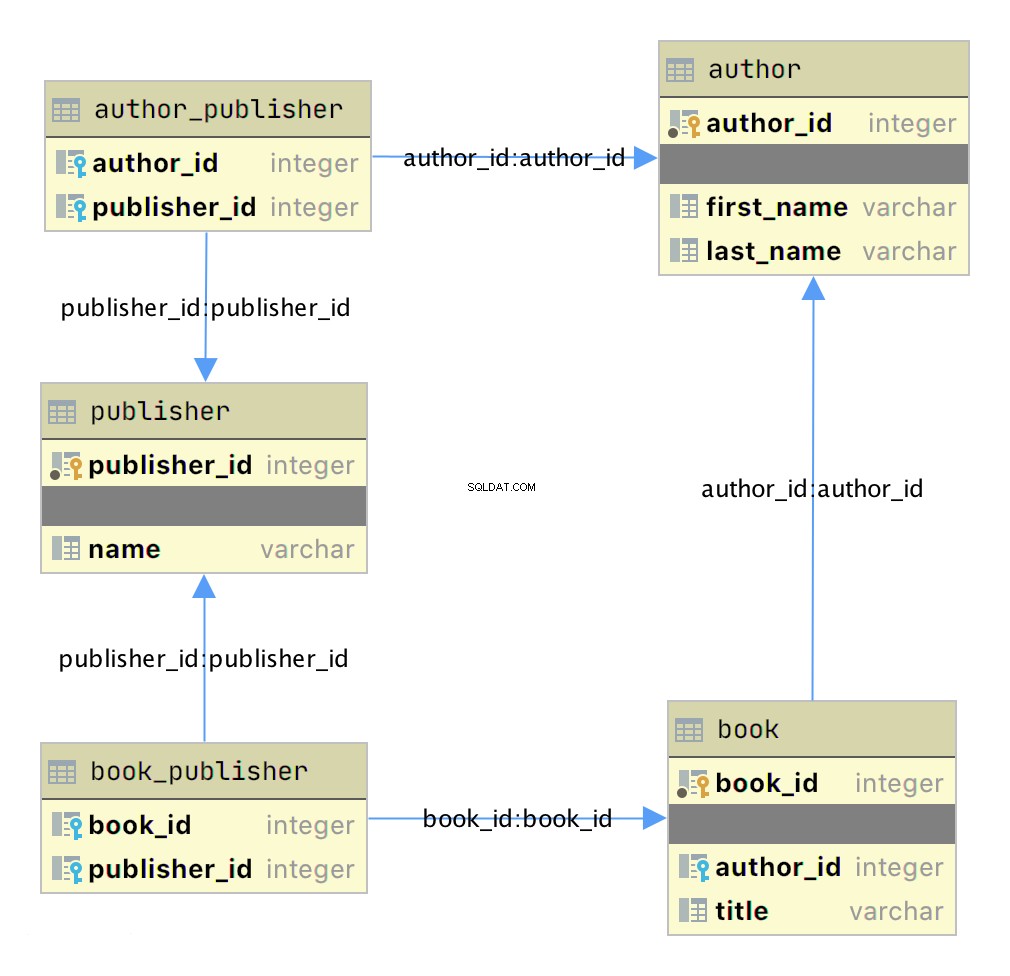
This diagram presents the table structures in the database and the relationships between them. Each box represents a table and contains the fields defined in the table, with the primary key indicated first if it exists.
The arrows show the relationships between the tables connecting a foreign key field in one table to a field, often the primary key, in another table. The table book_publisher has two arrows, one connecting it to the book table and another connecting it to the publisher tavolo. The arrow indicates the many-to-many relationship between the book and publisher tables. The author_publisher table provides the same relationship between author and publisher .
Working With SQLAlchemy and Python Objects
SQLAlchemy is a powerful database access tool kit for Python, with its object-relational mapper (ORM) being one of its most famous components, and the one discussed and used here.
When you’re working in an object-oriented language like Python, it’s often useful to think in terms of objects. It’s possible to map the results returned by SQL queries to objects, but doing so works against the grain of how the database works. Sticking with the scalar results provided by SQL works against the grain of how Python developers work. This problem is known as object-relational impedance mismatch.
The ORM provided by SQLAlchemy sits between the SQLite database and your Python program and transforms the data flow between the database engine and Python objects. SQLAlchemy allows you to think in terms of objects and still retain the powerful features of a database engine.
The Model
One of the fundamental elements to enable connecting SQLAlchemy to a database is creating a model . The model is a Python class defining the data mapping between the Python objects returned as a result of a database query and the underlying database tables.
The entity-relationship diagram displayed earlier shows boxes connected with arrows. The boxes are the tables built with the SQL commands and are what the Python classes will model. The arrows are the relationships between the tables.
The models are Python classes inheriting from an SQLAlchemy Base class. The Base class provides the interface operations between instances of the model and the database table.
Below is the models.py file that creates the models to represent the author_book_publisher.db database:
 1from sqlalchemy import Column, Integer, String, ForeignKey, Table
 2from sqlalchemy.orm import relationship, backref
 3from sqlalchemy.ext.declarative import declarative_base
 4
 5Base = declarative_base()
 6
 7author_publisher = Table(
 8    "author_publisher",
 9    Base.metadata,
10    Column("author_id", Integer, ForeignKey("author.author_id")),
11    Column("publisher_id", Integer, ForeignKey("publisher.publisher_id")),
12)
13
14book_publisher = Table(
15    "book_publisher",
16    Base.metadata,
17    Column("book_id", Integer, ForeignKey("book.book_id")),
18    Column("publisher_id", Integer, ForeignKey("publisher.publisher_id")),
19)
20
21class Author(Base):
22    __tablename__ = "author"
23    author_id = Column(Integer, primary_key=True)
24    first_name = Column(String)
25    last_name = Column(String)
26    books = relationship("Book", backref=backref("author"))
27    publishers = relationship(
28        "Publisher", secondary=author_publisher, back_populates="authors"
29    )
30
31class Book(Base):
32    __tablename__ = "book"
33    book_id = Column(Integer, primary_key=True)
34    author_id = Column(Integer, ForeignKey("author.author_id"))
35    title = Column(String)
36    publishers = relationship(
37        "Publisher", secondary=book_publisher, back_populates="books"
38    )
39
40class Publisher(Base):
41    __tablename__ = "publisher"
42    publisher_id = Column(Integer, primary_key=True)
43    name = Column(String)
44    authors = relationship(
45        "Author", secondary=author_publisher, back_populates="publishers"
46    )
47    books = relationship(
48        "Book", secondary=book_publisher, back_populates="publishers"
49    )
Here’s what’s going on in this module:
-
Line 1 imports the
Column,Integer,String,ForeignKey, andTableclasses from SQLAlchemy, which are used to help define the model attributes. -
Line 2 imports the
relationship()andbackrefobjects, which are used to create the relationships between objects. -
Line 3 imports the
declarative_baseobject, which connects the database engine to the SQLAlchemy functionality of the models. -
Line 5 creates the
Baseclass, which is what all models inherit from and how they get SQLAlchemy ORM functionality. -
Lines 7 to 12 create the
author_publisherassociation table model. -
Lines 14 to 19 create the
book_publisherassociation table model. -
Lines 21 to 29 define the
Authorclass model to theauthordatabase table. -
Lines 31 to 38 define the
Bookclass model to thebookdatabase table. -
Lines 40 to 49 define the
Publisherclass model to thepublisherdatabase table.
The description above shows the mapping of the five tables in the author_book_publisher.db database. But it glosses over some SQLAlchemy ORM features, including Table , ForeignKey , relationship() , and backref . Let’s get into those now.
Table Creates Associations
author_publisher and book_publisher are both instances of the Table class that create the many-to-many association tables used between the author and publisher tables and the book and publisher tables, respectively.
The SQLAlchemy Table class creates a unique instance of an ORM mapped table within the database. The first parameter is the table name as defined in the database, and the second is Base.metadata , which provides the connection between the SQLAlchemy functionality and the database engine.
The rest of the parameters are instances of the Column class defining the table fields by name, their type, and in the example above, an instance of a ForeignKey .
ForeignKey Creates a Connection
The SQLAlchemy ForeignKey class defines a dependency between two Column fields in different tables. A ForeignKey is how you make SQLAlchemy aware of the relationships between tables. For example, this line from the author_publisher instance creation establishes a foreign key relationship:
Column("author_id", Integer, ForeignKey("author.author_id"))
The statement above tells SQLAlchemy that there’s a column in the author_publisher table named author_id . The type of that column is Integer , and author_id is a foreign key related to the primary key in the author table.
Having both author_id and publisher_id defined in the author_publisher Table instance creates the connection from the author table to the publisher table and vice versa, establishing a many-to-many relationship.
relationship() Establishes a Collection
Having a ForeignKey defines the existence of the relationship between tables but not the collection of books an author can have. Take a look at this line in the Author class definition:
books = relationship("Book", backref=backref("author"))
The code above defines a parent-child collection. The books attribute being plural (which is not a requirement, just a convention) is an indication that it’s a collection.
The first parameter to relationship() , the class name Book (which is not the table name book ), is the class to which the books attribute is related. The relationship informs SQLAlchemy that there’s a relationship between the Author and Book classes. SQLAlchemy will find the relationship in the Book class definition:
author_id = Column(Integer, ForeignKey("author.author_id"))
SQLAlchemy recognizes that this is the ForeignKey connection point between the two classes. You’ll get to the backref parameter in relationship() in a moment.
The other relationship in Author is to the Publisher class. This is created with the following statement in the Author class definition:
publishers = relationship(
    "Publisher", secondary=author_publisher, back_populates="authors"
)
Like books , the attribute publishers indicates a collection of publishers associated with an author. The first parameter, "Publisher" , informs SQLAlchemy what the related class is. The second and third parameters are secondary=author_publisher and back_populates="authors" :
-
secondarytells SQLAlchemy that the relationship to thePublisherclass is through a secondary table, which is theauthor_publisherassociation table created earlier inmodels.py. Thesecondaryparameter makes SQLAlchemy find thepublisher_idForeignKeydefined in theauthor_publisherassociation table. -
back_populatesis a convenience configuration telling SQLAlchemy that there’s a complementary collection in thePublisherclass calledauthors.
backref Mirrors Attributes
The backref parameter of the books collection relationship() creates an author attribute for each Book esempio. This attribute refers to the parent Author that the Book instance is related to.
For example, if you executed the following Python code, then a Book instance would be returned from the SQLAlchemy query. The Book instance has attributes that can be used to print out information about the book:
book = session.query(Book).filter_by(Book.title == "The Stand").one_or_none()
print(f"Authors name: {book.author.first_name} {book.author.last_name}")
The existence of the author attribute in the Book above is because of the backref definition. A backref can be very handy to have when you need to refer to the parent and all you have is a child instance.
Queries Answer Questions
You can make a basic query like SELECT * FROM author; in SQLAlchemy like this:
results = session.query(Author).all()
The session is an SQLAlchemy object used to communicate with SQLite in the Python example programs. Here, you tell the session you want to execute a query against the Author model and return all records.
At this point, the advantages of using SQLAlchemy instead of plain SQL might not be obvious, especially considering the setup required to create the models representing the database. The results returned by the query is where the magic happens. Instead of getting back a list of lists of scalar data, you’ll get back a list of instances of Author objects with attributes matching the column names you defined.
The books and publishers collections maintained by SQLAlchemy create a hierarchical list of authors and the books they’ve written as well as the publishers who’ve published them.
Behind the scenes, SQLAlchemy turns the object and method calls into SQL statements to execute against the SQLite database engine. SQLAlchemy transforms the data returned by SQL queries into Python objects.
With SQLAlchemy, you can perform the more complex aggregation query shown earlier for the list of authors and the number of books they’ve written like this:
author_book_totals = (
    session.query(
        Author.first_name,
        Author.last_name,
        func.count(Book.title).label("book_total")
    )
    .join(Book)
    .group_by(Author.last_name)
    .order_by(desc("book_total"))
    .all()
)
The query above gets the author’s first and last name, along with a count of the number of books that the author has written. The aggregating count used by the group_by clause is based on the author’s last name. Finally, the results are sorted in descending order based on the aggregated and aliased book_total .
Example Program
The example program examples/example_2/main.py has the same functionality as examples/example_1/main.py but uses SQLAlchemy exclusively to interface with the author_book_publisher.db SQLite database. The program is broken up into the main() function and the functions it calls:
 1def main():
 2    """Main entry point of program"""
 3    # Connect to the database using SQLAlchemy
 4    with resources.path(
 5        "project.data", "author_book_publisher.db"
 6    ) as sqlite_filepath:
 7        engine = create_engine(f"sqlite:///{sqlite_filepath}")
 8    Session = sessionmaker()
 9    Session.configure(bind=engine)
10    session = Session()
11
12    # Get the number of books printed by each publisher
13    books_by_publisher = get_books_by_publishers(session, ascending=False)
14    for row in books_by_publisher:
15        print(f"Publisher: {row.name}, total books: {row.total_books}")
16    print()
17
18    # Get the number of authors each publisher publishes
19    authors_by_publisher = get_authors_by_publishers(session)
20    for row in authors_by_publisher:
21        print(f"Publisher: {row.name}, total authors: {row.total_authors}")
22    print()
23
24    # Output hierarchical author data
25    authors = get_authors(session)
26    output_author_hierarchy(authors)
27
28    # Add a new book
29    add_new_book(
30        session,
31        author_name="Stephen King",
32        book_title="The Stand",
33        publisher_name="Random House",
34    )
35    # Output the updated hierarchical author data
36    authors = get_authors(session)
37    output_author_hierarchy(authors)
This program is a modified version of examples/example_1/main.py . Let’s go over the differences:
-
Lines 4 to 7 first initialize the
sqlite_filepathvariable to the database file path. Then they create theenginevariable to communicate with SQLite and theauthor_book_publisher.dbdatabase file, which is SQLAlchemy’s access point to the database. -
Line 8 creates the
Sessionclass from the SQLAlchemy’ssessionmaker(). -
Line 9 binds the
Sessionto the engine created in line 8. -
Line 10 creates the
sessioninstance, which is used by the program to communicate with SQLAlchemy.
The rest of the function is similar, except for the replacement of data with session as the first parameter to all the functions called by main() .
get_books_by_publisher() has been refactored to use SQLAlchemy and the models you defined earlier to get the data requested:
 1def get_books_by_publishers(session, ascending=True):
 2    """Get a list of publishers and the number of books they've published"""
 3    if not isinstance(ascending, bool):
 4        raise ValueError(f"Sorting value invalid: {ascending}")
 5
 6    direction = asc if ascending else desc
 7
 8    return (
 9        session.query(
10            Publisher.name, func.count(Book.title).label("total_books")
11        )
12        .join(Publisher.books)
13        .group_by(Publisher.name)
14        .order_by(direction("total_books"))
15    )
Here’s what the new function, get_books_by_publishers() , is doing:
-
Line 6 creates the
directionvariable and sets it equal to the SQLAlchemydescorascfunction depending on the value of theascendingparametro. -
Lines 9 to 11 query the
Publishertable for data to return, which in this case arePublisher.nameand the aggregate total ofBookobjects associated with an author, aliased tototal_books. -
Line 12 joins to the
Publisher.booksraccolta. -
Line 13 aggregates the book counts by the
Publisher.nameattribute. -
Line 14 sorts the output by the book counts according to the operator defined by
direction. -
Line 15 closes the object, executes the query, and returns the results to the caller.
All the above code expresses what is wanted rather than how it’s to be retrieved. Now instead of using SQL to describe what’s wanted, you’re using Python objects and methods. What’s returned is a list of Python objects instead of a list of tuples of data.
get_authors_by_publisher() has also been modified to work exclusively with SQLAlchemy. Its functionality is very similar to the previous function, so a function description is omitted:
def get_authors_by_publishers(session, ascending=True):
    """Get a list of publishers and the number of authors they've published"""
    if not isinstance(ascending, bool):
        raise ValueError(f"Sorting value invalid: {ascending}")

    direction = asc if ascending else desc

    return (
        session.query(
            Publisher.name,
            func.count(Author.first_name).label("total_authors"),
        )
        .join(Publisher.authors)
        .group_by(Publisher.name)
        .order_by(direction("total_authors"))
    )
get_authors() has been added to get a list of authors sorted by their last names. The result of this query is a list of Author objects containing a collection of books. The Author objects already contain hierarchical data, so the results don’t have to be reformatted:
def get_authors(session):
    """Get a list of author objects sorted by last name"""
    return session.query(Author).order_by(Author.last_name).all()
Like its previous version, add_new_book() is relatively complex but straightforward to understand. It determines if a book with the same title, author, and publisher exists in the database already.
If the search query finds an exact match, then the function returns. If no book matches the exact search criteria, then it searches to see if the author has written a book using the passed in title. This code exists to prevent duplicate books from being created in the database.
If no matching book exists, and the author hasn’t written one with the same title, then a new book is created. The function then retrieves or creates an author and publisher. Once instances of the Book , Author and Publisher exist, the relationships between them are created, and the resulting information is saved to the database:
 1def add_new_book(session, author_name, book_title, publisher_name):
 2    """Adds a new book to the system"""
 3    # Get the author's first and last names
 4    first_name, _, last_name = author_name.partition(" ")
 5
 6    # Check if book exists
 7    book = (
 8        session.query(Book)
 9        .join(Author)
10        .filter(Book.title == book_title)
11        .filter(
12            and_(
13                Author.first_name == first_name, Author.last_name == last_name
14            )
15        )
16        .filter(Book.publishers.any(Publisher.name == publisher_name))
17        .one_or_none()
18    )
19    # Does the book by the author and publisher already exist?
20    if book is not None:
21        return
22
23    # Get the book by the author
24    book = (
25        session.query(Book)
26        .join(Author)
27        .filter(Book.title == book_title)
28        .filter(
29            and_(
30                Author.first_name == first_name, Author.last_name == last_name
31            )
32        )
33        .one_or_none()
34    )
35    # Create the new book if needed
36    if book is None:
37        book = Book(title=book_title)
38
39    # Get the author
40    author = (
41        session.query(Author)
42        .filter(
43            and_(
44                Author.first_name == first_name, Author.last_name == last_name
45            )
46        )
47        .one_or_none()
48    )
49    # Do we need to create the author?
50    if author is None:
51        author = Author(first_name=first_name, last_name=last_name)
52        session.add(author)
53
54    # Get the publisher
55    publisher = (
56        session.query(Publisher)
57        .filter(Publisher.name == publisher_name)
58        .one_or_none()
59    )
60    # Do we need to create the publisher?
61    if publisher is None:
62        publisher = Publisher(name=publisher_name)
63        session.add(publisher)
64
65    # Initialize the book relationships
66    book.author = author
67    book.publishers.append(publisher)
68    session.add(book)
69
70    # Commit to the database
71    session.commit()
The code above is relatively long. Let’s break the functionality down to manageable sections:
-
Lines 7 to 18 set the
bookvariable to an instance of aBookif a book with the same title, author, and publisher is found. Otherwise, they setbooktoNone. -
Lines 20 and 21 determine if the book already exists and return if it does.
-
Lines 24 to 37 set the
bookvariable to an instance of aBookif a book with the same title and author is found. Otherwise, they create a newBookesempio. -
Lines 40 to 52 set the
authorvariable to an existing author, if found, or create a newAuthorinstance based on the passed-in author name. -
Lines 55 to 63 set the
publishervariable to an existing publisher, if found, or create a newPublisherinstance based on the passed-in publisher name. -
Line 66 sets the
book.authorinstance to theauthoresempio. This creates the relationship between the author and the book, which SQLAlchemy will create in the database when the session is committed. -
Line 67 adds the
publisherinstance to thebook.publisherscollezione. This creates the many-to-many relationship between thebookandpublishertables. SQLAlchemy will create references in the tables as well as in thebook_publisherassociation table that connects the two. -
Line 68 adds the
Bookinstance to the session, making it part of the session’s unit of work. -
Line 71 commits all the creations and updates to the database.
There are a few things to take note of here. First, there’s is no mention of the author_publisher or book_publisher association tables in either the queries or the creations and updates. Because of the work you did in models.py setting up the relationships, SQLAlchemy can handle connecting objects together and keeping those tables in sync during creations and updates.
Second, all the creations and updates happen within the context of the session oggetto. None of that activity is touching the database. Only when the session.commit() statement executes does the session then go through its unit of work and commit that work to the database.
For example, if a new Book instance is created (as in line 37 above), then the book has its attributes initialized except for the book_id primary key and author_id foreign key. Because no database activity has happened yet, the book_id is unknown, and nothing was done in the instantiation of book to give it an author_id .
When session.commit() is executed, one of the things it will do is insert book into the database, at which point the database will create the book_id primary key. The session will then initialize the book.book_id value with the primary key value created by the database engine.
session.commit() is also aware of the insertion of the Book instance in the author.books collezione. The author object’s author_id primary key will be added to the Book instance appended to the author.books collection as the author_id foreign key.
Providing Access to Multiple Users
To this point, you’ve seen how to use pandas, SQLite, and SQLAlchemy to access the same data in different ways. For the relatively straightforward use case of the author, book, and publisher data, it could still be a toss-up whether you should use a database.
One deciding factor when choosing between using a flat file or a database is data and relationship complexity. If the data for each entity is complicated and contains many relationships between the entities, then creating and maintaining it in a flat file might become more difficult.
Another factor to consider is whether you want to share the data between multiple users. The solution to this problem might be as simple as using a sneakernet to physically move data between users. Moving data files around this way has the advantage of ease of use, but the data can quickly get out of sync when changes are made.
The problem of keeping the data consistent for all users becomes even more difficult if the users are remote and want to access the data across networks. Even when you’re limited to a single language like Python and using pandas to access the data, network file locking isn’t sufficient to ensure the data doesn’t get corrupted.
Providing the data through a server application and a user interface alleviates this problem. The server is the only application that needs file-level access to the database. By using a database, the server can take advantage of SQL to access the data using a consistent interface no matter what programming language the server uses.
The last example program demonstrates this by providing a web application and user interface to the Chinook sample SQLite database. Peter Stark generously maintains the Chinook database as part of the SQLite Tutorial site. If you’d like to learn more about SQLite and SQL in general, then the site is a great resource.
The Chinook database provides artist, music, and playlist information along the lines of a simplified Spotify. The database is part of the example code project in the project/data folder.
Using Flask With Python, SQLite, and SQLAlchemy
The examples/example_3/chinook_server.py program creates a Flask application that you can interact with using a browser. The application makes use of the following technologies:
-
Flask Blueprint is part of Flask and provides a good way to follow the separation of concerns design principle and create distinct modules to contain functionality.
-
Flask SQLAlchemy is an extension for Flask that adds support for SQLAlchemy in your web applications.
-
Flask_Bootstrap4 packages the Bootstrap front-end tool kit, integrating it with your Flask web applications.
-
Flask_WTF extends Flask with WTForms, giving your web applications a useful way to generate and validate web forms.
-
python_dotenv is a Python module that an application uses to read environment variables from a file and keep sensitive information out of program code.
Though not necessary for this example, a .env file holds the environment variables for the application. The .env file exists to contain sensitive information like passwords, which you should keep out of your code files. However, the content of the project .env file is shown below since it doesn’t contain any sensitive data:
SECRET_KEY = "you-will-never-guess"
SQLALCHEMY_TRACK_MODIFICATIONS = False
SQLAlCHEMY_ECHO = False
DEBUG = True
The example application is fairly large, and only some of it is relevant to this tutorial. For this reason, examining and learning from the code is left as an exercise for the reader. That said, you can take a look at an animated screen capture of the application below, followed by the HTML that renders the home page and the Python Flask route that provides the dynamic data.
Here’s the application in action, navigating through various menus and features:
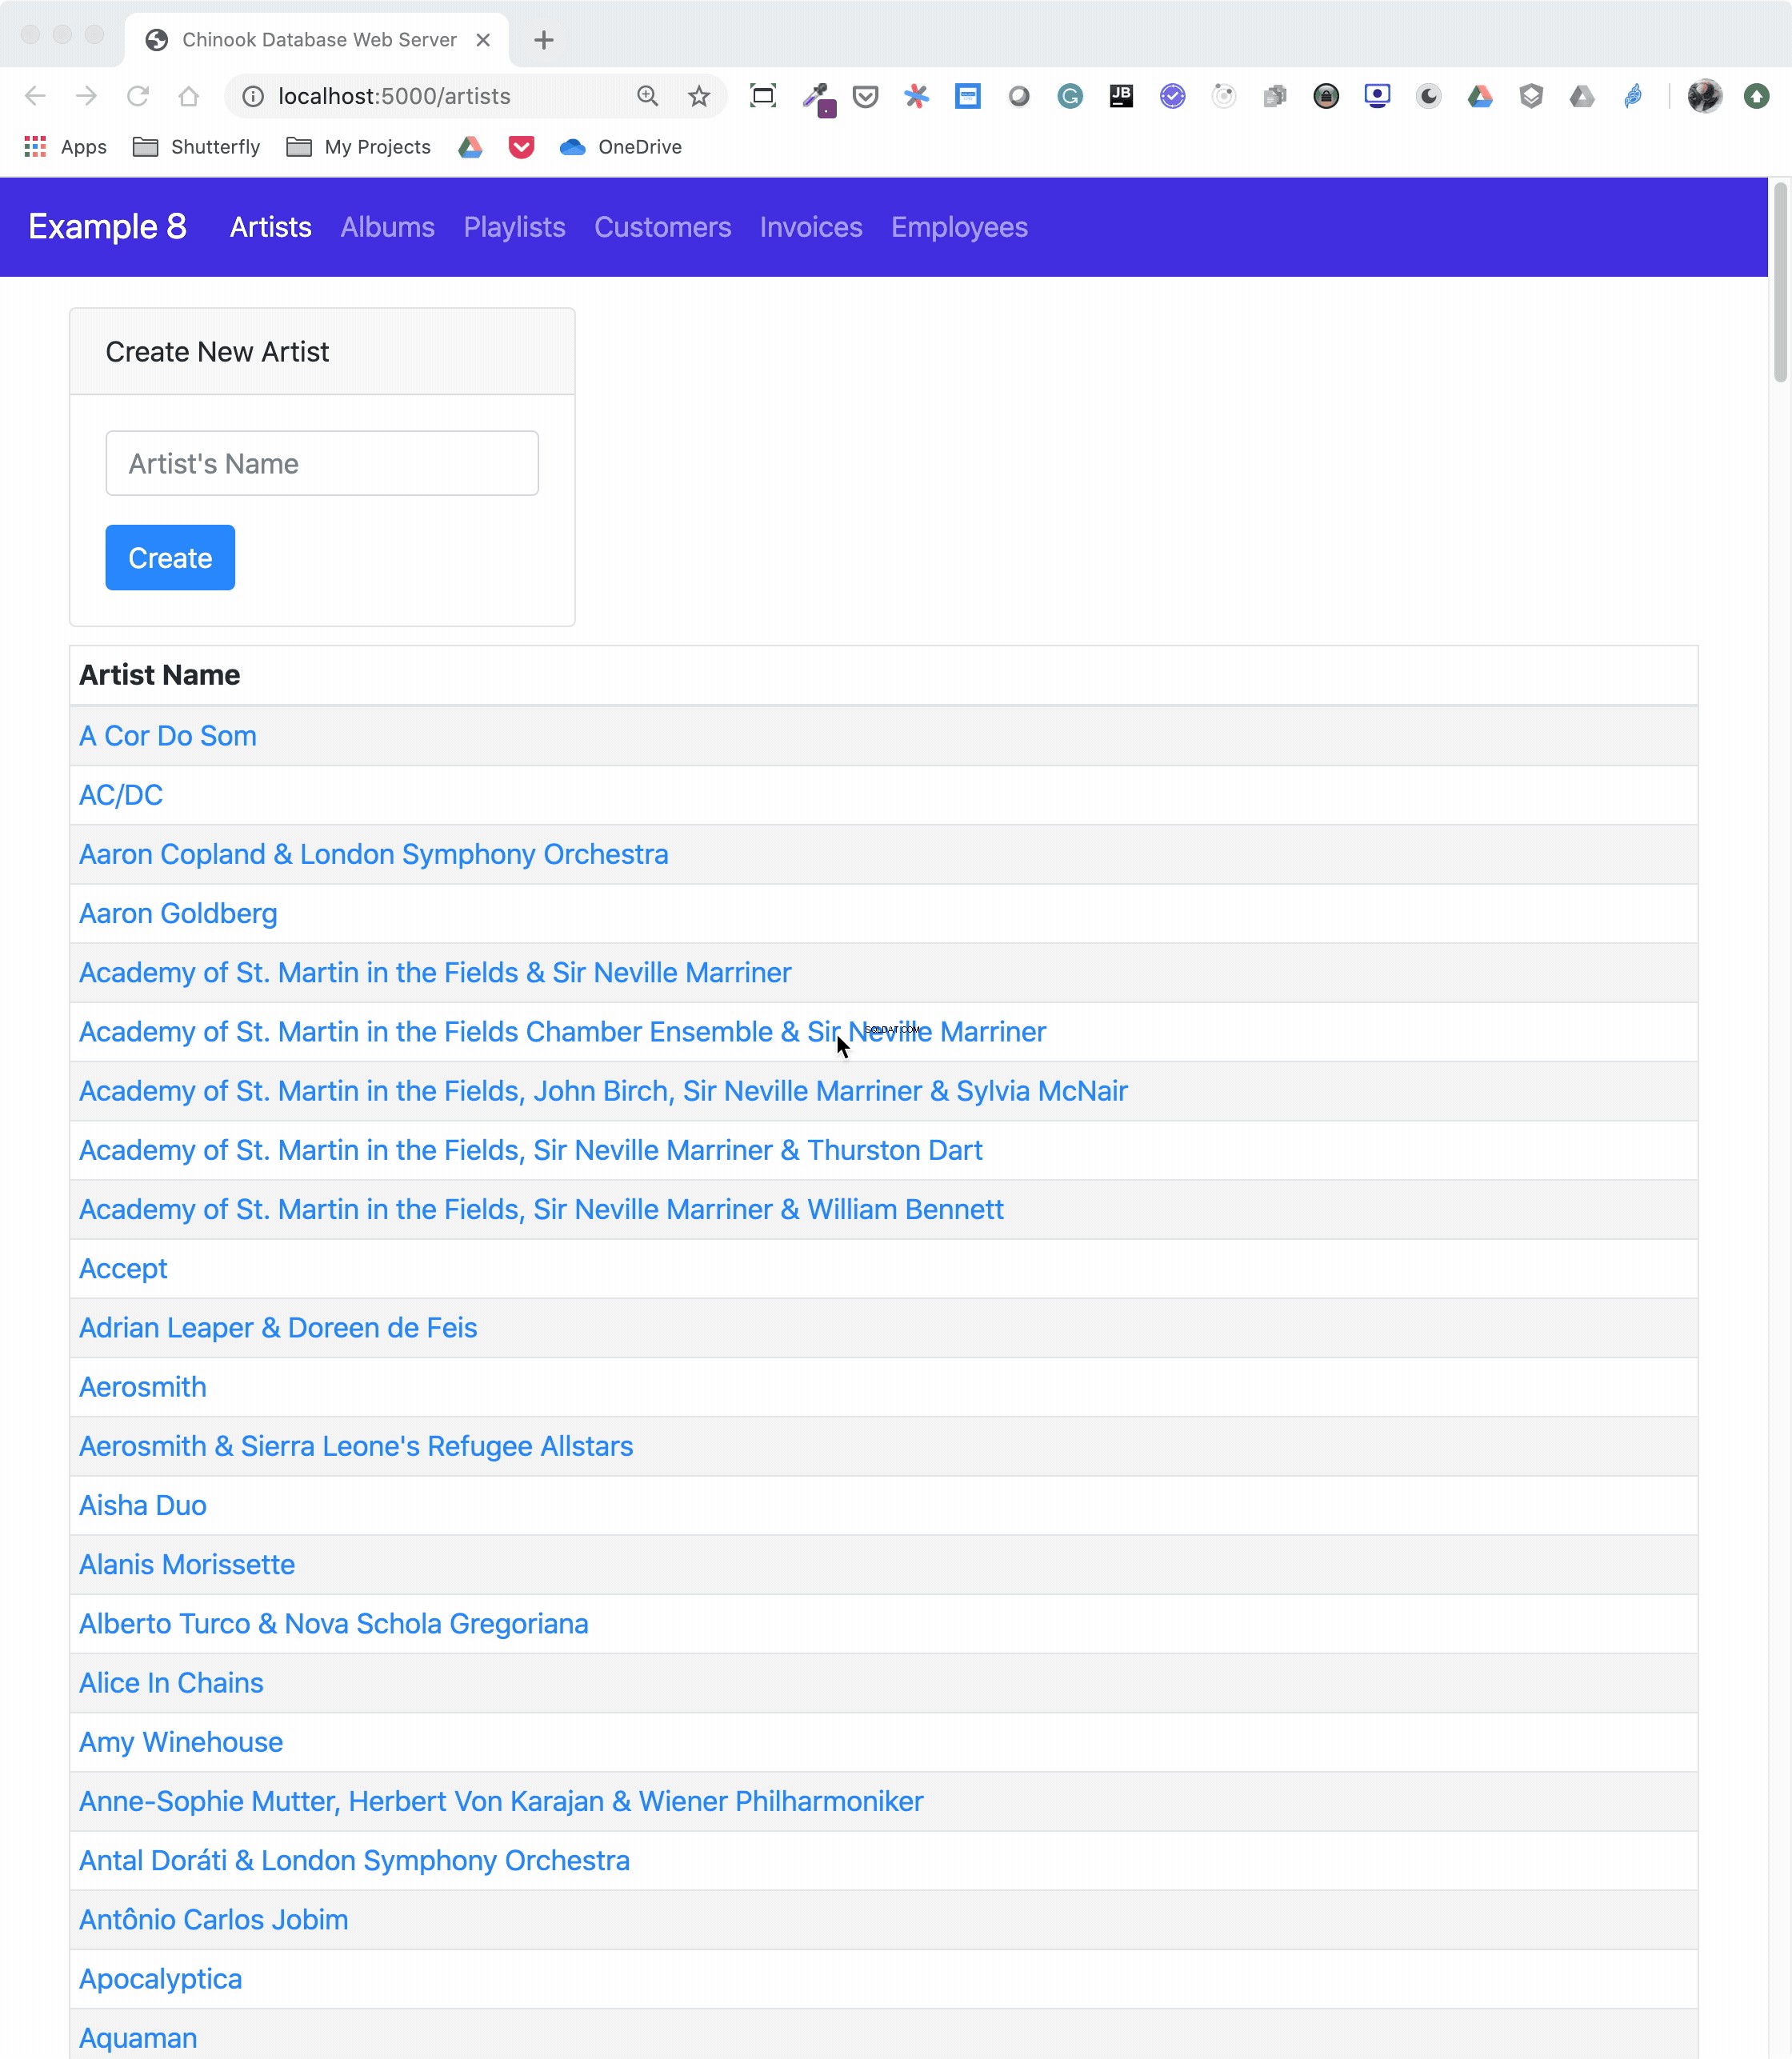
The animated screen capture starts on the application home page, styled using Bootstrap 4. The page displays the artists in the database, sorted in ascending order. The remainder of the screen capture presents the results of clicking on the displayed links or navigating around the application from the top-level menu.
Here’s the Jinja2 HTML template that generates the home page of the application:
 1{% extends "base.html" %}
 2
 3{% block content %}
 4<div class="container-fluid">
 5  <div class="m-4">
 6    <div class="card" style="width: 18rem;">
 7      <div class="card-header">Create New Artist</div>
 8      <div class="card-body">
 9        <form method="POST" action="{{url_for('artists_bp.artists')}}">
10          {{ form.csrf_token }}
11          {{ render_field(form.name, placeholder=form.name.label.text) }}
12          <button type="submit" class="btn btn-primary">Create</button>
13        </form>
14      </div>
15    </div>
16    <table class="table table-striped table-bordered table-hover table-sm">
17      <caption>List of Artists</caption>
18      <thead>
19        <tr>
20          <th>Artist Name</th>
21        </tr>
22      </thead>
23      <tbody>
24        {% for artist in artists %}
25        <tr>
26          <td>
27            <a href="{{url_for('albums_bp.albums', artist_id=artist.artist_id)}}">
28              {{ artist.name }}
29            </a>
30          </td>
31        </tr>
32        {% endfor %}
33      </tbody>
34    </table>
35  </div>
36</div>
37{% endblock %}
Here’s what’s going on in this Jinja2 template code:
-
Line 1 uses Jinja2 template inheritance to build this template from the
base.htmltemplate. Thebase.htmltemplate contains all the HTML5 boilerplate code as well as the Bootstrap navigation bar consistent across all pages of the site. -
Lines 3 to 37 contain the block content of the page, which is incorporated into the Jinja2 macro of the same name in the
base.htmlbase template. -
Lines 9 to 13 render the form to create a new artist. This uses the features of Flask-WTF to generate the form.
-
Lines 24 to 32 create a
forloop that renders the table of artist names. -
Lines 27 to 29 render the artist name as a link to the artist’s album page showing the songs associated with a particular artist.
Here’s the Python route that renders the page:
 1from flask import Blueprint, render_template, redirect, url_for
 2from flask_wtf import FlaskForm
 3from wtforms import StringField
 4from wtforms.validators import InputRequired, ValidationError
 5from app import db
 6from app.models import Artist
 7
 8# Set up the blueprint
 9artists_bp = Blueprint(
10    "artists_bp", __name__, template_folder="templates", static_folder="static"
11)
12
13def does_artist_exist(form, field):
14    artist = (
15        db.session.query(Artist)
16        .filter(Artist.name == field.data)
17        .one_or_none()
18    )
19    if artist is not None:
20        raise ValidationError("Artist already exists", field.data)
21
22class CreateArtistForm(FlaskForm):
23    name = StringField(
24        label="Artist's Name", validators=[InputRequired(), does_artist_exist]
25    )
26
27@artists_bp.route("/")
28@artists_bp.route("/artists", methods=["GET", "POST"])
29def artists():
30    form = CreateArtistForm()
31
32    # Is the form valid?
33    if form.validate_on_submit():
34        # Create new artist
35        artist = Artist(name=form.name.data)
36        db.session.add(artist)
37        db.session.commit()
38        return redirect(url_for("artists_bp.artists"))
39
40    artists = db.session.query(Artist).order_by(Artist.name).all()
41    return render_template("artists.html", artists=artists, form=form,)
Let’s go over what the above code is doing:
-
Lines 1 to 6 import all the modules necessary to render the page and initialize forms with data from the database.
-
Lines 9 to 11 create the blueprint for the artists page.
-
Lines 13 to 20 create a custom validator function for the Flask-WTF forms to make sure a request to create a new artist doesn’t conflict with an already existing artist.
-
Lines 22 to 25 create the form class to handle the artist form rendered in the browser and provide validation of the form field inputs.
-
Lines 27 to 28 connect two routes to the
artists()function they decorate. -
Line 30 creates an instance of the
CreateArtistForm()class. -
Line 33 determines if the page was requested through the HTTP methods GET or POST (submit). If it was a POST, then it also validates the fields of the form and informs the user if the fields are invalid.
-
Lines 35 to 37 create a new artist object, add it to the SQLAlchemy session, and commit the artist object to the database, persisting it.
-
Line 38 redirects back to the artists page, which will be rerendered with the newly created artist.
-
Line 40 runs an SQLAlchemy query to get all the artists in the database and sort them by
Artist.name. -
Line 41 renders the artists page if the HTTP request method was a GET.
You can see that a great deal of functionality is created by a reasonably small amount of code.
Creating a REST API Server
You can also create a web server providing a REST API. This kind of server offers URL endpoints responding with data, often in JSON format. A server providing REST API endpoints can be used by JavaScript single-page web applications through the use of AJAX HTTP requests.
Flask is an excellent tool for creating REST applications. For a multi-part series of tutorials about using Flask, Connexion, and SQLAlchemy to create REST applications, check out Python REST APIs With Flask, Connexion, and SQLAlchemy.
If you’re a fan of Django and are interested in creating REST APIs, then check out Django Rest Framework – An Introduction and Create a Super Basic REST API with Django Tastypie.
Nota: It’s reasonable to ask if SQLite is the right choice as the database backend to a web application. The SQLite website states that SQLite is a good choice for sites that serve around 100,000 hits per day. If your site gets more daily hits, the first thing to say is congratulations!
Beyond that, if you’ve implemented your website with SQLAlchemy, then it’s possible to move the data from SQLite to another database such as MySQL or PostgreSQL. For a comparison of SQLite, MySQL, and PostgreSQL that will help you make decisions about which one will serve your application best, check out Introduction to Python SQL Libraries.
It’s well worth considering SQLite for your Python application, no matter what it is. Using a database gives your application versatility, and it might create surprising opportunities to add additional features.
Conclusion
You’ve covered a lot of ground in this tutorial about databases, SQLite, SQL, and SQLAlchemy! You’ve used these tools to move data contained in flat files to an SQLite database, access the data with SQL and SQLAlchemy, and provide that data through a web server.
In this tutorial, you’ve learned:
- Why an SQLite database can be a compelling alternative to flat-file data storage
- How to normalize data to reduce data redundancy and increase data integrity
- How to use SQLAlchemy to work with databases in an object-oriented manner
- How to build a web application to serve a database to multiple users
Working with databases is a powerful abstraction for working with data that adds significant functionality to your Python programs and allows you to ask interesting questions of your data.
You can get all of the code and data you saw in this tutorial at the link below:
Download the sample code: Click here to get the code you’ll use to learn about data management with SQLite and SQLAlchemy in this tutorial.
Further Reading
This tutorial is an introduction to using databases, SQL, and SQLAlchemy, but there’s much more to learn about these subjects. These are powerful, sophisticated tools that no single tutorial can cover adequately. Here are some resources for additional information to expand your skills:
-
If your application will expose the database to users, then avoiding SQL injection attacks is an important skill. For more information, check out Preventing SQL Injection Attacks With Python.
-
Providing web access to a database is common in web-based single-page applications. To learn how, check out Python REST APIs With Flask, Connexion, and SQLAlchemy – Part 2.
-
Preparing for data engineering job interviews gives you a leg up in your career. To get started, check out Data Engineer Interview Questions With Python.
-
Migrating data and being able to roll back using Flask with Postgres and SQLAlchemy is an integral part of the Software Development Life Cycle (SDLC). You can learn more about it by checking out Flask by Example – Setting up Postgres, SQLAlchemy, and Alembic.