Costruire progetti è probabilmente uno dei modi più accessibili ed efficaci per imparare a programmare. I progetti reali richiedono l'applicazione di abilità di programmazione diverse e varie. Ti incoraggiano anche a ricercare argomenti che emergono mentre risolvi problemi nel processo di sviluppo. In questo tutorial creerai un'applicazione Rubrica contatti con Python, PyQt e SQLite.
In questo tutorial imparerai come:
- Crea un'interfaccia utente grafica (GUI) per l'applicazione della rubrica utilizzando Python e PyQt
- Collega l'applicazione a un database SQLite utilizzando il supporto SQL di PyQt
- Gestisci i dati dei contatti utilizzando l'architettura Model-View di PyQt
Al termine di questo progetto, avrai un'applicazione funzionale per la rubrica dei contatti che ti consentirà di archiviare e gestire le tue informazioni di contatto.
Per ottenere il codice sorgente completo per l'applicazione e il codice per ogni passaggio che seguirai in questo tutorial, fai clic sul collegamento seguente:
Ottieni il codice sorgente: Fai clic qui per ottenere il codice sorgente che utilizzerai per creare una rubrica con Python, PyQt e SQLite in questo tutorial.
Demo:una rubrica con Python
I libri di contatto sono un tipo di applicazione utile e ampiamente utilizzato. Sono ovunque. Probabilmente hai una rubrica sul telefono e sul computer. Con una rubrica, puoi archiviare e gestire le informazioni di contatto per i tuoi familiari, amici, colleghi e così via.
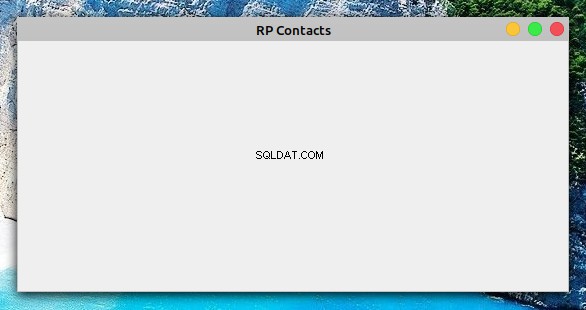
In questo tutorial, codificherai un'applicazione GUI per la rubrica dei contatti con Python, SQLite e PyQt. Ecco una demo di come apparirà e funzionerà la tua rubrica dei contatti dopo aver seguito i passaggi in questo tutorial:
La tua rubrica fornirà il set minimo di funzionalità richiesto per questo tipo di applicazione. Potrai visualizzare, creare, aggiornare e rimuovere le informazioni nell'elenco dei contatti.
Panoramica del progetto
Per creare la tua applicazione per la rubrica, devi organizzare il codice in moduli e pacchetti e dare al tuo progetto una struttura coerente. In questo tutorial utilizzerai le seguenti directory e la struttura dei file:
rpcontacts_project/
│
├── rpcontacts/
│   ├── __init__.py
│   ├── views.py
│   ├── database.py
│   ├── main.py
│   └── model.py
│
├── requirements.txt
├── README.md
└── rpcontacts.py
Ecco un breve riassunto dei contenuti della directory del tuo progetto:
rpcontacts_project/è la directory principale del progetto. Conterrà i seguenti file:requirements.txtfornisce l'elenco dei requisiti del progetto.README.mdfornisce informazioni generali sul progetto.rpcontacts.pyfornisce lo script del punto di ingresso per eseguire l'applicazione.
rpcontacts/è una sottodirectory che fornisce il pacchetto principale dell'applicazione. Fornisce i seguenti moduli:__init__.pyviews.pydatabase.pymain.pymodel.py
Tratterai ciascuno di questi file passo dopo passo in questo tutorial. Il nome di ogni file dà un'idea del suo ruolo nell'applicazione. Ad esempio, views.py conterrà il codice per generare la GUI di finestre e finestre di dialogo, database.py conterrà il codice per lavorare con il database e main.py ospiterà l'applicazione stessa. Infine, model.py implementerà il modello per gestire i dati nel database dell'applicazione.
In generale, l'applicazione avrà una finestra principale per visualizzare, aggiungere, rimuovere e aggiornare i contatti. Avrà anche una finestra di dialogo per aggiungere nuovi contatti al database.
Prerequisiti
Per ottenere il massimo da questo progetto, sarebbe utile una certa conoscenza precedente della programmazione GUI con Python e PyQt. A questo proposito, dovrai conoscere le basi di come:
- Crea applicazioni GUI con PyQt e Python
- Costruisci e struttura le GUI con PyQt
- Gestisci database SQL con Python e PyQt
- Lavora con i database SQLite
Per rispolverare questi argomenti, puoi consultare le seguenti risorse:
- Python e PyQt:creazione di una calcolatrice desktop GUI
- Python e PyQt:creazione di menu, barre degli strumenti e barre di stato
- Layout PyQt:crea applicazioni GUI dall'aspetto professionale
- Gestire i database SQL con PyQt:le basi
- Introduzione alle librerie SQL Python
- Gestione dei dati con Python, SQLite e SQLAlchemy
Non preoccuparti se non sei un esperto in queste aree prima di iniziare questo tutorial. Imparerai attraverso il processo di sporcarti le mani su un progetto reale. Se rimani bloccato, prenditi il tuo tempo e rivedi le risorse collegate sopra. Quindi torna al codice.
L'applicazione della rubrica che creerai in questo tutorial ha un'unica dipendenza esterna:PyQt.
Nota: In questo tutorial, utilizzerai PyQt versione 5.15.2 per creare l'applicazione della tua rubrica. La versione 5.15.2 è necessaria affinché il progetto funzioni su macOS Big Sur.
PyQt versione 6.0 è stata rilasciata il 4 gennaio 2021. Questa è la prima versione della libreria che si lega a Qt versione 6. Tuttavia, il progetto in questo tutorial non è stato testato con PyQt 6.0.
Se senti la necessità di eseguire il progetto con questa nuova versione di PyQt, provalo. Come suggerimento, dovresti pip install PyQt6 e quindi aggiorna le importazioni per utilizzare PyQt6 invece di PyQt5 .
Per seguire le migliori pratiche nel tuo processo di sviluppo, puoi iniziare creando un ambiente virtuale e quindi installando PyQt usando pip . Dopo aver installato PyQt, sei pronto per iniziare a programmare!
Passaggio 1:creazione dell'app scheletro del libro dei contatti con PyQt
In questo primo passaggio, creerai un'applicazione GUI PyQt minimale ma funzionale per fornire le basi su cui inizierai a costruire la rubrica. Creerai anche la struttura del progetto minima richiesta, incluso il pacchetto principale del progetto e uno script del punto di ingresso per eseguire l'applicazione.
Tutto il codice e i file che aggiungerai al progetto Rubrica contatti in questa sezione sono raccolti in source_code_step_1/ directory. Puoi scaricarli cliccando sul link qui sotto:
Ottieni il codice sorgente: Fai clic qui per ottenere il codice sorgente che utilizzerai per creare una rubrica con Python, PyQt e SQLite in questo tutorial.
Entro la fine di questa sezione, sarai in grado di eseguire per la prima volta l'applicazione GUI dello scheletro per la tua rubrica.
Strutturare il progetto Contact Book
Per iniziare a codificare l'applicazione, vai avanti e crea una nuova directory chiamata rpcontacts_project/ . Questa sarà la directory principale del progetto. Ora crea una nuova sottodirectory chiamata rpcontacts/ all'interno di rpcontacts_project/ . Questa sottodirectory conterrà il pacchetto principale dell'applicazione. Infine, avvia il tuo editor di codice o IDE all'interno della directory principale.
Per trasformare una directory in un pacchetto, Python ha bisogno di un __init__.py modulo per inizializzare il pacchetto. Crea questo file all'interno di rpcontacts/ e aggiungi il seguente codice:
# -*- coding: utf-8 -*-

"""This module provides the rpcontacts package."""

__version__ = "0.1.0"
Questo file dice a Python che rpcontacts è un pacchetto Il codice nel file viene eseguito quando importi il pacchetto o alcuni dei suoi moduli.
Non è necessario inserire alcun codice in un __init__.py file per inizializzare il pacchetto. Un __init__.py vuoto il file farà il lavoro. Tuttavia, in questo caso, definisci una costante a livello di modulo chiamata __version__ per conservare il numero di versione della tua applicazione.
Creazione della finestra principale dell'applicazione
Ora è il momento di creare la finestra principale della tua rubrica. Per farlo, crea un modulo chiamato views.py nei tuoi rpcontacts pacchetto. Quindi aggiungi il seguente codice al modulo e salvalo:
# -*- coding: utf-8 -*-

"""This module provides views to manage the contacts table."""

from PyQt5.QtWidgets import (
    QHBoxLayout,
    QMainWindow,
    QWidget,
)

class Window(QMainWindow):
    """Main Window."""
    def __init__(self, parent=None):
        """Initializer."""
        super().__init__(parent)
        self.setWindowTitle("RP Contacts")
        self.resize(550, 250)
        self.centralWidget = QWidget()
        self.setCentralWidget(self.centralWidget)
        self.layout = QHBoxLayout()
        self.centralWidget.setLayout(self.layout)
Per prima cosa, importi le classi richieste da PyQt5.QtWidgets . Quindi crei Window . Questa classe eredita da QMainWindow e fornisce il codice per generare la finestra principale dell'applicazione. Nel metodo di inizializzazione, imposti il titolo della finestra su "RP Contacts" , ridimensiona la finestra a 550 per 250 pixel, definire e impostare il widget centrale utilizzando QWidget e infine definire un layout per il widget centrale utilizzando un layout box orizzontale.
Codifica ed esecuzione dell'applicazione
Dato che hai già una finestra principale per la rubrica, è ora di scrivere il codice per creare un'applicazione PyQt funzionale usando QApplication . Per farlo, crea un nuovo modulo chiamato main.py nei tuoi rpcontacts pacchetto e aggiungi il seguente codice:
# -*- coding: utf-8 -*-
# rpcontacts/main.py

"""This module provides RP Contacts application."""

import sys

from PyQt5.QtWidgets import QApplication

from .views import Window

def main():
    """RP Contacts main function."""
    # Create the application
    app = QApplication(sys.argv)
    # Create the main window
    win = Window()
    win.show()
    # Run the event loop
    sys.exit(app.exec())
In questo modulo importi sys per accedere a exit() , che consente di uscire dall'applicazione in modo pulito quando l'utente chiude la finestra principale. Quindi importi QApplication da PyQt5.QtWidgets e Window da views . Il passaggio finale è definire main() come funzione principale della tua applicazione.
Dentro main() , istanzia QApplication e Window . Quindi chiami .show() su Window e infine esegui il ciclo principale dell'applicazione o ciclo di eventi , utilizzando .exec() .
Ora vai alla directory principale del progetto rpcontacts_project/ e crea un file chiamato rpcontacts.py . Questo file fornisce lo script del punto di ingresso per eseguire l'applicazione. Aggiungi il seguente codice al file e salvalo:
#!/usr/bin/env python3
# -*- coding: utf-8 -*-
# rpcontacts_project/rpcontacts.py

"""This module provides RP Contacts entry point script."""

from rpcontacts.main import main

if __name__ == "__main__":
    main()
Questo file importa main() dal tuo main.py modulo. Quindi implementi la tradizionale istruzione condizionale che chiama main() se l'utente esegue questo modulo come uno script Python. Ora avvia l'applicazione eseguendo il comando python rpcontacts.py nel tuo ambiente Python. Avrai la seguente finestra sullo schermo:
Questo è tutto! Hai creato un'applicazione GUI PyQt minimale ma funzionale che puoi utilizzare come punto di partenza per costruire la tua rubrica. A questo punto, il tuo progetto dovrebbe avere la seguente struttura:
./rpcontacts_project/
│
├── rpcontacts/
│   ├── __init__.py
│   ├── views.py
│   └── main.py
│
└── rpcontacts.py
In questa sezione, hai creato la struttura minima richiesta per il tuo progetto di rubrica utilizzando moduli e pacchetti Python. Hai creato la finestra principale dell'applicazione e messo insieme il codice standard per creare un'applicazione GUI PyQt. Hai anche eseguito l'applicazione per la prima volta. Successivamente, inizierai ad aggiungere funzionalità alla tua GUI.
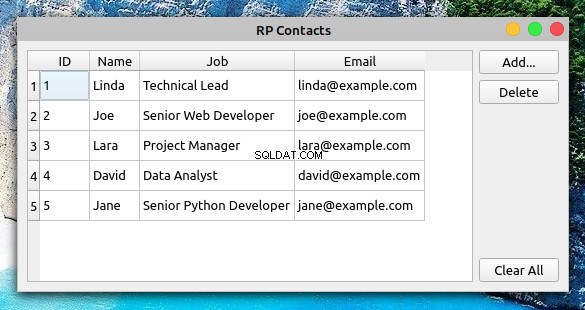
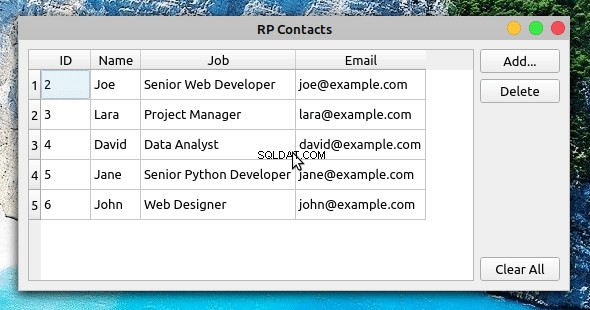
Fase 2:creazione della GUI della Rubrica dei contatti con Python
Ora che hai creato lo scheletro della tua applicazione Rubrica contatti, puoi iniziare a codificare la GUI della finestra principale. Alla fine di questa sezione, avrai completato i passaggi necessari per creare la GUI della tua rubrica utilizzando Python e PyQt. La GUI sarà simile a questa:
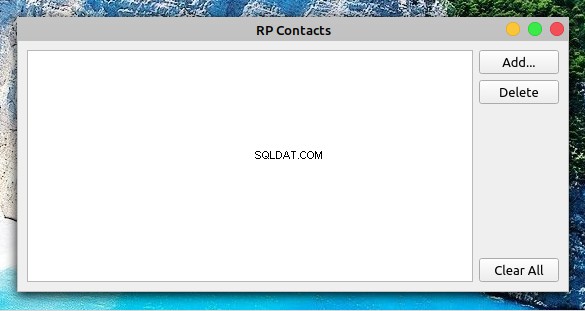
Al centro della finestra, hai una vista tabella per visualizzare l'elenco dei contatti. Sul lato destro del modulo, hai tre pulsanti:
- Aggiungi per aggiungere un nuovo contatto all'elenco
- Elimina per rimuovere un contatto selezionato dall'elenco
- Cancella tutto per rimuovere tutti i contatti dall'elenco
Tutto il codice e i file che aggiungerai o modificherai in questa sezione sono raccolti in source_code_step_2/ directory. Puoi scaricarli cliccando sul link qui sotto:
Ottieni il codice sorgente: Fai clic qui per ottenere il codice sorgente che utilizzerai per creare una rubrica con Python, PyQt e SQLite in questo tutorial.
Torna a views.py modulo e aggiorna il codice di Window per generare la GUI sopra:
 1# -*- coding: utf-8 -*-
 2# rpcontacts/views.py
 3
 4"""This module provides views to manage the contacts table."""
 5
 6from PyQt5.QtWidgets import (
 7    QAbstractItemView,
 8    QHBoxLayout,
 9    QMainWindow,
10    QPushButton,
11    QTableView,
12    QVBoxLayout,
13    QWidget,
14)
15
16class Window(QMainWindow):
17    """Main Window."""
18    def __init__(self, parent=None):
19        """Initializer."""
20        # Snip...
21
22        self.setupUI()
23
24    def setupUI(self):
25        """Setup the main window's GUI."""
26        # Create the table view widget
27        self.table = QTableView()
28        self.table.setSelectionBehavior(QAbstractItemView.SelectRows)
29        self.table.resizeColumnsToContents()
30        # Create buttons
31        self.addButton = QPushButton("Add...")
32        self.deleteButton = QPushButton("Delete")
33        self.clearAllButton = QPushButton("Clear All")
34        # Lay out the GUI
35        layout = QVBoxLayout()
36        layout.addWidget(self.addButton)
37        layout.addWidget(self.deleteButton)
38        layout.addStretch()
39        layout.addWidget(self.clearAllButton)
40        self.layout.addWidget(self.table)
41        self.layout.addLayout(layout)
Per prima cosa importi alcune classi PyQt extra da utilizzare nella GUI. Eccone alcuni di quelli più rilevanti:
QPushButtonper creare l'Aggiungi , Elimina e Cancella tutto pulsantiQTableViewper fornire la vista simile a una tabella che mostra l'elenco dei contattiQAbstractItemViewper fornire l'accesso alla politica del comportamento di selezione della vista tabella
In questo codice, la prima aggiunta a Window è una chiamata a .setupUI() alla fine di __init__() . Questa chiamata genera la GUI della finestra principale quando esegui l'applicazione.
Ecco qual è il codice all'interno di .setupUI() fa:
- Riga 27 crea un
QTableViewistanza per visualizzare l'elenco dei contatti. - Riga 28 imposta il
.selectionBehaviorproprietà suQAbstractItemView.SelectRows. Ciò garantisce che quando un utente fa clic su qualsiasi cella della visualizzazione tabella, verrà selezionata la riga completa. Le righe nella visualizzazione tabella contengono tutte le informazioni relative a un singolo contatto nell'elenco dei contatti. - Righe da 31 a 33 aggiungi i tre pulsanti alla GUI:Aggiungi , Elimina e Cancella tutto . Questi pulsanti non eseguono ancora alcuna azione.
- Righe da 35 a 41 creare e impostare un layout coerente per tutti i widget nella GUI.
Con queste aggiunte a Window , è possibile eseguire nuovamente l'applicazione. La finestra sullo schermo apparirà come la finestra che hai visto all'inizio della sezione.
Nota: I numeri di riga nel codice precedente e nel resto degli esempi di codice in questo tutorial hanno lo scopo di facilitare la spiegazione. Non corrispondono all'ordine delle righe nel modulo o nello script finale.
In questa sezione, hai eseguito tutti i passaggi necessari per creare la GUI della finestra principale della tua rubrica. Ora sei pronto per iniziare a lavorare su come la tua applicazione gestirà e memorizzerà i tuoi dati di contatto.
Fase 3:configurazione del database della Rubrica contatti
A questo punto, hai creato un'applicazione PyQt e la GUI della sua finestra principale per creare il tuo progetto di rubrica. In questa sezione, scriverai il codice per definire come l'applicazione si connette al database dei contatti. Per completare questo passaggio, utilizzerai SQLite per gestire il database e il supporto SQL di PyQt per connettere l'applicazione al database e lavorare con i tuoi dati di contatto.
Il codice sorgente e i file che aggiungerai o modificherai in questa sezione sono archiviati in source_code_step_3/ directory. Puoi scaricarli cliccando sul link qui sotto:
Ottieni il codice sorgente: Fai clic qui per ottenere il codice sorgente che utilizzerai per creare una rubrica con Python, PyQt e SQLite in questo tutorial.
Per prima cosa, torna a main.py nel rpcontacts/ directory e aggiorna il codice per creare la connessione al database:
# -*- coding: utf-8 -*-
# rpcontacts/main.py

"""This module provides RP Contacts application."""

import sys

from PyQt5.QtWidgets import QApplication

from .database import createConnection
from .views import Window

def main():
    """RP Contacts main function."""
    # Create the application
    app = QApplication(sys.argv)
    # Connect to the database before creating any window
    if not createConnection("contacts.sqlite"):
        sys.exit(1)
    # Create the main window if the connection succeeded
    win = Window()
    win.show()
    # Run the event loop
    sys.exit(app.exec_())
In questo caso, importi prima createConnection() da database.py . Questa funzione conterrà il codice per creare e aprire una connessione al database dei contatti. Creerai database.py e scrivi createConnection() nella prossima sezione.
Dentro main() , la prima riga evidenziata è un tentativo di creare una connessione al database utilizzando createConnection() . Se per qualche motivo l'applicazione non è in grado di creare una connessione, allora la chiamata a sys.exit(1) chiuderà l'applicazione senza creare un elemento grafico e indicherà che si è verificato un errore.
Devi gestire la connessione in questo modo perché l'applicazione dipende dal database per funzionare correttamente. Se non disponi di una connessione funzionale, la tua applicazione non funzionerà affatto.
Questa pratica consente di gestire gli errori e chiudere l'applicazione in modo pulito se si verifica un problema. Potrai anche presentare all'utente informazioni rilevanti sull'errore in cui si è verificata l'applicazione durante il tentativo di connessione al database.
Con queste aggiunte in atto, è tempo di tuffarsi nel codice di createConnection() .
Connessione al database con PyQt e SQLite
Il collegamento dell'applicazione della rubrica al database associato è un passaggio fondamentale nello sviluppo dell'applicazione. Per fare ciò, codificherai una funzione chiamata createConnection() , che creerà e aprirà una connessione al database. Se la connessione riesce, la funzione restituirà True . In caso contrario, fornirà informazioni sulla causa dell'errore di connessione.
Torna a rpcontacts/ directory e crea un nuovo modulo chiamato database.py al suo interno. Quindi aggiungi il seguente codice a quel modulo:
 1# -*- coding: utf-8 -*-
 2# rpcontacts/database.py
 3
 4"""This module provides a database connection."""
 5
 6from PyQt5.QtWidgets import QMessageBox
 7from PyQt5.QtSql import QSqlDatabase
 8
 9def createConnection(databaseName):
10    """Create and open a database connection."""
11    connection = QSqlDatabase.addDatabase("QSQLITE")
12    connection.setDatabaseName(databaseName)
13
14    if not connection.open():
15        QMessageBox.warning(
16            None,
17            "RP Contact",
18            f"Database Error: {connection.lastError().text()}",
19        )
20        return False
21
22    return True
Qui, prima importi alcune classi PyQt richieste. Quindi definisci createConnection() . Questa funzione accetta un argomento:databaseName contiene il nome o il percorso del file di database SQLite fisico nel file system.
Ecco qual è il codice all'interno di createConnection() fa:
- Riga 11 crea la connessione al database utilizzando il
QSQLITEconducente. - Riga 12 imposta il nome del file o il percorso del database.
- Riga 14 tenta di aprire la connessione. Se si verifica un problema durante la chiamata a
.open(), quindiifil blocco di codice mostra un messaggio di errore e quindi restituisceFalseper indicare che il tentativo di connessione non è riuscito. - Riga 22 restituisce
Truese il tentativo di connessione ha esito positivo.
Hai già codificato createConnection() . Ora puoi scrivere il codice per creare i contacts tabelle nel database.
Creazione dei contacts Tabella
Con la funzione che crea e apre la connessione al database in atto, puoi procedere a codificare una funzione di supporto per creare i contacts tavolo. Utilizzerai questa tabella per memorizzare le informazioni sui tuoi contatti.
Ecco il codice che implementa _createContactsTable() :
# -*- coding: utf-8 -*-
# rpcontacts/database.py

# Snip...
from PyQt5.QtSql import QSqlDatabase, QSqlQuery

def _createContactsTable():
    """Create the contacts table in the database."""
    createTableQuery = QSqlQuery()
    return createTableQuery.exec(
        """
        CREATE TABLE IF NOT EXISTS contacts (
            id INTEGER PRIMARY KEY AUTOINCREMENT UNIQUE NOT NULL,
            name VARCHAR(40) NOT NULL,
            job VARCHAR(50),
            email VARCHAR(40) NOT NULL
        )
        """
    )

def createConnection(databaseName):
    # Snip...
    _createContactsTable()
    return True
Qui, prima aggiungi una nuova importazione. Importi QSqlQuery per eseguire e manipolare istruzioni SQL.
All'interno di _createContactsTable() , crei un QSqlQuery esempio. Quindi chiami .exec() sull'oggetto query con un SQL CREATE TABLE basato su stringa affermazione come argomento. Questa istruzione crea una nuova tabella chiamata contacts nel tuo database. La tabella ha le seguenti colonne:
| Colonna | Contenuto |
|---|---|
id | Un numero intero con la chiave primaria della tabella |
name | Una stringa con il nome di un contatto |
job | Una stringa con il titolo professionale di un contatto |
email | Una stringa con l'e-mail di un contatto |
I contacts tabella nel tuo database memorizzerà le informazioni rilevanti sui tuoi contatti.
Il passaggio finale per completare la codifica di database.py è aggiungere una chiamata a _createContactsTable() dall'interno di createConnection() , subito prima dell'ultimo return dichiarazione. Ciò garantisce che l'applicazione crei i contacts tabella prima di eseguire qualsiasi operazione sul database.
Dopo aver creato i contacts tabella, puoi eseguire alcuni test sul database e anche aggiungere alcuni dati di esempio per ulteriori test.
Test del database della Rubrica dei contatti
Finora hai finito di scrivere il codice richiesto per gestire la connessione al database della rubrica. In questa sezione, eseguirai alcuni test per assicurarti che questo codice e il database stesso funzionino correttamente. Aggiungerai anche alcuni dati di esempio al database per eseguire ulteriori test più avanti in questo tutorial.
Ora apri un terminale o una riga di comando e spostati nella directory principale del progetto, rpcontacts_project/ . Una volta lì, avvia una sessione interattiva Python e digita il seguente codice:
>>> from rpcontacts.database import createConnection

>>> # Create a connection
>>> createConnection("contacts.sqlite")
True

>>> # Confirm that contacts table exists
>>> from PyQt5.QtSql import QSqlDatabase
>>> db = QSqlDatabase.database()
>>> db.tables()
['contacts', 'sqlite_sequence']
Qui importi prima createConnection() dal database.py modulo. Quindi si chiama questa funzione per creare e aprire una connessione al database dei contatti. Il nome del file del database è contacts.sqlite . Poiché questo file non esiste nella directory principale del progetto, SQLite lo crea per te. Puoi verificarlo dando un'occhiata alla tua directory attuale.
Successivamente, confermi che il database contiene una tabella denominata contacts . Per farlo, chiami .database() su QSqlDatabase . Questo metodo di classe restituisce un puntatore alla connessione al database corrente. Con questo riferimento alla connessione, puoi chiamare .tables() per ottenere l'elenco delle tabelle nel database. Nota che la prima tabella nell'elenco è contacts , quindi ora sei sicuro che tutto funzioni bene.
Ora puoi preparare una query SQL per inserire dati di esempio nei contacts tabella:
>>> # Prepare a query to insert sample data
>>> from PyQt5.QtSql import QSqlQuery

>>> insertDataQuery = QSqlQuery()
>>> insertDataQuery.prepare(
...     """
...     INSERT INTO contacts (
...         name,
...         job,
...         email
...     )
...     VALUES (?, ?, ?)
...     """
... )
True
La query precedente ti consente di inserire valori specifici nel name , job e email attributi e per salvare tali valori nel database. Di seguito è riportato un esempio di come farlo:
>>> # Sample data
>>> data = [
...     ("Linda", "Technical Lead", "linda@example.com"),
...     ("Joe", "Senior Web Developer", "joe@example.com"),
...     ("Lara", "Project Manager", "lara@example.com"),
...     ("David", "Data Analyst", "david@example.com"),
...     ("Jane", "Senior Python Developer", "jane@example.com"),
... ]

>>> # Insert sample data
>>> for name, job, email in data:
...     insertDataQuery.addBindValue(name)
...     insertDataQuery.addBindValue(job)
...     insertDataQuery.addBindValue(email)
...     insertDataQuery.exec()
...
True
True
True
True
True
In questo pezzo di codice, devi prima definire data per conservare le informazioni di contatto di un elenco di persone. Successivamente, usi un for loop per inserire i dati chiamando .addBindValue() . Quindi chiami .exec() sull'oggetto query per eseguire efficacemente la query SQL sul database.
Poiché tutte le chiamate a .exec() restituisce True , puoi concludere che i dati sono stati inseriti correttamente nel database. Se vuoi confermarlo, esegui il seguente codice:
>>> query = QSqlQuery()
>>> query.exec("SELECT name, job, email FROM contacts")
True

>>> while query.next():
...     print(query.value(0), query.value(1), query.value(2))
...
Linda Technical Lead linda@example.com
Joe Senior Web Developer joe@example.com
Lara Project Manager lara@example.com
David Data Analyst david@example.com
Jane Senior Python Developer jane@example.com
Questo è tutto! Il tuo database funziona bene! Ora hai alcuni dati di esempio con cui testare l'applicazione e puoi concentrarti su come caricare e visualizzare le informazioni di contatto nella finestra principale della tua rubrica.
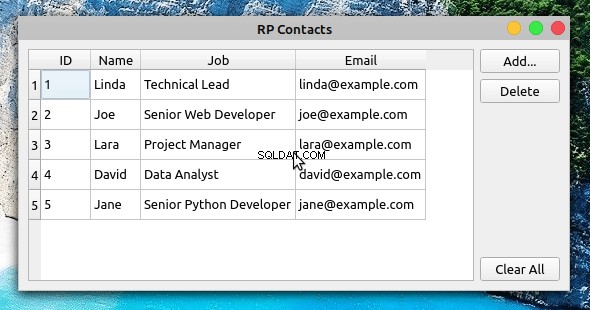
Fase 4:visualizzazione e aggiornamento dei contatti esistenti
Per visualizzare i tuoi dati di contatto nella finestra principale dell'applicazione, puoi utilizzare QTableView . Questa classe fa parte dell'architettura Model-View di PyQt e fornisce un modo robusto ed efficiente per visualizzare elementi da un oggetto modello PyQt.
I file e il codice che aggiungerai o modificherai in questa sezione sono archiviati in source_code_step_4/ directory. Per scaricarli, fare clic sul collegamento seguente:
Ottieni il codice sorgente: Fai clic qui per ottenere il codice sorgente che utilizzerai per creare una rubrica con Python, PyQt e SQLite in questo tutorial.
Una volta terminato questo passaggio, la tua rubrica dei contatti apparirà così:
L'oggetto di visualizzazione tabella nella finestra principale fornisce le funzionalità necessarie per consentire di modificare e aggiornare rapidamente le informazioni di contatto.
Ad esempio, per aggiornare il nome di un contatto, puoi fare doppio clic sulla cella contenente il nome, aggiornare il nome e quindi premere Invio per salvare automaticamente le modifiche nel database. Ma prima di poterlo fare, devi creare un modello e collegarlo alla vista tabella.
Creazione di un modello per la gestione dei dati di contatto
PyQt fornisce un ricco set di classi per lavorare con i database SQL. Per l'applicazione della tua rubrica, utilizzerai QSqlTableModel , che fornisce un modello di dati modificabile per una singola tabella di database. È perfetto per il lavoro poiché il tuo database ha un'unica tabella, contacts .
Torna al tuo editor di codice e crea un nuovo modulo chiamato model.py all'interno di rpcontacts/ directory. Aggiungi il seguente codice al file e salvalo:
 1# -*- coding: utf-8 -*-
 2# rpcontacts/model.py
 3
 4"""This module provides a model to manage the contacts table."""
 5
 6from PyQt5.QtCore import Qt
 7from PyQt5.QtSql import QSqlTableModel
 8
 9class ContactsModel:
10    def __init__(self):
11        self.model = self._createModel()
12
13    @staticmethod
14    def _createModel():
15        """Create and set up the model."""
16        tableModel = QSqlTableModel()
17        tableModel.setTable("contacts")
18        tableModel.setEditStrategy(QSqlTableModel.OnFieldChange)
19        tableModel.select()
20        headers = ("ID", "Name", "Job", "Email")
21        for columnIndex, header in enumerate(headers):
22            tableModel.setHeaderData(columnIndex, Qt.Horizontal, header)
23        return tableModel
In questo codice, esegui prima alcune importazioni obbligatorie, quindi crei ContactsModel . In the class initializer, you define an instance attribute called .model to hold the data model.
Next, you add a static method to create and set up the model object. Here’s what the code in ._createModel() does:
- Line 16 creates an instance of
QSqlTableModel()calledtableModel. - Line 17 associates the model object with the
contactstable in your database. - Line 18 sets the
.editStrategyproperty of the model toQSqlTableModel.OnFieldChange. With this, you ensure that the changes on the model get saved into the database immediately. - Line 19 loads the table into the model by calling
.select(). - Lines 20 to 22 define and set user-friendly headers for the
contactstable’s columns. - Line 23 returns the newly created model.
At this point, you have your data model ready to use. Now you need to connect the table view widget to the model so you can present your users with the contact information.
Connecting the Model to the View
To display contact data in your contact book’s main window, you need to connect the table view with the data model. To perform this connection, you need to call .setModel() on the table view object and pass the model as an argument:
# -*- coding: utf-8 -*-
# rpcontacts/views.py

# Snip...
from .model import ContactsModel

class Window(QMainWindow):
    """Main Window."""
    def __init__(self, parent=None):
        # Snip...
        self.contactsModel = ContactsModel()
        self.setupUI()

    def setupUI(self):
        """Setup the main window's GUI."""
        # Create the table view widget
        self.table = QTableView()
        self.table.setModel(self.contactsModel.model)
        self.table.setSelectionBehavior(QAbstractItemView.SelectRows)
        # Snip...
In this code, you first import ContactsModel from model.py . This class provides the model that manages the data in your contact database.
In the initializer of Window , you create an instance of ContactsModel . Then inside .setupUI() , you call .setModel() on .table to connect the model with the table view. If you run the application after this update, then you’ll get the window you saw at the beginning of step 4.
Displaying and Updating Contacts
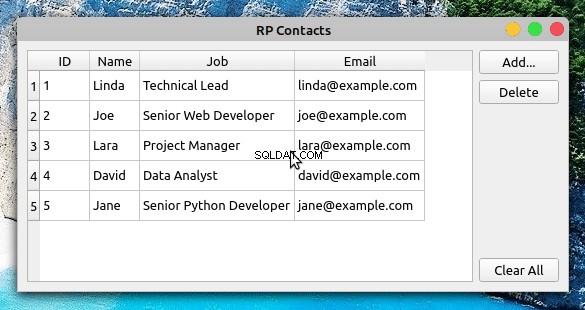
PyQt’s Model-View architecture provides a robust and user-friendly way to create GUI applications that manage databases. Models communicate with and access the data in the database. Any change in a model updates the database immediately. Views are responsible for displaying the data to the user and also for providing editable widgets to allow the user to modify the data directly in the view.
If the user modifies the data through the view, then the view internally communicates with and updates the model, which saves the changes to the physical database:
In this example, you double-click Joe’s Job campo. This gives you access to an editable widget that allows you to modify the value in the cell. Then you update the job description from Senior Web Developer to Web Developer . When you hit Enter , the table view communicates the change to the model, and the model saves the change to the database immediately.
To confirm that the changes were successfully saved into the database, you can close the application and run it again. The table view should reflect your updates.
Step 5:Creating New Contacts
At this step, your contact book application provides functionality to load, display, and update the information about your contacts. Even though you’re able to modify and update the contact information, you can neither add nor remove contacts from the list.
All the files and the code you’ll add or modify in this section are collected in the source_code_step_5/ directory. To download them, click the link below:
Get the Source Code: Click here to get the source code you’ll use to build a contact book with Python, PyQt, and SQLite in this tutorial.
In this section, you’ll provide the required functionality to add new contacts to the database, using a pop-up dialog to enter the new information. The first step is to create the Add Contact dialog.
Creating the Add Contact Dialog
Dialogs are small windows that you can use to communicate with your users. In this section, you’ll code the contact book’s Add Contact dialog to allow your users add new contacts to their current list of contacts.
To code the Add Contact dialog, you’ll subclass QDialog . This class provides a blueprint to build dialogs for your GUI applications.
Now open the views.py module and update the import section like this:
# -*- coding: utf-8 -*-
# rpcontacts/views.py

# Snip...
from PyQt5.QtCore import Qt
from PyQt5.QtWidgets import (
    QAbstractItemView,
    QDialog,
    QDialogButtonBox,
    QFormLayout,
    QHBoxLayout,
    QLineEdit,
    QMainWindow,
    QMessageBox,
    QPushButton,
    QTableView,
    QVBoxLayout,
    QWidget,
)
The highlighted lines in the above code import the required classes to build the Add Contact dialog. With these classes in your namespace, add the following class at the end of views.py :
 1# -*- coding: utf-8 -*-
 2# rpcontacts/views.py
 3
 4# Snip...
 5class AddDialog(QDialog):
 6    """Add Contact dialog."""
 7    def __init__(self, parent=None):
 8        """Initializer."""
 9        super().__init__(parent=parent)
10        self.setWindowTitle("Add Contact")
11        self.layout = QVBoxLayout()
12        self.setLayout(self.layout)
13        self.data = None
14
15        self.setupUI()
16
17    def setupUI(self):
18        """Setup the Add Contact dialog's GUI."""
19        # Create line edits for data fields
20        self.nameField = QLineEdit()
21        self.nameField.setObjectName("Name")
22        self.jobField = QLineEdit()
23        self.jobField.setObjectName("Job")
24        self.emailField = QLineEdit()
25        self.emailField.setObjectName("Email")
26        # Lay out the data fields
27        layout = QFormLayout()
28        layout.addRow("Name:", self.nameField)
29        layout.addRow("Job:", self.jobField)
30        layout.addRow("Email:", self.emailField)
31        self.layout.addLayout(layout)
32        # Add standard buttons to the dialog and connect them
33        self.buttonsBox = QDialogButtonBox(self)
34        self.buttonsBox.setOrientation(Qt.Horizontal)
35        self.buttonsBox.setStandardButtons(
36            QDialogButtonBox.Ok | QDialogButtonBox.Cancel
37        )
38        self.buttonsBox.accepted.connect(self.accept)
39        self.buttonsBox.rejected.connect(self.reject)
40        self.layout.addWidget(self.buttonsBox)
There are a lot of things happening in this code. Here’s a summary:
- Line 5 defines a new class that inherits from
QDialog. - Lines 7 to 15 define the class initializer. In this case, the most relevant addition is
.data, which is an instance attribute that you’ll use to hold the data your users provide.
In .setupUI() , you define the dialog’s GUI:
- Lines 20 to 25 add three
QLineEditobjects:name,job, andemail. You’ll use these line edits to take the user’s input for the name, job description, and email of the contact to add. They represent the corresponding fields in the database. - Lines 27 to 30 create a
QFormLayoutinstance that arranges the line edits in a form. This layout manager also provides user-friendly labels for each line edit or field. - Lines 33 to 37 add a
QDialogButtonBoxobject that provides two standard buttons:OK and Cancel . The OK button accepts the user’s input and the Cancel button rejects it. - Lines 38 and 39 connect the dialog’s built-in
.accepted()and.rejected()signals with the.accept()andreject()slots, respectively. In this case, you’ll rely on the dialog’s built-in.reject()slot, which closes the dialog without processing the input. Other than that, you just need to code the.accept()slot.
To code the dialog’s .accept() slot, you need to consider that any user input needs validation to make sure that it’s correct and safe. This is especially true when you’re working with SQL databases because of the risk of an SQL injection attack.
In this example, you’ll add a minimal validation rule just to make sure that the user provides data for each input field in the dialog. However, adding your own, more robust validation rules would be a good exercise.
Without further ado, get back to AddDialog and add the following code for its .accept() slot:
 1# -*- coding: utf-8 -*-
 2# rpcontacts/views.py
 3
 4# Snip...
 5class AddDialog(QDialog):
 6    def __init__(self, parent=None):
 7        # Snip...
 8
 9    def setupUI(self):
10        # Snip...
11
12    def accept(self):
13        """Accept the data provided through the dialog."""
14        self.data = []
15        for field in (self.nameField, self.jobField, self.emailField):
16            if not field.text():
17                QMessageBox.critical(
18                    self,
19                    "Error!",
20                    f"You must provide a contact's {field.objectName()}",
21                )
22                self.data = None  # Reset .data
23                return
24
25            self.data.append(field.text())
26
27        if not self.data:
28            return
29
30        super().accept()
The code within .accept() does the following:
- Line 14 initializes
.datato an empty list ([]). This list will store the user’s input data. - Line 15 defines a
forloop that iterates over the three line edits, or fields, in the dialog. - Lines 16 to 23 define a conditional statement that checks if the user has provided data for each field in the dialog. If not, then the dialog shows an error message that warns the user about the missing data.
- Line 25 adds the user’s input for each field to
.data. - Line 30 calls the superclass’s
.accept()slot to provide the standard behavior that closes the dialog after the user clicks OK .
With this code, you’re ready to add a new slot to the contact book’s main window. This slot will launch the dialog, and if the user provides valid input, then the slot will use the model to save the newly added contact to the database.
Launching the Add Contact Dialog
Now that you’ve coded the Add Contact dialog, it’s time to add a new slot to Window so you can launch the dialog by clicking Add and process the user’s input once they click OK .
Go to the definition of Window and add the following code:
 1# -*- coding: utf-8 -*-
 2# rpcontacts/views.py
 3
 4# Snip...
 5class Window(QMainWindow):
 6    # Snip...
 7
 8    def setupUI(self):
 9        # Snip...
10        self.addButton = QPushButton("Add...")
11        self.addButton.clicked.connect(self.openAddDialog)
12        # Snip...
13
14    def openAddDialog(self):
15        """Open the Add Contact dialog."""
16        dialog = AddDialog(self)
17        if dialog.exec() == QDialog.Accepted:
18            self.contactsModel.addContact(dialog.data)
19            self.table.resizeColumnsToContents()
Here’s a summary of what’s happening in the above code:
- Line 11 connects the
.clicked()signal of the Add button to the newly created slot,.openAddDialog(). This way, a click on the button will automatically call the slot. - Line 14 defines the
.openAddDialog()slot. - Line 16 creates an instance of
AddDialog. - Lines 17 to 19 define a conditional statement to check if the dialog was accepted. If so, then line 14 calls
.addContact()on the data model with the dialog’s.dataattribute as an argument. The final statement in theifcode block resizes the table view to fit the size of its updated content.
Now that you have a way to launch the Add Contact dialog and to process its data, you need to provide the code for .addContact() in your data model. That’s a topic for the next section.
Processing the Add Dialog’s Data in the Model
In this section, you’ll add a method called .addContact() to your data model, ContactsModel . Open model.py in your code editor, go to the definition of ContactsModel , and add the following code:
 1# -*- coding: utf-8 -*-
 2# rpcontacts/model.py
 3
 4# Snip...
 5class ContactsModel:
 6    # Snip...
 7
 8    def addContact(self, data):
 9        """Add a contact to the database."""
10        rows = self.model.rowCount()
11        self.model.insertRows(rows, 1)
12        for column, field in enumerate(data):
13            self.model.setData(self.model.index(rows, column + 1), field)
14        self.model.submitAll()
15        self.model.select()
Inside .addContact() , the code does the following:
- Line 10 gets the current number of rows in the data model.
- Line 11 inserts a new row at the end of the data model.
- Lines 12 and 13 run a
forloop that inserts every item indatainto the corresponding cell in the data model. To do this, line 9 calls.setData()on the model, with the index of the cell and the current datafieldas arguments. - Line 14 submits the changes to the database by calling
.submitAll()on the model. - Line 15 reloads the data from the database into the model.
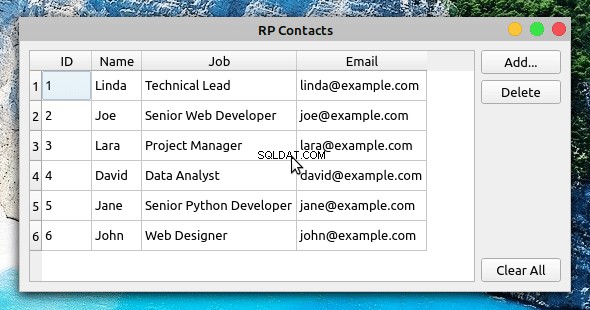
If you run the application with these new additions, then you’ll get the following behavior:
Now when you click Add , the Add Contact dialog appears on your screen. You can use the dialog to provide the required information for a new contact and to add the contact to the database by clicking OK .
Step 6:Deleting Existing Contacts
The final feature you’ll add to the contact book application is the ability to remove contacts from the database using the GUI.
Again, you’ll find all the files and the code added or modified in this section under the source_code_step_6/ directory. You can download them by clicking the link below:
Get the Source Code: Click here to get the source code you’ll use to build a contact book with Python, PyQt, and SQLite in this tutorial.
In this section, you’ll first add the capability to delete a single contact at a time. Then you’ll add code to remove all the contacts from the database.
Deleting Selected Contacts
To remove a single contact from the contact database, you need to select the desired contact in the table view on the contact book’s main window. Once you’ve selected the contact, you can click Delete to perform the operation on the database.
Go to the model.py module and add the following code to implement .deleteContact() inside ContactsModel :
# -*- coding: utf-8 -*-
# rpcontacts/model.py

# Snip...
class ContactsModel:
    # Snip...

    def deleteContact(self, row):
        """Remove a contact from the database."""
        self.model.removeRow(row)
        self.model.submitAll()
        self.model.select()
This method has three lines of code. The first line removes the selected row . The second line submits the change to the database. Finally, the third line reloads the data into the model.
Next, get back to the views.py module and add the code behind the Delete button in Window :
# -*- coding: utf-8 -*-
# rpcontacts/views.py

# Snip...
class Window(QMainWindow):
    # Snip...

    def setupUI(self):
        """Setup the main window's GUI."""
        # Snip...
        self.deleteButton = QPushButton("Delete")
        self.deleteButton.clicked.connect(self.deleteContact)
        # Snip...

    def deleteContact(self):
        """Delete the selected contact from the database."""
        row = self.table.currentIndex().row()
        if row < 0:
            return

        messageBox = QMessageBox.warning(
            self,
            "Warning!",
            "Do you want to remove the selected contact?",
            QMessageBox.Ok | QMessageBox.Cancel,
        )

        if messageBox == QMessageBox.Ok:
            self.contactsModel.deleteContact(row)
In the first highlighted line, you connect the .clicked() signal of the Delete button to the .deleteContact() slot. This connection triggers a call to .deleteContact() every time the user clicks the button.
In .deleteContact() , you first get the index of the currently selected row in the table view. The if statement checks if the index is lower than 0 , which would mean that there are no contacts in the table view. If so, then the method returns immediately without performing any further actions.
Then the method shows a warning message confirming that the user wants to delete the selected contact. If the user accepts the operation, then .deleteContact(row) gets called. In this case, row represents the index of the currently selected row in the table.
After these additions, you can run the application again to get the following behavior:
Now when you select a contact from the table view and click Delete , you’re presented with a warning message. If you click the message dialog’s OK button, then the application removes the selected contact from the database, updating the table view accordingly.
Clearing the Contact Database
To remove all the contacts from the database, you’ll start by adding a method called .clearContacts() to ContactsModel . Open your model.py module and add the following method at the end of the class:
 1# -*- coding: utf-8 -*-
 2# rpcontacts/model.py
 3
 4# Snip...
 5class ContactsModel:
 6    # Snip...
 7
 8    def clearContacts(self):
 9        """Remove all contacts in the database."""
10        self.model.setEditStrategy(QSqlTableModel.OnManualSubmit)
11        self.model.removeRows(0, self.model.rowCount())
12        self.model.submitAll()
13        self.model.setEditStrategy(QSqlTableModel.OnFieldChange)
14        self.model.select()
Here’s what each line of code does:
- Line 10 sets the data model’s
.editStrategyproperty toQSqlTableModel.OnManualSubmit. This allows you to cache all the changes until you call.submitAll()later on. You need to do this because you’re changing several rows at the same time. - Line 11 removes all the rows from the model.
- Line 12 saves changes to the database.
- Line 13 resets the model’s
.editStrategyproperty to its original value,QSqlTableModel.OnFieldChange. If you don’t reset this property to its original value, then you won’t be able to update the contacts directly in the table view. - Line 14 reloads the data into the model.
Once you’ve coded .clearContacts() , you can get back to the views.py file and update Window with the following code:
# -*- coding: utf-8 -*-
# rpcontacts/views.py

# Snip...
class Window(QMainWindow):
    # Snip...

    def setupUI(self):
        """Setup the main window's GUI."""
        # Snip...
        self.clearAllButton = QPushButton("Clear All")
        self.clearAllButton.clicked.connect(self.clearContacts)
        # Snip...

    def clearContacts(self):
        """Remove all contacts from the database."""
        messageBox = QMessageBox.warning(
            self,
            "Warning!",
            "Do you want to remove all your contacts?",
            QMessageBox.Ok | QMessageBox.Cancel,
        )

        if messageBox == QMessageBox.Ok:
            self.contactsModel.clearContacts()
The first highlighted line in this code connects the .clicked() signal of the Clear All button to the .clearContacts() slot below.
In .clearContacts() , you first create a message dialog, messageBox , to ask the user to confirm the removing operation. If the user confirms the operation by clicking OK , then .clearContacts() gets called on the model to remove all the contacts from the database:
That’s it! With this last piece of code, your contact book application is complete. The application provides features that allow your users to display, add, update, and remove contacts from the database.
Conclusion
Building a contact book GUI application with Python, PyQt, and SQLite is an excellent exercise for you to expand your skills with these tools and as a developer in general. Coding projects like this allows you to apply the knowledge and skills you already have and also pushes you to research and learn about new topics every time you encounter a new programming problem.
In this tutorial, you learned how to:
- Build the GUI for a contact book application using PyQt
- Use PyQt’s SQL support to connect the application to an SQLite database
- Use PyQt’s Model-View architecture to work with the application’s database
You can download the complete source code for the contact book application and also the code to complete each step in this tutorial by clicking the link below:
Get the Source Code: Click here to get the source code you’ll use to build a contact book with Python, PyQt, and SQLite in this tutorial.
Next Steps
At this point, you’ve completed a fully functional contact book project. The application provides minimal functionality, but it’s a good starting point to continue adding features and take your Python and PyQt skills to the next level. Here are some next step ideas that you can implement:
-
Add new data fields: Adding new data fields to store more information about your contacts would be great. For example, you can add the contact’s photo, phone number, web page, Twitter handle, and so on. To do this, you might need to create new tables and set up relations between them. PyQt provides the
QSqlRelationalTableModel, which defines an editable data model for a single table and provides foreign key support. -
Provide search capability: Giving your users a way to search for a contact in the database is arguably a must-have feature in this kind of application. To implement it, you can use PyQt’s
QSqlQueryandQSqlQueryModel. -
Add back-up capability: Providing a way of backing up contact information is another interesting feature. Users might face problems with their computers and lose their data. You can provide options to upload the data to a cloud service or to back it up to an external disk.
These are just a few ideas for how you can continue adding features to your contact book. Take the challenge and build something amazing on top of this!