Introduzione
Questo tutorial include informazioni su SQL (DDL, DML) che ho raccolto durante la mia vita professionale. Questo è il minimo che devi sapere mentre lavori con i database. Se è necessario utilizzare complesse costruzioni SQL, di solito navigo nella libreria MSDN, che può essere facilmente trovata su Internet. A mio avviso, è molto difficile tenersi tutto in testa e, tra l'altro, non ce n'è bisogno. Ti consiglio di conoscere tutte le principali costruzioni utilizzate nella maggior parte dei database relazionali come Oracle, MySQL e Firebird. Tuttavia, possono differire nei tipi di dati. Ad esempio, per creare oggetti (tabelle, vincoli, indici, ecc.), puoi semplicemente utilizzare l'ambiente di sviluppo integrato (IDE) per lavorare con i database e non è necessario studiare strumenti visivi per un particolare tipo di database (MS SQL, Oracle , MySQL, Firebird, ecc.). Questo è comodo perché puoi vedere l'intero testo e non è necessario guardare attraverso numerose schede per creare, ad esempio, un indice o un vincolo. Se lavori costantemente con i database, creare, modificare e soprattutto ricostruire un oggetto utilizzando gli script è molto più veloce che in modalità visiva. Inoltre, secondo me, nella modalità script (con la dovuta precisione), è più facile specificare e controllare le regole per la denominazione degli oggetti. Inoltre, è conveniente utilizzare gli script quando è necessario trasferire le modifiche al database da un database di test a un database di produzione.
SQL è diviso in più parti. Nel mio articolo esaminerò i più importanti:
DDL – Linguaggio di definizione dei dati
DML – Linguaggio di manipolazione dei dati, che include le seguenti costruzioni:
- SELECT – selezione dei dati
- INSERT – nuovo inserimento dati
- AGGIORNAMENTO – aggiornamento dati
- CANCELLA – cancellazione dei dati
- MERGE – unione di dati
Spiegherò tutte le costruzioni nei casi di studio. Inoltre, penso che un linguaggio di programmazione, in particolare SQL, dovrebbe essere studiato in pratica per una migliore comprensione.
Questo è un tutorial passo dopo passo, in cui è necessario eseguire esempi durante la lettura. Tuttavia, se hai bisogno di conoscere i comandi in dettaglio, naviga in Internet, ad esempio MSDN.
Durante la creazione di questo tutorial, ho utilizzato il database MS SQL Server, versione 2014, e MS SQL Server Management Studio (SSMS) per eseguire gli script.
In breve MS SQL Server Management Studio (SSMS)
SQL Server Management Studio (SSMS) è l'utilità di Microsoft SQL Server per la configurazione, la gestione e l'amministrazione dei componenti del database. Include un editor di script e un programma grafico che funziona con gli oggetti e le impostazioni del server. Lo strumento principale di SQL Server Management Studio è Esplora oggetti, che consente a un utente di visualizzare, recuperare e gestire gli oggetti del server. Questo testo è in parte tratto da Wikipedia.
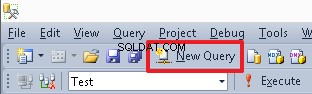
Per creare un nuovo editor di script, utilizza il pulsante Nuova query:
Per passare dal database corrente, puoi utilizzare il menu a tendina:

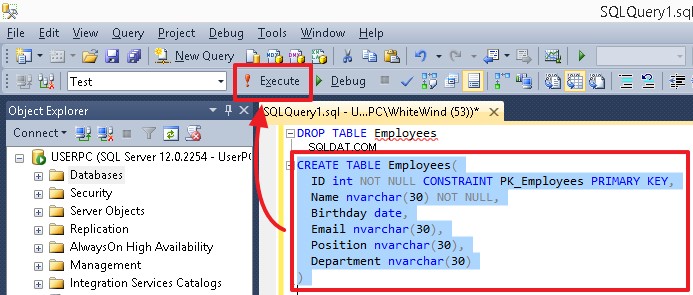
Per eseguire un particolare comando o una serie di comandi, evidenziarlo e premere il pulsante Esegui o F5. Se nell'editor è presente un solo comando o devi eseguire tutti i comandi, non evidenziare nulla.
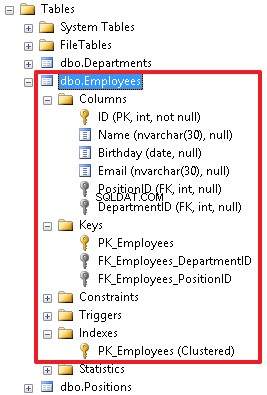
Dopo aver eseguito gli script che creano oggetti (tabelle, colonne, indici), seleziona l'oggetto corrispondente (ad esempio, Tabelle o Colonne), quindi fai clic su Aggiorna nel menu di scelta rapida per visualizzare le modifiche.

In realtà, questo è tutto ciò che devi sapere per eseguire gli esempi forniti qui.
Teoria
Un database relazionale è un insieme di tabelle collegate tra loro. In generale, un database è un file che memorizza dati strutturati.
Database Management System (DBMS) è un insieme di strumenti per lavorare con particolari tipi di database (MS SQL, Oracle, MySQL, Firebird, ecc.).
Nota: Come nella nostra vita quotidiana, diciamo "Oracle DB" o semplicemente "Oracle" che in realtà significa "Oracle DBMS", quindi in questo tutorial userò il termine "database".
Una tabella è un insieme di colonne. Molto spesso puoi ascoltare le seguenti definizioni di questi termini:campi, righe e record, che hanno lo stesso significato.
Una tabella è l'oggetto principale del database relazionale. Tutti i dati vengono archiviati riga per riga nelle colonne della tabella.
Per ogni tabella, oltre che per le sue colonne, devi specificare un nome, in base al quale puoi trovare un elemento richiesto.
Il nome dell'oggetto, della tabella, della colonna e dell'indice può avere una lunghezza minima di 128 simboli.
Nota: Nei database Oracle, il nome di un oggetto può avere una lunghezza minima di 30 simboli. Pertanto, in un particolare database, è necessario creare regole personalizzate per i nomi degli oggetti.
SQL è un linguaggio che consente di eseguire query nei database tramite DBMS. In un particolare DBMS, un linguaggio SQL può avere il proprio dialetto.
DDL e DML:il sottolinguaggio SQL:
- Il linguaggio DDL serve per creare e modificare una struttura di database (cancellazione tabelle e link);
- Il linguaggio DML consente di manipolare i dati della tabella, le sue righe. Serve anche per selezionare i dati dalle tabelle, aggiungere nuovi dati, nonché aggiornare ed eliminare i dati correnti.
È possibile utilizzare due tipi di commenti in SQL (a riga singola e delimitati):
-- single-line comment
e
/* delimited comment */
Questo è tutto per quanto riguarda la teoria.
DDL – Linguaggio di definizione dei dati
Consideriamo una tabella di esempio con dati sui dipendenti rappresentati in modo familiare a una persona che non è un programmatore.
| ID dipendente | Nome completo | Data di nascita | Posizione | Reparto | |
| 1000 | Giovanni | 19.02.1955 | esempio@sqldat.com | CEO | Amministrazione |
| 1001 | Daniele | 12.03.1983 | esempio@sqldat.com | programmatore | IT |
| 1002 | Mike | 07.06.1976 | esempio@sqldat.com | Contabile | Reparto account |
| 1003 | Giordania | 17.04.1982 | esempio@sqldat.com | Programmatore senior | IT |
In questo caso, le colonne hanno i seguenti titoli:ID dipendente, Nome completo, Data di nascita, E-mail, Posizione e Dipartimento.
Possiamo descrivere ogni colonna di questa tabella in base al tipo di dati:
- ID dipendente – intero
- Nome completo – stringa
- Data di nascita – data
- E-mail – stringa
- Posizione – stringa
- Dipartimento – stringa
Un tipo di colonna è una proprietà che specifica il tipo di dati che ogni colonna può memorizzare.
Per cominciare, è necessario ricordare i principali tipi di dati utilizzati in MS SQL:
| Definizione | Denominazione dentro MS SQL | Descrizione |
| Stringa a lunghezza variabile | varchar(N) e nvarchar(N) | Utilizzando il numero N, possiamo specificare la lunghezza massima possibile della stringa per una particolare colonna. Ad esempio, se vogliamo dire che il valore della colonna Nome completo può contenere (al massimo 30 simboli), allora è necessario specificare il tipo di nvarchar(30).
La differenza tra varchar e nvarchar è che varchar consente di memorizzare le stringhe nel formato ASCII, mentre nvarchar memorizza le stringhe nel formato Unicode, dove ogni simbolo occupa 2 byte. |
| Stringa a lunghezza fissa | char(N) e nchar(N) | Questo tipo differisce dalla stringa a lunghezza variabile in quanto segue:se la lunghezza della stringa è inferiore a N simboli, gli spazi vengono sempre aggiunti alla lunghezza N a destra. Quindi, in un database, prende esattamente N simboli, dove un simbolo prende 1 byte per char e 2 byte per nchar. Nella mia pratica, questo tipo non è molto utilizzato. Tuttavia, se qualcuno lo usa, di solito questo tipo ha il formato char(1), cioè quando un campo è definito da 1 simbolo. |
| Intero | int | Questo tipo ci consente di utilizzare solo numeri interi (sia positivi che negativi) in una colonna. Nota:un intervallo di numeri per questo tipo è il seguente:da 2 147 483 648 a 2 147 483 647. Di solito, è il tipo principale utilizzato per вуашту identificatori. |
| Numero in virgola mobile | flottante | Numeri con punto decimale. |
| Data | data | Viene utilizzato per memorizzare solo una data (data, mese e anno) in una colonna. Ad esempio, 15/02/2014. Questo tipo può essere utilizzato per le seguenti colonne:data di ricevuta, data di nascita, ecc., quando è necessario specificare solo una data o quando l'ora non è importante per noi e possiamo eliminarla. |
| Ora | ora | Puoi usare questo tipo se è necessario memorizzare il tempo:ore, minuti, secondi e millisecondi. Ad esempio, hai 17:38:31.3231603 o devi aggiungere l'orario di partenza del volo. |
| Data e ora | data e ora | Questo tipo consente agli utenti di memorizzare sia la data che l'ora. Ad esempio, hai l'evento il 15/02/2014 17:38:31.323. |
| Indicatore | bit | Puoi utilizzare questo tipo per memorizzare valori come 'Sì'/'No', dove 'Sì' è 1 e 'No' è 0. |
Inoltre, non è necessario specificare il valore del campo, a meno che non sia vietato. In questo caso, puoi usare NULL.
Per eseguire esempi, creeremo un database di test chiamato "Test".
Per creare un database semplice senza proprietà aggiuntive, eseguire il comando seguente:
CREATE DATABASE Test
Per eliminare un database, eseguire questo comando:
DROP DATABASE Test
Per passare al nostro database, usa il comando:
USE Test
In alternativa, puoi selezionare il database Test dal menu a discesa nell'area del menu SSMS.
Ora possiamo creare una tabella nel nostro database usando descrizioni, spazi e simboli cirillici:
CREATE TABLE [Employees](
[EmployeeID] int,
[FullName] nvarchar(30),
[Birthdate] date,
[E-mail] nvarchar(30),
[Position] nvarchar(30),
[Department] nvarchar(30)
)
In questo caso, dobbiamo racchiudere i nomi tra parentesi quadre […].
Tuttavia, è meglio specificare tutti i nomi degli oggetti in latino e non usare spazi nei nomi. In questo caso, ogni parola inizia con una lettera maiuscola. Ad esempio, per il campo "EmployeeID", potremmo specificare il nome PersonnelNumber. Puoi anche utilizzare i numeri nel nome, ad esempio PhoneNumber1.
Nota: In alcuni DBMS è più conveniente utilizzare il seguente formato del nome «PHONE_NUMBER». Ad esempio, puoi vedere questo formato nei database ORACLE. Inoltre, il nome del campo non deve coincidere con le parole chiave utilizzate nel DBMS.
Per questo motivo, puoi dimenticare la sintassi delle parentesi quadre e puoi eliminare la tabella Impiegati:
DROP TABLE [Employees]
Ad esempio, puoi nominare la tabella con i dipendenti come "Dipendenti" e impostare i seguenti nomi per i suoi campi:
- ID
- Nome
- Compleanno
- Posizione
- Dipartimento
Molto spesso, utilizziamo "ID" per il campo dell'identificatore.
Ora creiamo una tabella:
CREATE TABLE Employees(
ID int,
Name nvarchar(30),
Birthday date,
Email nvarchar(30),
Position nvarchar(30),
Department nvarchar(30)
)
Per impostare le colonne obbligatorie, puoi utilizzare l'opzione NOT NULL.
Per la tabella corrente, puoi ridefinire i campi utilizzando i seguenti comandi:
-- ID field update

ALTER TABLE Employees ALTER COLUMN ID int NOT NULL

-- Name field update

ALTER TABLE Employees ALTER COLUMN Name nvarchar(30) NOT NULL
Nota: Il concetto generale del linguaggio SQL per la maggior parte dei DBMS è lo stesso (dalla mia esperienza). La differenza tra i DDL nei diversi DBMS risiede principalmente nei tipi di dati (possono differire non solo per i nomi ma anche per la loro specifica implementazione). Inoltre, l'implementazione SQL specifica (comandi) è la stessa, ma potrebbero esserci lievi differenze nel dialetto. Conoscendo le basi di SQL, puoi passare facilmente da un DBMS a un altro. In questo caso, dovrai solo comprendere le specifiche dell'implementazione dei comandi in un nuovo DBMS.
Confronta gli stessi comandi nel DBMS ORACLE:
-- create table
CREATE TABLE Employees(
ID int, -- In ORACLE the int type is a value for number(38)
Name nvarchar2(30), -- in ORACLE nvarchar2 is identical to nvarchar in MS SQL Birthday date,
Email nvarchar2(30),
Position nvarchar2(30),
Department nvarchar2(30)
);

-- ID and Name field update (here we use MODIFY(…) instead of ALTER COLUMN
ALTER TABLE Employees MODIFY(ID int NOT NULL,Name nvarchar2(30) NOT NULL);
-- add PK (in this case the construction is the same as in the MS SQL)
ALTER TABLE Employees ADD CONSTRAINT PK_Employees PRIMARY KEY(ID);
ORACLE differisce nell'implementazione del tipo varchar2. Il suo formato dipende dalle impostazioni del DB e puoi salvare un testo, ad esempio, in UTF-8. Inoltre, puoi specificare la lunghezza del campo sia in byte che in simboli. Per fare ciò, è necessario utilizzare i valori BYTE e CHAR seguiti dal campo della lunghezza. Ad esempio:
NAME varchar2(30 BYTE) – field capacity equals 30 bytes
NAME varchar2(30 CHAR) -- field capacity equals 30 symbols
Il valore (BYTE o CHAR) da utilizzare per impostazione predefinita quando si indica semplicemente varchar2(30) in ORACLE dipenderà dalle impostazioni del DB. Spesso puoi essere facilmente confuso. Pertanto, ti consiglio di specificare esplicitamente CHAR quando usi il tipo varchar2 (ad esempio, con UTF-8) in ORACLE (poiché è più comodo leggere la lunghezza della stringa in simboli).
Tuttavia, in questo caso, se nella tabella sono presenti dati, quindi per eseguire correttamente i comandi, è necessario compilare i campi ID e Nome in tutte le righe della tabella.
Lo mostrerò in un esempio particolare.
Inseriamo i dati nei campi ID, Posizione e Reparto utilizzando il seguente script:
INSERT Employees(ID,Position,Department) VALUES
(1000,’CEO,N'Administration'),
(1001,N'Programmer',N'IT'),
(1002,N'Accountant',N'Accounts dept'),
(1003,N'Senior Programmer',N'IT')
In questo caso, anche il comando INSERT restituisce un errore. Ciò accade perché non abbiamo specificato il valore per il campo obbligatorio Nome.
Se ci fossero dei dati nella tabella originale, il comando "ALTER TABLE Employees ALTER COLUMN ID int NOT NULL" funzionerebbe, mentre il comando "ALTER TABLE Employees ALTER COLUMN Name int NOT NULL" restituirebbe un errore che il campo Nome ha Valori NULL.
Aggiungiamo i valori nel campo Nome:
INSERT Employees(ID,Position,Department,Name) VALUES (1000,N'CEO',N'Administration',N'John'),
(1001,N'Programmer',N'IT',N'Daniel'),
(1002,N'Accountant',N'Accounts dept',N'Mike'),
(1003,N'Senior Programmer',N'IT',N'Jordan’)
Inoltre, puoi utilizzare NOT NULL quando crei una nuova tabella con l'istruzione CREATE TABLE.
Per prima cosa, eliminiamo una tabella:
DROP TABLE Employees
Ora creeremo una tabella con i campi obbligatori ID e Nome:
CREATE TABLE Employees( ID int NOT NULL, Name nvarchar(30) NOT NULL, Birthday date, Email nvarchar(30), Position nvarchar(30), Department nvarchar(30) )
Inoltre, puoi specificare NULL dopo il nome di una colonna che implica che i valori NULL sono consentiti. Questo non è obbligatorio, poiché questa opzione è impostata per impostazione predefinita.
Se devi rendere la colonna corrente non obbligatoria, usa la seguente sintassi:
ALTER TABLE Employees ALTER COLUMN Name nvarchar(30) NULL
In alternativa, puoi usare questo comando:
ALTER TABLE Employees ALTER COLUMN Name nvarchar(30)
Inoltre, con questo comando, possiamo modificare il tipo di campo in un altro compatibile o cambiarne la lunghezza. Ad esempio, estendiamo il campo Nome a 50 simboli:
ALTER TABLE Employees ALTER COLUMN Name nvarchar(50)
Chiave primaria
Quando si crea una tabella, è necessario specificare una colonna o un insieme di colonne univoche per ogni riga. Utilizzando questo valore univoco, è possibile identificare un record. Questo valore è chiamato chiave primaria. La colonna ID (che contiene il «numero personale di un dipendente» – nel nostro caso è il valore univoco per ciascun dipendente e non può essere duplicato) può essere la chiave primaria per la nostra tabella Dipendenti.
Puoi utilizzare il comando seguente per creare una chiave primaria per la tabella:
ALTER TABLE Employees ADD CONSTRAINT PK_Employees PRIMARY KEY(ID)
'PK_Employees' è un nome di vincolo che definisce la chiave primaria. Di solito, il nome di una chiave primaria è costituito dal prefisso "PK_" e dal nome della tabella.
Se la chiave primaria contiene più campi, è necessario elencare questi campi tra parentesi separate da una virgola:
ALTER TABLE table_name ADD CONSTRAINT constraint_name PRIMARY KEY(field1,field2,…)
Tieni presente che in MS SQL, tutti i campi della chiave primaria devono essere NON NULL.
Inoltre, puoi definire una chiave primaria durante la creazione di una tabella. Eliminiamo la tabella:
DROP TABLE Employees
Quindi, crea una tabella utilizzando la seguente sintassi:
CREATE TABLE Employees( ID int NOT NULL, Name nvarchar(30) NOT NULL, Birthday date, Email nvarchar(30), Position nvarchar(30), Department nvarchar(30), CONSTRAINT PK_Employees PRIMARY KEY(ID) – describe PK after all the fileds as a constraint )
Aggiungi dati alla tabella:
INSERT Employees(ID,Position,Department,Name) VALUES (1000,N'CEO',N'Administration',N'John'),
(1001,N'Programmer',N'IT',N'Daniel'),
(1002,N'Accountant',N'Accounts dept',N'Mike'),
(1003,N'Senior programmer',N'IT',N'Jordan')
In realtà, non è necessario specificare il nome del vincolo. In questo caso verrà assegnato un nome di sistema. Ad esempio, «PK__Employee__3214EC278DA42077»:
CREATE TABLE Employees(
ID int NOT NULL,
Name nvarchar(30) NOT NULL,
Birthday date,
Email nvarchar(30),
Position nvarchar(30),
Department nvarchar(30),
PRIMARY KEY(ID) )
o
CREATE TABLE Employees( ID int NOT NULL PRIMARY KEY, Name nvarchar(30) NOT NULL, Birthday date, Email nvarchar(30), Position nvarchar(30), Department nvarchar(30) )
Personalmente, consiglierei di specificare in modo esplicito il nome del vincolo per le tabelle permanenti, poiché è più facile lavorare con o eliminare un valore chiaro e definito in modo esplicito in futuro. Ad esempio:
ALTER TABLE Employees DROP CONSTRAINT PK_Employees
Tuttavia, è più comodo applicare questa sintassi breve, senza nomi di vincolo durante la creazione di tabelle di database temporanee (il nome di una tabella temporanea inizia con # o ##.
Riepilogo:
Abbiamo già analizzato i seguenti comandi:
- CREA TABELLA nome_tabella (elenco dei campi e dei loro tipi, nonché vincoli) – serve per creare una nuova tabella nel database corrente;
- TAVOLA A CADUTA nome_tabella – serve per eliminare una tabella dal database corrente;
- ALTER TABELLA nome_tabella ALTER COLUMN column_name … – serve per aggiornare il tipo di colonna o per modificarne le impostazioni (ad esempio, quando è necessario impostare NULL o NOT NULL);
- ALTER TABELLA nome_tabella AGGIUNGI VINCOLO nome_vincolo CHIAVE PRIMARIA (campo1, campo2,...) – utilizzato per aggiungere una chiave primaria alla tabella corrente;
- ALTER TABELLA nome_tabella VINCOLI RILASCIO nome_vincolo – utilizzato per eliminare un vincolo dalla tabella.
Tabelle temporanee
Astratto da MSDN. Ci sono due tipi di tabelle temporanee in MS SQL Server:locale (#) e globale (##). Le tabelle temporanee locali sono visibili solo ai loro creatori prima che l'istanza di SQL Server venga disconnessa. Vengono eliminati automaticamente dopo la disconnessione dell'utente dall'istanza di SQL Server. Le tabelle temporanee globali sono visibili a tutti gli utenti durante qualsiasi sessione di connessione dopo la creazione di queste tabelle. Queste tabelle vengono eliminate una volta disconnessi gli utenti dall'istanza di SQL Server.
Le tabelle temporanee vengono create nel database di sistema tempdb, il che significa che non inondiamo il database principale. Inoltre, puoi eliminarli utilizzando il comando DROP TABLE. Molto spesso vengono utilizzate tabelle temporanee locali (#).
Per creare una tabella temporanea, puoi utilizzare il comando CREATE TABLE:
CREATE TABLE #Temp( ID int, Name nvarchar(30) )
Puoi eliminare la tabella temporanea con il comando DROP TABLE:
DROP TABLE #Temp
Inoltre, puoi creare una tabella temporanea e compilarla con i dati utilizzando la sintassi SELECT … INTO:
SELECT ID,Name INTO #Temp FROM Employees
Nota: In diversi DBMS, l'implementazione di database temporanei può variare. Ad esempio, nei DBMS ORACLE e Firebird, la struttura delle tabelle temporanee dovrebbe essere definita in anticipo dal comando CREATE GLOBAL TEMPORARY TABLE. Inoltre, è necessario specificare il modo in cui archiviare i dati. Dopodiché, un utente lo vede tra le tabelle comuni e lavora con esso come con una tabella convenzionale.
Normalizzazione del database:suddivisione in sottotabelle (tabelle di riferimento) e definizione delle relazioni tra tabelle
La nostra attuale tabella Dipendenti ha uno svantaggio:un utente può digitare qualsiasi testo nei campi Posizione e Reparto, che potrebbe restituire errori, poiché per un dipendente può specificare "IT" come reparto, mentre per un altro dipendente può specificare "IT Dipartimento". Di conseguenza, non sarà chiaro cosa intendesse l'utente, se questi dipendenti lavorano per lo stesso reparto o se c'è un errore di ortografia e ci sono 2 diversi reparti. Inoltre, in questo caso, non potremo raggruppare correttamente i dati per un report, dove dobbiamo mostrare il numero di dipendenti per ogni reparto.
Un altro inconveniente è il volume di archiviazione e la sua duplicazione, ovvero è necessario specificare un nome completo del reparto per ogni dipendente, che richiede spazio nei database per memorizzare ogni simbolo del nome del reparto.
Il terzo svantaggio è la complessità dell'aggiornamento dei dati sul campo quando è necessario modificare il nome di qualsiasi posizione, da programmatore a programmatore junior. In questo caso, dovrai aggiungere nuovi dati in ogni riga della tabella in cui la Posizione è “Programmatore”.
Per evitare tali situazioni, si consiglia di utilizzare la normalizzazione del database – suddivisione in sottotabelle – tabelle di riferimento.
Creiamo 2 tabelle di riferimento “Posizioni” e “Reparti”:
CREATE TABLE Positions( ID int IDENTITY(1,1) NOT NULL CONSTRAINT PK_Positions PRIMARY KEY, Name nvarchar(30) NOT NULL ) CREATE TABLE Departments( ID int IDENTITY(1,1) NOT NULL CONSTRAINT PK_Departments PRIMARY KEY, Name nvarchar(30) NOT NULL )
Si noti che qui abbiamo utilizzato una nuova proprietà IDENTITY. Significa che i dati nella colonna ID verranno elencati automaticamente a partire da 1. Pertanto, quando si aggiungono nuovi record, i valori 1, 2, 3, ecc. verranno assegnati in sequenza. Di solito, questi campi sono chiamati campi di incremento automatico. È possibile definire un solo campo con la proprietà IDENTITY come chiave primaria in una tabella. Di solito, ma non sempre, tale campo è la chiave primaria della tabella.
Nota: In diversi DBMS, l'implementazione dei campi con un incrementatore può differire. In MySQL, ad esempio, tale campo è definito dalla proprietà AUTO_INCREMENT. In ORACLE e Firebird, puoi emulare questa funzionalità per sequenze (SEQUENCE). Ma per quanto ne so, la proprietà GENERATED AS IDENTITY è stata aggiunta in ORACLE.
Compiliamo automaticamente queste tabelle in base ai dati correnti nei campi Posizione e Reparto della tabella Impiegati:
-- fill in the Name field of the Positions table with unique values from the Position field of the Employees table
 INSERT Positions(Name) SELECT DISTINCT Position FROM Employees WHERE Position IS NOT NULL – drop records where a position is not specified
Devi eseguire gli stessi passaggi per la tabella Dipartimenti:
INSERT Departments(Name) SELECT DISTINCT Department FROM Employees WHERE Department IS NOT NULL
Ora, se apriamo le tabelle Posizioni e Reparti, vedremo un elenco numerato di valori nel campo ID:
SELECT * FROM Positions
| ID | Nome |
| 1 | Contabile |
| 2 | CEO |
| 3 | Programmatore |
| 4 | Programmatore senior |
SELECT * FROM Departments
| ID | Nome |
| 1 | Amministrazione |
| 2 | Reparto account |
| 3 | IT |
Queste tabelle saranno le tabelle di riferimento per definire posizioni e reparti. Ora faremo riferimento agli identificatori di posizioni e dipartimenti. Per prima cosa, creiamo nuovi campi nella tabella Impiegati per memorizzare gli identificatori:
-- add a field for the ID position
ALTER TABLE Employees ADD PositionID int
-- add a field for the ID department
ALTER TABLE Employees ADD DepartmentID int
Il tipo di campi di riferimento dovrebbe essere lo stesso delle tabelle di riferimento, in questo caso è int.
Inoltre, puoi aggiungere più campi utilizzando un comando elencando i campi separati da virgole:
ALTER TABLE Employees ADD PositionID int, DepartmentID int
Ora aggiungeremo vincoli di riferimento (CHIAVE STRANIERA) a questi campi, in modo che un utente non possa aggiungere valori che non siano i valori ID delle tabelle di riferimento.
ALTER TABLE Employees ADD CONSTRAINT FK_Employees_PositionID FOREIGN KEY(PositionID) REFERENCES Positions(ID)
Gli stessi passaggi dovrebbero essere eseguiti per il secondo campo:
ALTER TABLE Employees ADD CONSTRAINT FK_Employees_DepartmentID FOREIGN KEY(DepartmentID) REFERENCES Departments(ID)
Ora gli utenti possono inserire in questi campi solo i valori ID dalla tabella di riferimento corrispondente. Pertanto, per utilizzare un nuovo dipartimento o posizione, un utente deve aggiungere un nuovo record nella tabella di riferimento corrispondente. Poiché le posizioni e i reparti sono archiviati nelle tabelle di riferimento in una copia, quindi per cambiarne il nome è necessario cambiarlo solo nella tabella di riferimento.
Il nome di un vincolo di riferimento è generalmente composto. È costituito dal prefisso «FK» seguito dal nome di una tabella e da un nome di campo che fa riferimento all'identificatore della tabella di riferimento.
L'identificatore (ID) è solitamente un valore interno utilizzato solo per i collegamenti. Non importa quale valore abbia. Pertanto, non cercare di eliminare le lacune nella sequenza di valori che appaiono quando si lavora con la tabella, ad esempio quando si eliminano i record dalla tabella di riferimento.
In alcuni casi, è possibile costruire un riferimento da diversi campi:
ALTER TABLE table ADD CONSTRAINT constraint_name FOREIGN KEY(field1,field2,…) REFERENCES reference table(field1,field2,…)
In questo caso, una chiave primaria è rappresentata da un insieme di più campi (campo1, campo2, …) nella tabella “tabella_riferimento”.
Ora aggiorniamo i campi PositionID e DepartmentID con i valori ID delle tabelle di riferimento.
Per fare ciò, utilizzeremo il comando UPDATE:
UPDATE e SET PositionID=(SELECT ID FROM Positions WHERE Name=e.Position), DepartmentID=(SELECT ID FROM Departments WHERE Name=e.Department) FROM Employees e
Esegui la seguente query:
SELECT * FROM Employees
| ID | Nome | Compleanno | Posizione | Reparto | ID posizione | ID reparto | |
| 1000 | Giovanni | NULL | NULL | CEO | Amministrazione | 2 | 1 |
| 1001 | Daniele | NULL | NULL | Programmatore | IT | 3 | 3 |
| 1002 | Mike | NULL | NULL | Contabile | Reparto account | 1 | 2 |
| 1003 | Giordania | NULL | NULL | Programmatore senior | IT | 4 | 3 |
Come puoi vedere, i campi PositionID e DepartmentID corrispondono a posizioni e dipartimenti. Pertanto, puoi eliminare i campi Posizione e Reparto nella tabella Impiegati eseguendo il seguente comando:
ALTER TABLE Employees DROP COLUMN Position,Department
Ora, esegui questa istruzione:
SELECT * FROM Employees
| ID | Nome | Compleanno | ID posizione | ID reparto | |
| 1000 | Giovanni | NULL | NULL | 2 | 1 |
| 1001 | Daniele | NULL | NULL | 3 | 3 |
| 1002 | Mike | NULL | NULL | 1 | 2 |
| 1003 | Giordania | NULL | NULL | 4 | 3 |
Therefore, we do not have information overload. We can define the names of positions and departments by their identifiers using the values in the reference tables:
SELECT e.ID,e.Name,p.Name PositionName,d.Name DepartmentName FROM Employees e LEFT JOIN Departments d ON d.ID=e.DepartmentID LEFT JOIN Positions p ON p.ID=e.PositionID
| ID | Name | PositionName | DepartmentName |
| 1000 | John | CEO | Administration |
| 1001 | Daniel | Programmer | IT |
| 1002 | Mike | Accountant | Accounts dept |
| 1003 | Jordan | Senior programmer | IT |
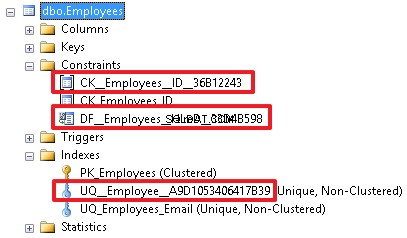
In the object inspector, we can see all the objects created for this table. Here we can also manipulate these objects in different ways, for example, rename or delete the objects.
In addition, it should be noted that it is possible to create a recursive reference.
Let’s consider this particular example.
Let’s add the ManagerID field to the table with employees. This new field will define an employee to whom this employee is subordinated.
ALTER TABLE Employees ADD ManagerID int
This field permits the NULL value as well.
Now, we will create a FOREIGN KEY for the Employees table:
ALTER TABLE Employees ADD CONSTRAINT FK_Employees_ManagerID FOREIGN KEY (ManagerID) REFERENCES Employees(ID)
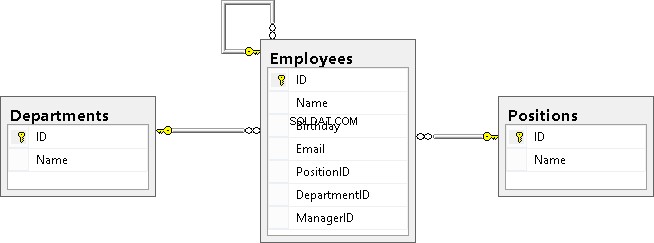
Then create a diagram and check how our tables are linked:
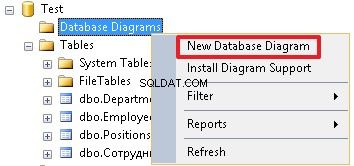
As you can see, the Employees table is linked with the Positions and Departments tables and is a recursive reference.
Finally, I would like to note that reference keys can include additional properties such as ON DELETE CASCADE and ON UPDATE CASCADE. They define the behavior when deleting or updating a record that is referenced from the reference table. If these properties are not specified, then we cannot change the ID of the record in the reference table referenced from the other table. Also, we cannot delete this record from the reference table until we remove all the rows that refer to this record or update the references to another value in these rows.
For example, let’s re-create the table and specify the ON DELETE CASCADE property for FK_Employees_DepartmentID:
DROP TABLE Employees CREATE TABLE Employees( ID int NOT NULL, Name nvarchar(30), Birthday date, Email nvarchar(30), PositionID int, DepartmentID int, ManagerID int, CONSTRAINT PK_Employees PRIMARY KEY (ID), CONSTRAINT FK_Employees_DepartmentID FOREIGN KEY(DepartmentID) REFERENCES Departments(ID) ON DELETE CASCADE, CONSTRAINT FK_Employees_PositionID FOREIGN KEY(PositionID) REFERENCES Positions(ID), CONSTRAINT FK_Employees_ManagerID FOREIGN KEY (ManagerID) REFERENCES Employees(ID) ) INSERT Employees (ID,Name,Birthday,PositionID,DepartmentID,ManagerID)VALUES (1000,N'John','19550219',2,1,NULL), (1001,N'Daniel','19831203',3,3,1003), (1002,N'Mike','19760607',1,2,1000), (1003,N'Jordan','19820417',4,3,1000)
Let’s delete the department with identifier ‘3’ from the Departments table:
DELETE Departments WHERE ID=3
Let’s view the data in table Employees:
SELECT * FROM Employees
| ID | Name | Birthday | PositionID | DepartmentID | ManagerID | |
| 1000 | John | 1955-02-19 | NULL | 2 | 1 | NULL |
| 1002 | Mike | 1976-06-07 | NULL | 1 | 2 | 1000 |
As you can see, data of Department ‘3’ has been deleted from the Employees table as well.
The ON UPDATE CASCADE property has similar behavior, but it works when updating the ID value in the reference table. For example, if we change the position ID in the Positions reference table, then DepartmentID in the Employees table will receive a new value, which we have specified in the reference table. But in this case this cannot be demonstrated, because the ID column in the Departments table has the IDENTITY property, which will not allow us to execute the following query (change the department identifier from 3 to 30):
UPDATE Departments SET ID=30 WHERE ID=3
The main point is to understand the essence of these 2 options ON DELETE CASCADE and ON UPDATE CASCADE. I apply these options very rarely, and I recommend that you think carefully before you specify them in the reference constraint, because If an entry is accidentally deleted from the reference table, this can lead to big problems and create a chain reaction.
Let’s restore department ‘3’:
-- we permit to add or modify the IDENTITY value
SET IDENTITY_INSERT Departments ON
INSERT Departments(ID,Name) VALUES(3,N'IT')
-- we prohibit to add or modify the IDENTITY value
SET IDENTITY_INSERT Departments OFF
We completely clear the Employees table using the TRUNCATE TABLE command:
TRUNCATE TABLE Employees
Again, we will add data using the INSERT command:
INSERT Employees (ID,Name,Birthday,PositionID,DepartmentID,ManagerID)VALUES (1000,N'John','19550219',2,1,NULL),
(1001,N'Daniel','19831203',3,3,1003),
(1002,N'Mike','19760607',1,2,1000),
(1003,N'Jordan','19820417',4,3,1000)
Summary:
We have described the following DDL commands:
• Adding the IDENTITY property to a field allows to make this field automatically populated (count field) for the table;
• ALTER TABLE table_name ADD field_list with_features – allows you to add new fields to the table;
• ALTER TABLE table_name DROP COLUMN field_list – allows you to delete fields from the table;
• ALTER TABLE table_name ADD CONSTRAINT constraint_name FOREIGN KEY (fields) REFERENCES reference_table – allows you to determine the relationship between a table and a reference table.
Other constraints – UNIQUE, DEFAULT, CHECK
Using the UNIQUE constraint, you can say that the values for each row in a given field or in a set of fields must be unique. In the case of the Employees table, we can apply this restriction to the Email field. Let’s first fill the Email values, if they are not yet defined:
UPDATE Employees SET Email='example@sqldat.com' WHERE ID=1000 UPDATE Employees SET Email='example@sqldat.com' WHERE ID=1001 UPDATE Employees SET Email='example@sqldat.com' WHERE ID=1002 UPDATE Employees SET Email='example@sqldat.com' WHERE ID=1003
Now, you can impose the UNIQUE constraint on this field:
ALTER TABLE Employees ADD CONSTRAINT UQ_Employees_Email UNIQUE(Email)
Thus, a user will not be able to enter the same email for several employees.
The UNIQUE constraint has the following structure:the «UQ» prefix followed by the table name and a field name (after the underscore), to which the restriction applies.
When you need to add the UNIQUE constraint for the set of fields, we will list them separated by commas:
ALTER TABLE table_name ADD CONSTRAINT constraint_name UNIQUE(field1,field2,…)
By adding a DEFAULT constraint to a field, we can specify a default value that will be inserted if, when inserting a new record, this field is not listed in the list of fields in the INSERT command. You can set this restriction when creating a table.
Let’s add the HireDate field to the Employees table and set the current date as a default value:
ALTER TABLE Employees ADD HireDate date NOT NULL DEFAULT SYSDATETIME()
If the HireDate column already exists, then we can use the following syntax:
ALTER TABLE Employees ADD DEFAULT SYSDATETIME() FOR HireDate
To specify the default value, execute the following command:
ALTER TABLE Employees ADD CONSTRAINT DF_Employees_HireDate DEFAULT SYSDATETIME() FOR HireDate
As there was no such column before, then when adding it, the current date will be inserted into each entry of the HireDate field.
When creating a new record, the current date will be also automatically added, unless we explicitly specify it, i.e. specify in the list of columns. Let’s demonstrate this with an example, where we will not specify the HireDate field in the list of the values added:
INSERT Employees(ID,Name,Email)VALUES(1004,N'Ostin',' example@sqldat.com')
To check the result, run the command:
SELECT * FROM Employees
| ID | Name | Birthday | PositionID | DepartmentID | ManagerID | HireDate | |
| 1000 | John | 1955-02-19 | example@sqldat.com | 2 | 1 | NULL | 2015-04-08 |
| 1001 | Daniel | 1983-12-03 | example@sqldat.com | 3 | 4 | 1003 | 2015-04-08 |
| 1002 | Mike | 1976-06-07 | example@sqldat.com | 1 | 2 | 1000 | 2015-04-08 |
| 1003 | Jordan | 1982-04-17 | example@sqldat.com | 4 | 3 | 1000 | 2015-04-08 |
| 1004 | Ostin | NULL | example@sqldat.com | NULL | NULL | NULL | 2015-04-08 |
The CHECK constraint is used when it is necessary to check the values being inserted in the fields. For example, let’s impose this constraint on the identification number field, which is an employee ID (ID). Let’s limit the identification numbers to be in the range from 1000 to 1999:
ALTER TABLE Employees ADD CONSTRAINT CK_Employees_ID CHECK(ID BETWEEN 1000 AND 1999)
The constraint name is usually as follows:the «CK_» prefix first followed by the table name and a field name, for which constraint is imposed.
Let’s add an invalid record to check if the constraint is working properly (we will get the corresponding error):
INSERT Employees(ID,Email) VALUES(2000,'example@sqldat.com')
Now, let’s change the value being inserted to 1500 and make sure that the record is inserted:
INSERT Employees(ID,Email) VALUES(1500,'example@sqldat.com')
We can also create UNIQUE and CHECK constraints without specifying a name:
ALTER TABLE Employees ADD UNIQUE(Email)
ALTER TABLE Employees ADD CHECK(ID BETWEEN 1000 AND 1999)
Still, this is a bad practice and it is desirable to explicitly specify the constraint name so that users can see what each object defines:
A good name gives us more information about the constraint. And, accordingly, all these restrictions can be specified when creating a table, if it does not exist yet.
Let’s delete the table:
DROP TABLE Employees
Let’s re-create the table with all the specified constraints using the CREATE TABLE command:
CREATE TABLE Employees( ID int NOT NULL, Name nvarchar(30), Birthday date, Email nvarchar(30), PositionID int, DepartmentID int, HireDate date NOT NULL DEFAULT SYSDATETIME(),
-- I have an exception for DEFAULT
CONSTRAINT PK_Employees PRIMARY KEY (ID), CONSTRAINT FK_Employees_DepartmentID FOREIGN KEY(DepartmentID) REFERENCES Departments(ID), CONSTRAINT FK_Employees_PositionID FOREIGN KEY(PositionID) REFERENCES Positions(ID), CONSTRAINT UQ_Employees_Email UNIQUE (Email), CONSTRAINT CK_Employees_ID CHECK (ID BETWEEN 1000 AND 1999) )
Finally, let’s insert our employees in the table:
INSERT Employees (ID,Name,Birthday,Email,PositionID,DepartmentID)VALUES
(1000,N'John','19550219',' example@sqldat.com ',2,1),
(1001,N'Daniel','19831203',' example@sqldat.com ',3,3),
(1002,N'Mike','19760607',' example@sqldat.com ',1,2),
(1003,N'Jordan','19820417',' example@sqldat.com',4,3)
Some words about the indexes created with the PRIMARY KEY and UNIQUE constraints
When creating the PRIMARY KEY and UNIQUE constraints, the indexes with the same names (PK_Employees and UQ_Employees_Email) are automatically created. By default, the index for the primary key is defined as CLUSTERED, and for other indexes, it is set as NONCLUSTERED.
It should be noted that the clustered index is not used in all DBMSs. A table can have only one clustered (CLUSTERED) index. It means that the records of the table will be ordered by this index. In addition, we can say that this index has direct access to all the data in the table. This is the main index of the table. A clustered index can help with the optimization of queries. If we want to set the clustered index for another index, then when creating the primary key, we should specify the NONCLUSTERED property:
ALTER TABLE table_name ADD CONSTRAINT constraint_name PRIMARY KEY NONCLUSTERED(field1,field2,…)
Let’s specify the PK_Employees constraint index as nonclustered, while the UQ_Employees_Email constraint index – as clustered. At first, delete these constraints:
ALTER TABLE Employees DROP CONSTRAINT PK_Employees ALTER TABLE Employees DROP CONSTRAINT UQ_Employees_Email
Now, create them with the CLUSTERED and NONCLUSTERED indexes:
ALTER TABLE Employees ADD CONSTRAINT PK_Employees PRIMARY KEY NONCLUSTERED (ID) ALTER TABLE Employees ADD CONSTRAINT UQ_Employees_Email UNIQUE CLUSTERED (Email)
Once it is done, you can see that records have been sorted by the UQ_Employees_Email clustered index:
SELECT * FROM Employees
| ID | Name | Birthday | PositionID | DepartmentID | HireDate | |
| 1003 | Jordan | 1982-04-17 | example@sqldat.com | 4 | 3 | 2015-04-08 |
| 1000 | John | 1955-02-19 | example@sqldat.com | 2 | 1 | 2015-04-08 |
| 1001 | Daniel | 1983-12-03 | example@sqldat.com | 3 | 3 | 2015-04-08 |
| 1002 | Mike | 1976-06-07 | example@sqldat.com | 1 | 2 | 2015-04-08 |
For reference tables, it is better when a clustered index is built on the primary key, as in queries we often refer to the identifier of the reference table to obtain a name (Position, Department). The clustered index has direct access to the rows of the table, and hence it follows that we can get the value of any column without additional overhead.
It is recommended that the clustered index should be applied to the fields that you use for selection very often.
Sometimes in tables, a key is created by the stubbed field. In this case, it is a good idea to specify the CLUSTERED index for an appropriate index and specify the NONCLUSTERED index when creating the stubbed field.
Summary:
We have analyzed all the constraint types that are created with the «ALTER TABLE table_name ADD CONSTRAINT constraint_name …» command:
- PRIMARY KEY;
- FOREIGN KEY controls links and data referential integrity;
- UNIQUE – serves for setting a unique value;
- CHECK – allows monitoring the correctness of added data;
- DEFAULT – allows specifying a default value;
- The «ALTER TABLE table_name DROP CONSTRAINT constraint_name» command allows deleting all the constraints.
Additionally, we have reviewed the indexes:CLUSTERED and UNCLUSTERED.
Creating unique indexes
I am going to analyze indexes created not for the PRIMARY KEY or UNIQUE constraints.
It is possible to set indexes by a field or a set of fields using the following command:
CREATE INDEX IDX_Employees_Name ON Employees(Name)
Also, you can add the CLUSTERED, NONCLUSTERED, and UNIQUE properties as well as specify the order:ASC (by default) or DESC.
CREATE UNIQUE NONCLUSTERED INDEX UQ_Employees_EmailDesc ON Employees(Email DESC)
When creating the nonclustered index, the NONCLUSTERED property can be dropped as it is set by default.
To delete the index, use the command:
DROP INDEX IDX_Employees_Name ON Employees
You can create simple indexes and constraints with the CREATE TABLE command.
At first, delete the table:
DROP TABLE Employees
Then, create the table with all the constraints and indexes using the CREATE TABLE command:
CREATE TABLE Employees( ID int NOT NULL, Name nvarchar(30), Birthday date, Email nvarchar(30), PositionID int, DepartmentID int, HireDate date NOT NULL CONSTRAINT DF_Employees_HireDate DEFAULT SYSDATETIME(), ManagerID int, CONSTRAINT PK_Employees PRIMARY KEY (ID), CONSTRAINT FK_Employees_DepartmentID FOREIGN KEY(DepartmentID) REFERENCES Departments(ID), CONSTRAINT FK_Employees_PositionID FOREIGN KEY(PositionID) REFERENCES Positions(ID), CONSTRAINT FK_Employees_ManagerID FOREIGN KEY (ManagerID) REFERENCES Employees(ID), CONSTRAINT UQ_Employees_Email UNIQUE(Email), CONSTRAINT CK_Employees_ID CHECK(ID BETWEEN 1000 AND 1999), INDEX IDX_Employees_Name(Name) )
Finally, add information about our employees:
INSERT Employees (ID,Name,Birthday,Email,PositionID,DepartmentID,ManagerID)VALUES (1000,N'John','19550219',' example@sqldat.com ',2,1,NULL),
(1001,N'Daniel','19831203',' example@sqldat.com ',3,3,1003),
(1002,N'Mike','19760607',' example@sqldat.com ',1,2,1000),
(1003,N'Jordan','19820417',' example@sqldat.com',4,3,1000)
Keep in mind that it is possible to add values with the INCLUDE command in the nonclustered index. Thus, in this case, the INCLUDE index is a clustered index where the necessary values are linked to the index, rather than to the table. These indexes can improve the SELECT query performance if there are all the required fields in the index. However, it may lead to increasing the index size, as field values are duplicated in the index.
Abstract from MSDN. Here is how the syntax of the command to create indexes looks:
CREATE [ UNIQUE ] [ CLUSTERED | NONCLUSTERED ] INDEX index_name ON <object> ( column [ ASC | DESC ] [ ,...n ] ) [ INCLUDE ( column_name [ ,...n ] ) ]
Riepilogo
Indexes can simultaneously improve the SELECT query performance and lead to poor speed for modifying table data. This happens, as you need to rebuild all the indexes for a particular table after each system modification.
The strategy on creating indexes may depend on many factors such as frequency of data modifications in the table.
Conclusion
As you can see, the DDL language is not as difficult as it may seem. I have provided almost all the main constructions. I wish you good luck with studying the SQL language.