Se segui le persone Oracle giuste, probabilmente sai già che Oracle ha appena rilasciato Oracle Linux Automation Manager:
Il tuo motore di automazione #Ansible potrebbe essere già presente, incluso nel tuo abbonamento a Oracle Linux... https://t.co/RPZw37yOvs pic.twitter.com/aQZInFcUsv
— Ludovico Caldara (@ludodba) 6 settembre 2021La mia comprensione era che l'accesso richiedeva l'accesso ULN, quindi non c'era modo di avviare una macchina virtuale veloce a casa e provarla... ma mi sbagliavo.
Come confermato da Ludovico, c'è l'accesso pubblico:
Potrei aver parlato troppo presto, sembra che sia disponibile anche un repository pubblico:https://t.co/XxZhs9oFDi
— Ludovico Caldara (@ludodba) 7 settembre 2021
Ho pensato di mantenerlo semplice per ora, quindi ho appena creato una VM con Vagrant e confermo che puoi testarla da casa da quel repository pubblico.
Innanzitutto, aggiungi e abilita il repository pubblico di Automation al tuo sistema:
[root@OracleAuto ~]# dnf config-manager --add-repo http://yum.oracle.com/repo/OracleLinux/OL8/automation/x86_64
Adding repo from: http://yum.oracle.com/repo/OracleLinux/OL8/automation/x86_64


[root@OracleAuto ~]#  dnf repolist
repo id                                                       repo name
ol8_UEKR6                                                     Latest Unbreakable Enterprise Kernel Release 6 for Oracle Linux 8 (x86_64)
ol8_appstream                                                 Oracle Linux 8 Application Stream (x86_64)
ol8_baseos_latest                                             Oracle Linux 8 BaseOS Latest (x86_64)
yum.oracle.com_repo_OracleLinux_OL8_automation_x86_64         created by dnf config-manager from http://yum.oracle.com/repo/OracleLinux/OL8/automation/x86_64
[root@OracleAuto ~]# dnf config-manager --set-enabled yum.oracle.com_repo_OracleLinux_OL8_automation_x86_64


[root@OracleAuto ~]# dnf update
created by dnf config-manager from http://yum.oracle.com/repo/OracleLinux/OL8/automation/x86_64                                      108 kB/s | 437 kB     00:04
Last metadata expiration check: 0:00:01 ago on Tue 07 Sep 2021 07:35:18 PM UTC.
Dependencies resolved.
=====================================================================================================================================================================
 Package                                     Architecture            Version                                                Repository                          Size
=====================================================================================================================================================================
Installing:
 kernel-uek                                  x86_64                  5.4.17-2102.204.4.4.el8uek                             ol8_UEKR6                           66 M
Upgrading:
 NetworkManager                              x86_64                  1:1.30.0-10.0.1.el8_4                                  ol8_baseos_latest                  2.6 M
 NetworkManager-libnm                        x86_64                  1:1.30.0-10.0.1.el8_4                                  ol8_baseos_latest                  1.8 M
 btrfs-progs                                 x86_64                  5.12.1-1.el8                                           ol8_UEKR6                          858 k
 dhcp-client                                 x86_64                  12:4.3.6-44.el8_4.1                                    ol8_baseos_latest                  318 k
 dhcp-common                                 noarch                  12:4.3.6-44.el8_4.1                                    ol8_baseos_latest                  207 k
 dhcp-libs                                   x86_64                  12:4.3.6-44.el8_4.1                                    ol8_baseos_latest                  148 k
 dmidecode                                   x86_64                  1:3.2-8.0.2.el8                                        ol8_baseos_latest                   92 k
[....]
  nvme-cli-1.12-4.el8_4.x86_64                               openldap-2.4.46-17.el8_4.x86_64                        oraclelinux-release-el8-1.0-19.el8.x86_64
  procps-ng-3.3.15-6.0.1.el8.x86_64                          python3-firewall-0.8.2-7.0.1.el8_4.noarch              python3-rpm-4.14.3-14.el8_4.x86_64
  rpm-4.14.3-14.el8_4.x86_64                                 rpm-build-libs-4.14.3-14.el8_4.x86_64                  rpm-libs-4.14.3-14.el8_4.x86_64
  rpm-plugin-selinux-4.14.3-14.el8_4.x86_64                  rpm-plugin-systemd-inhibit-4.14.3-14.el8_4.x86_64      rsyslog-8.1911.0-7.0.1.el8_4.2.x86_64
  selinux-policy-3.14.3-67.0.6.el8_4.1.noarch                selinux-policy-targeted-3.14.3-67.0.6.el8_4.1.noarch   systemd-239-45.0.2.el8_4.3.x86_64
  systemd-libs-239-45.0.2.el8_4.3.x86_64                     systemd-pam-239-45.0.2.el8_4.3.x86_64                  systemd-udev-239-45.0.2.el8_4.3.x86_64
  virt-what-1.18-9.el8_4.x86_64
Installed:
  kernel-uek-5.4.17-2102.204.4.4.el8uek.x86_64

Complete!
[root@OracleAuto ~]#
Dopo aver aggiornato il sistema, possiamo cercare il pacchetto di gestione dell'automazione
[root@OracleAuto ~]# dnf search automation-manager
Last metadata expiration check: 0:07:57 ago on Tue 07 Sep 2021 07:35:18 PM UTC.
================================================================= Name Matched: automation-manager ==================================================================
ol-automation-manager.src : Oracle Linux Automation Manager, based on AWX, provides a web-based user interface, REST API, and task engine built on top of Ansible.
ol-automation-manager.x86_64 : Oracle Linux Automation Manager, based on AWX, provides a web-based user interface, REST API, and task engine built on top of Ansible.
oraclelinux-automation-manager-release-el8.src : Oracle Linux Automation Manager yum repository configuration
oraclelinux-automation-manager-release-el8.x86_64 : Oracle Linux Automation Manager yum repository configuration
[root@OracleAuto ~]#
L'installazione del pacchetto di automazione è abbastanza semplice (per una configurazione di default/test, ovviamente) e puoi vedere un esempio qui sotto copiato dalla documentazione di Oracle:
Installazione di Oracle Linux Automation Manager
[root@OracleAuto ~]# dnf install ol-automation-manager
Last metadata expiration check: 0:09:39 ago on Tue 07 Sep 2021 07:35:18 PM UTC.
Dependencies resolved.
=====================================================================================================================================================================
 Package                            Architecture Version                                           Repository                                                   Size
=====================================================================================================================================================================
Installing:
 ol-automation-manager              x86_64       1.0.0-1.el8                                       yum.oracle.com_repo_OracleLinux_OL8_automation_x86_64        67 M
Installing dependencies:
 aajohan-comfortaa-fonts            noarch       3.001-2.el8                                       ol8_baseos_latest                                           148 k
 ansible                            noarch       2.9.23-1.el8                                      yum.oracle.com_repo_OracleLinux_OL8_automation_x86_64        17 M
 bzip2                              x86_64       1.0.6-26.el8                                      ol8_baseos_latest                                            60 k
 checkpolicy                        x86_64       2.9-1.el8                                         ol8_baseos_latest                                           346 k
 emacs-filesystem                   noarch       1:26.1-5.el8                                      ol8_baseos_latest                                            69 k
 fontconfig                         x86_64       2.13.1-3.el8                                      ol8_baseos_latest                                           274 k
 fontpackages-filesystem            noarch       1.44-22.el8                                       ol8_baseos_latest                                            16 k
 gd                                 x86_64       2.2.5-7.el8                                       ol8_appstream                                               144 k
[...]

  redis-5.0.3-2.module+el8.0.0.z+5250+19ca22c8.x86_64                                   sos-4.0-11.0.1.el8.noarch
  sshpass-1.06-9.el8.x86_64                                                             supervisor-4.2.2-1.el8.noarch
  uwsgi-2.0.18-4.0.1.el8.x86_64                                                         xmlsec1-1.2.25-4.el8.x86_64
  xmlsec1-openssl-1.2.25-4.el8.x86_64

Complete!
[root@OracleAuto ~]#
Successivamente, è necessario configurare la configurazione utilizzando l'utente AWX.
Ancora una volta, solo seguendo l'esempio della documentazione:
[root@OracleAuto ~]# cat /etc/redis.conf
[...]
unixsocket /var/run/redis/redis.sock
unixsocketperm 775

[root@OracleAuto ~]# /var/lib/ol-automation-manager/ol-automation-manager-DB-init.sh
 * Initializing database in '/var/lib/pgsql/data'
 * Initialized, logs are in /var/lib/pgsql/initdb_postgresql.log
Database pre-setup is completed
[root@OracleAuto ~]#

[root@OracleAuto ~]# su -l awx -s /bin/bash


[awx@OracleAuto ~]$ awx-manage migrate
Operations to perform:
  Apply all migrations: auth, conf, contenttypes, main, oauth2_provider, sessions, sites, social_django, sso, taggit
Running migrations:
  Applying contenttypes.0001_initial... OK
  Applying contenttypes.0002_remove_content_type_name... OK
  Applying taggit.0001_initial... OK
  Applying taggit.0002_auto_20150616_2121... OK
  Applying auth.0001_initial... OK
  Applying main.0001_initial... OK
  Applying main.0002_squashed_v300_release... OK
  Applying main.0003_squashed_v300_v303_updates... OK
  Applying main.0004_squashed_v310_release... OK
  Applying conf.0001_initial... OK
  Applying conf.0002_v310_copy_tower_settings... OK
  Applying main.0005_squashed_v310_v313_updates... OK
  Applying main.0006_v320_release... OK
  Applying main.0007_v320_data_migrations... OK
  Applying main.0008_v320_drop_v1_credential_fields... OK
  Applying main.0009_v322_add_setting_field_for_activity_stream... OK
[....]

  Applying social_django.0002_add_related_name... OK
  Applying social_django.0003_alter_email_max_length... OK
  Applying social_django.0004_auto_20160423_0400... OK
  Applying social_django.0005_auto_20160727_2333... OK
  Applying social_django.0006_partial... OK
  Applying social_django.0007_code_timestamp... OK
  Applying social_django.0008_partial_timestamp... OK
  Applying sso.0001_initial... OK
  Applying sso.0002_expand_provider_options... OK
  Applying taggit.0003_taggeditem_add_unique_index... OK
Creiamo ora l'utente di gestione e assicuriamoci di aver impostato il nome host/l'indirizzo IP corretto per il "Provisioning dell'istanza AWX"
[awx@OracleAuto ~]$ awx-manage createsuperuser --username admin
Email address: [email protected]
Password:
Password (again):
Superuser created successfully.
[awx@OracleAuto ~]$


[awx@OracleAuto ~]$ awx-manage create_preload_data
Default organization added.
Demo Credential, Inventory, and Job Template added.
(changed: True)
[awx@OracleAuto ~]$ awx-manage provision_instance --hostname=OracleAuto
Successfully registered instance OracleAuto
(changed: True)
[awx@OracleAuto ~]$ awx-manage register_queue --queuename=tower --hostnames=OracleAuto
Creating instance group tower
Added instance OracleAuto to tower
(changed: True)
[awx@OracleAuto ~]$
[awx@OracleAuto ~]$ exit
logout
Una volta completato, è necessario configurare il server HTTP.
Poiché questo è solo un test, puoi semplicemente creare un certificato SSL per evitare problemi di accesso alla tua interfaccia di gestione (per favore, non farlo sul tuo sistema di produzione :))
[root@OracleAuto ~]# openssl req -x509 -nodes -days 365 -newkey rsa:2048 -keyout /etc/tower/tower.key -out /etc/tower/tower.crt
Generating a RSA private key
......+++++
.+++++
writing new private key to '/etc/tower/tower.key'
-----
You are about to be asked to enter information that will be incorporated
into your certificate request.
What you are about to enter is what is called a Distinguished Name or a DN.
There are quite a few fields but you can leave some blank
For some fields there will be a default value,
If you enter '.', the field will be left blank.
-----
Country Name (2 letter code) [XX]:
State or Province Name (full name) []:
Locality Name (eg, city) [Default City]:
Organization Name (eg, company) [Default Company Ltd]:
Organizational Unit Name (eg, section) []:
Common Name (eg, your name or your server's hostname) []:
Email Address []:
[root@OracleAuto ~]#
Sono sicuro che puoi cambiare il server web con il tuo preferito, ma per ora configureremo il server nginx che è quello predefinito.
Qui, abbiamo appena eseguito un backup della configurazione predefinita e copiato la configurazione predefinita dalla documentazione:
[root@OracleAuto ~]# mv /etc/nginx/nginx.conf /etc/nginx/nginx.conf.bk
[root@OracleAuto ~]# nano /etc/nginx/nginx.conf

[root@OracleAuto ~]# cat /etc/nginx/nginx.conf
user nginx;
worker_processes auto;
error_log /var/log/nginx/error.log;
pid /run/nginx.pid;

# Load dynamic modules. See /usr/share/doc/nginx/README.dynamic.
include /usr/share/nginx/modules/*.conf;

events {
    worker_connections 1024;
}

http {
    log_format  main  '$remote_addr - $remote_user [$time_local] "$request" '
                      '$status $body_bytes_sent "$http_referer" '
                      '"$http_user_agent" "$http_x_forwarded_for"';

    access_log  /var/log/nginx/access.log  main;

    sendfile            on;
    tcp_nopush          on;
    tcp_nodelay         on;
    keepalive_timeout   65;
    types_hash_max_size 2048;

    include             /etc/nginx/mime.types;
    default_type        application/octet-stream;

    # Load modular configuration files from the /etc/nginx/conf.d directory.
    # See http://nginx.org/en/docs/ngx_core_module.html#include
    # for more information.
    include /etc/nginx/conf.d/*.conf;
}
[root@OracleAuto ~]#
Ultimi passaggi, basta modificare alcune informazioni sul file di impostazione della torre (basta aggiungere il tuo nome host/IP in CLUSTER_HOST_ID) e abilitare/avviare Oracle Automation Manager Service con Systemd
[root@OracleAuto ~]# grep -i CLUSTER_HOST_ID /etc/tower/settings.py
CLUSTER_HOST_ID = "OracleAuto"
[root@OracleAuto ~]#

[root@OracleAuto ~]# systemctl enable --now ol-automation-manager.service
Created symlink /etc/systemd/system/multi-user.target.wants/ol-automation-manager.service → /usr/lib/systemd/system/ol-automation-manager.service.
[root@OracleAuto ~]#
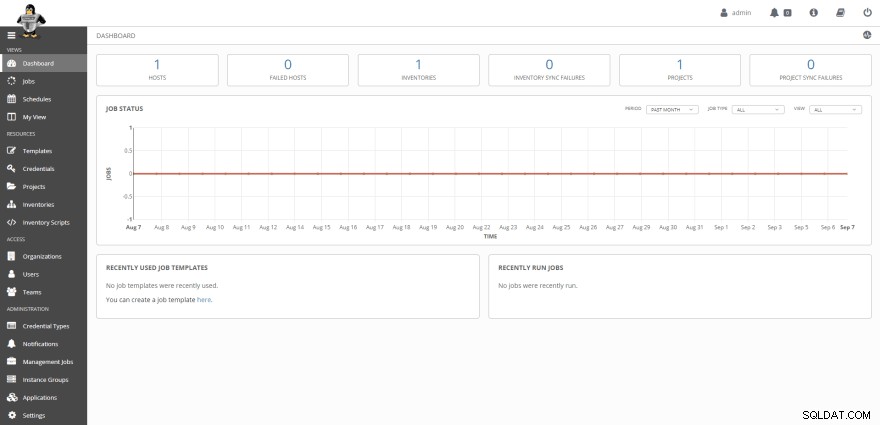
E voilà! ora puoi iniziare a gestire i tuoi playbook ansible direttamente dall'interfaccia Oracle Automation Manager


Ho davvero bisogno di approfondire Ansible e Automation, quindi questo potrebbe essere un buon modo per iniziare a utilizzare Oracle Automation Manager :)


