Di recente abbiamo annunciato il rilascio di ClusterControl 1.7.3 che include una serie di miglioramenti e nuove funzionalità aggiunte. Una di queste nuove funzionalità è l'aggiunta del supporto in ClusterControl per consentire a un utente di configurare e gestire più istanze PostgreSQL sullo stesso host. Questa nuova funzionalità è ciò di cui parleremo nel nostro blog di seguito, inclusi i motivi per cui questo tipo di configurazione può aiutarti a risparmiare risorse e fornisce istruzioni dettagliate su come ottenere questo tipo di installazione in ClusterControl.
Perché avresti bisogno di un'installazione PostgreSQL multipla su un singolo host?
Con il rapido sviluppo e il miglioramento odierno delle tecnologie dall'hardware al software, l'ambito dei requisiti è diventato più adattabile, flessibile e scalabile. Alcune organizzazioni preferiscono persino sfruttare lo stack tecnologico poiché ridimensionarlo è più semplice. Inoltre, ci sono situazioni in cui potresti voler distribuire un server di database su un server potente e di fascia alta che contiene una grande CPU, molta memoria e dispositivi di archiviazione veloci, potenti e non volatili come SSD/Fusion IO /NVMe. Questo, tuttavia, a volte può essere uno spreco di risorse se stai cercando di eseguire le risorse condivise di un server di database (come usarlo come slave, una macchina di backup a caldo o anche come server di verifica del backup). In alcune configurazioni, potresti voler utilizzare le risorse disponibili nel tuo potente server sia come server di sviluppo che come server di controllo qualità per evitare costi hardware indesiderati (invece di acquistare una macchina dedicata o generare una nuova istanza di calcolo nel cloud).
Come configurare un'installazione multi-PostgreSQL
Per questo esempio creeremo un cluster con un'installazione multi-PostgreSQL insieme a istanze multi-PostgreSQL in esecuzione in un singolo host utilizzando ClusterControl.
Nota:a partire dalla versione corrente (es. ClusterControl 1.7.3), ClusterControl non consente di creare un cluster o inizializzare un cluster se si specificano informazioni master e slave con un PostgreSQL multi-versione installato o con un multi -istanze di PostgreSQL in esecuzione all'interno di un singolo host. Tuttavia, puoi importare un nodo con più versioni installate o più istanze di PostgreSQL in esecuzione in un singolo host.
Dettagli e informazioni sul server
Poiché al momento non possiamo avviare o creare un cluster quando è installata una versione multipla di PostgreSQL, importeremo un'istanza esistente o in esecuzione di PostgreSQL. Di seguito sono riportate le informazioni sul server.
IP: 192.168.30.10
Utente del sistema operativo: vagabondo
Tipo e versione del sistema operativo: Ubuntu 16.04.6 LTS (xenial)
e alcune informazioni dal mio /etc/postgresql/9.6/multi_pg/postgresql.conf,
data_directory = '/data/pgsql/master/data'
hba_file = '/etc/postgresql/9.6/multi_pg/pg_hba.conf'
ident_file = '/etc/postgresql/9.6/multi_pg/pg_ident.conf'
external_pid_file = '/var/run/postgresql/9.6-main.pid'
listen_addresses = '*'
port = 7654
max_connections = 100
shared_buffers = 511995kB
work_mem = 10239kB
maintenance_work_mem = 127998kB
dynamic_shared_memory_type = posix
wal_level = hot_standby
full_page_writes = on
wal_log_hints = on
checkpoint_completion_target = 0.9
max_wal_senders = 16
wal_keep_segments = 32
hot_standby = on
effective_cache_size = 1535985kB
logging_collector = on
log_timezone = 'Etc/UTC'
cluster_name = '9.6/multi_pg'
stats_temp_directory = '/var/run/postgresql/9.6-main.pg_stat_tmp'
datestyle = 'iso, mdy'
timezone = 'Etc/UTC'
lc_messages = 'en_US.UTF-8'
lc_monetary = 'en_US.UTF-8'
lc_numeric = 'en_US.UTF-8'
lc_time = 'en_US.UTF-8'
default_text_search_config = 'pg_catalog.english'
In cui una versione esistente è già stata installata:
example@sqldat.com:/home/vagrant# dpkg -l | grep 'object-relational'
ii  postgresql-11                     11.4-1.pgdg16.04+1                         amd64        object-relational SQL database, version 11 server
ii  postgresql-9.2                    9.2.24-1.pgdg16.04+1                       amd64        object-relational SQL database, version 9.2 server
ii  postgresql-9.6                    9.6.14-1.pgdg16.04+1                       amd64        object-relational SQL database, version 9.6 server
Inoltre, per questa configurazione, ci sono istanze aggiuntive in esecuzione...
example@sqldat.com:/data/pgsql/master# ps axufwww | grep 'postgre[s]'
postgres  1243  0.0  0.8 186064 17916 ?        S    15:59   0:00 /usr/lib/postgresql/9.2/bin/postgres -D /var/lib/postgresql/9.2/main -c config_file=/etc/postgresql/9.2/main/postgresql.conf
postgres  1285  0.0  0.1 186064  3860 ?        Ss   15:59   0:00  \_ postgres: checkpointer process
postgres  1286  0.0  0.2 186064  4620 ?        Ss   15:59   0:00  \_ postgres: writer process
postgres  1287  0.0  0.1 186064  3860 ?        Ss   15:59   0:00  \_ postgres: wal writer process
postgres  1288  0.0  0.2 186808  6008 ?        Ss   15:59   0:00  \_ postgres: autovacuum launcher process
postgres  1289  0.0  0.1 145808  3736 ?        Ss   15:59   0:00  \_ postgres: stats collector process
postgres  1246  0.0  1.2 309600 25884 ?        S    15:59   0:00 /usr/lib/postgresql/11/bin/postgres -D /var/lib/postgresql/11/main -c config_file=/etc/postgresql/11/main/postgresql.conf
postgres  1279  0.0  0.1 309600  4028 ?        Ss   15:59   0:00  \_ postgres: 11/main: checkpointer
postgres  1280  0.0  0.1 309600  4028 ?        Ss   15:59   0:00  \_ postgres: 11/main: background writer
postgres  1281  0.0  0.4 309600  9072 ?        Ss   15:59   0:00  \_ postgres: 11/main: walwriter
postgres  1282  0.0  0.3 310012  6496 ?        Ss   15:59   0:00  \_ postgres: 11/main: autovacuum launcher
postgres  1283  0.0  0.1 164516  3528 ?        Ss   15:59   0:00  \_ postgres: 11/main: stats collector
postgres  1284  0.0  0.3 309892  6596 ?        Ss   15:59   0:00  \_ postgres: 11/main: logical replication launcher
Per questo esempio useremo PostgreSQL 9.6.
Costruzione del cluster PostgreSQL Master-Slave
Per creare un cluster, è necessario configurare manualmente l'istanza PostgreSQL e quindi importare tale istanza in ClusterControl in un secondo momento. In alternativa, possiamo creare un cluster con un solo nodo master e lasciare che ClusterControl lo gestisca, ma per fare ciò dovremo arrestare tutti gli altri nodi in esecuzione. Questo non sarebbe l'ideale se operi su server di database PostgreSQL occupati.
Ora eseguiamo la configurazione manuale...
example@sqldat.com:/etc/postgresql/9.6/multi_pg# sudo -iu postgres /usr/lib/postgresql/9.6/bin/pg_ctl -D /data/pgsql/master/data initdb
The files belonging to this database system will be owned by user "postgres".
This user must also own the server process.

The database cluster will be initialized with locale "en_US.UTF-8".
The default database encoding has accordingly been set to "UTF8".
The default text search configuration will be set to "english".

Data page checksums are disabled.

creating directory /data/pgsql/master/data ... ok
creating subdirectories ... ok
selecting default max_connections ... 100
selecting default shared_buffers ... 128MB
selecting default timezone ... Etc/UTC
selecting dynamic shared memory implementation ... posix
creating configuration files ... ok
running bootstrap script ... ok
performing post-bootstrap initialization ... ok
syncing data to disk ... ok

WARNING: enabling "trust" authentication for local connections
You can change this by editing pg_hba.conf or using the option -A, or
--auth-local and --auth-host, the next time you run initdb.

Success. You can now start the database server using:

    /usr/lib/postgresql/9.6/bin/pg_ctl -D /data/pgsql/master/data -l logfile start
Quindi avvia il database eseguendo il comando seguente,
example@sqldat.com:/etc/postgresql/9.6/multi_pg# sudo -iu postgres /usr/lib/postgresql/9.6/bin/pg_ctl -D /data/pgsql/master/data  -o "-c config_file=/etc/postgresql/9.6/multi_pg/postgresql.conf" -l /var/log/postgresql/postgresql-9.6-master.log start
server starting
Ora, verifichiamo se l'istanza viene eseguita e utilizza la porta desiderata che abbiamo utilizzato:
example@sqldat.com:/etc/postgresql/9.6/multi_pg# netstat -ntlvp46|grep postgres
tcp        0      0 127.0.0.1:5432          0.0.0.0:*               LISTEN      1246/postgres
tcp        0      0 127.0.0.1:5433          0.0.0.0:*               LISTEN      1243/postgres
tcp        0      0 0.0.0.0:7654            0.0.0.0:*               LISTEN      18403/postgres
tcp6       0      0 :::7654                 :::*
Ora sembra corretto. Il pid di 18403 mostra che siamo in grado di eseguirlo e ha IPv4 e IPv6 aperti.
Ora importiamolo in ClusterControl. Vai a Distribuisci → Importa server/database esistente , per importare il nodo master desiderato è sufficiente configurare.
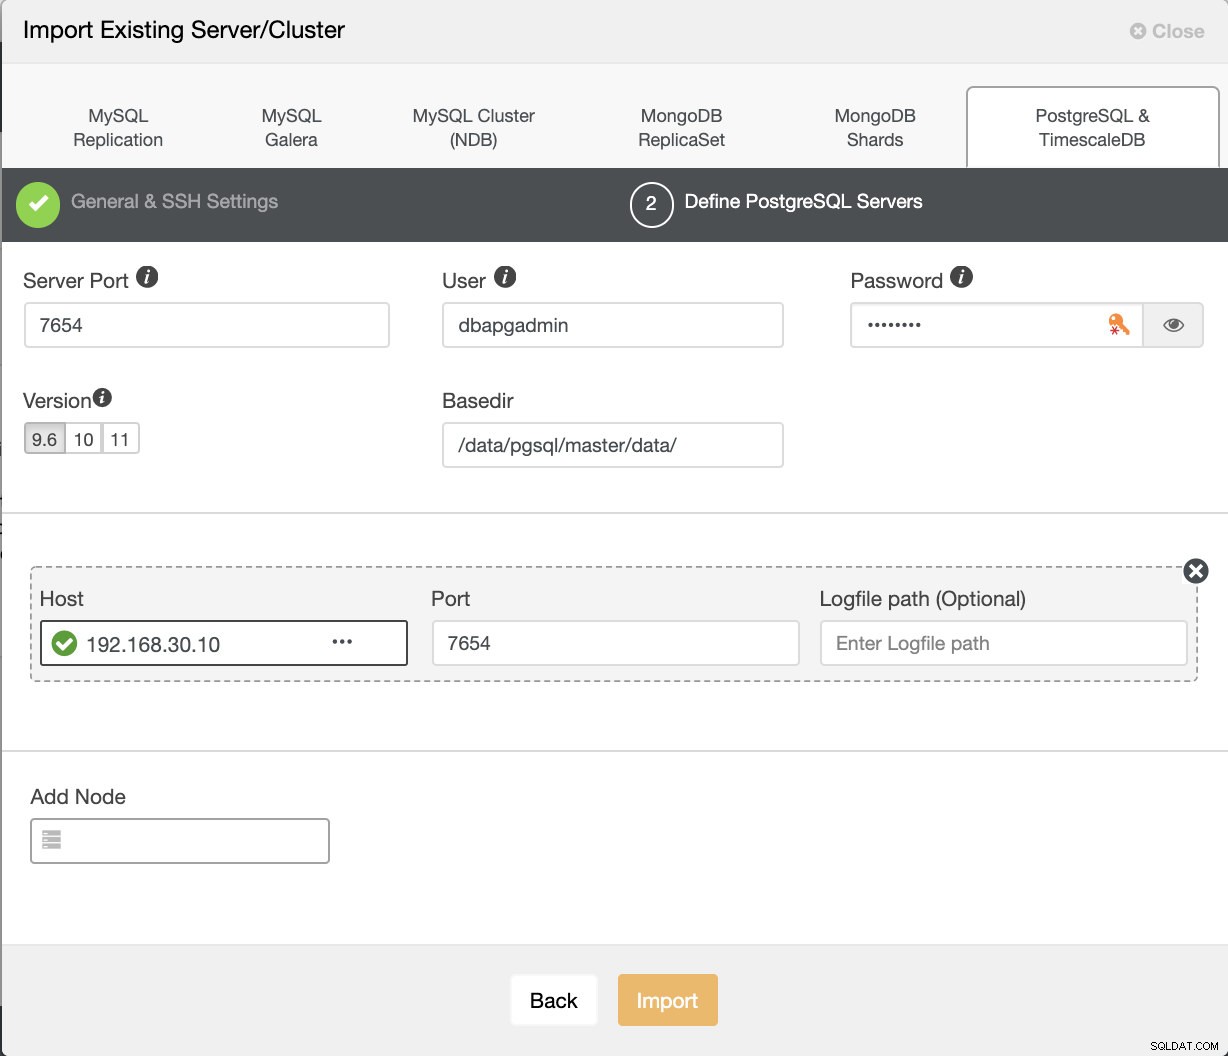
Dopo aver premuto il pulsante Importa, sarai in grado di avere un cluster con un nodo master proprio come di seguito:

Ora creiamo uno slave all'interno dello stesso host (cioè con IP 192.168.30.10).
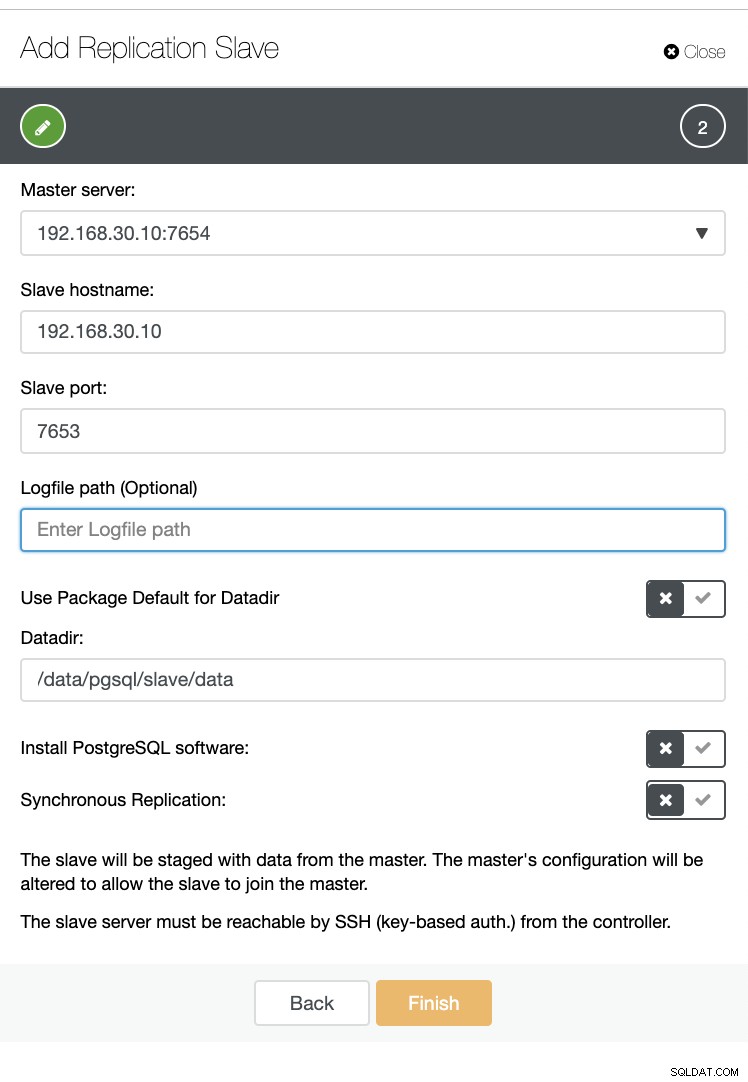
E non preoccuparti, ClusterControl lo gestirà per te come mostrato di seguito in un esempio di registro delle attività lavorative.
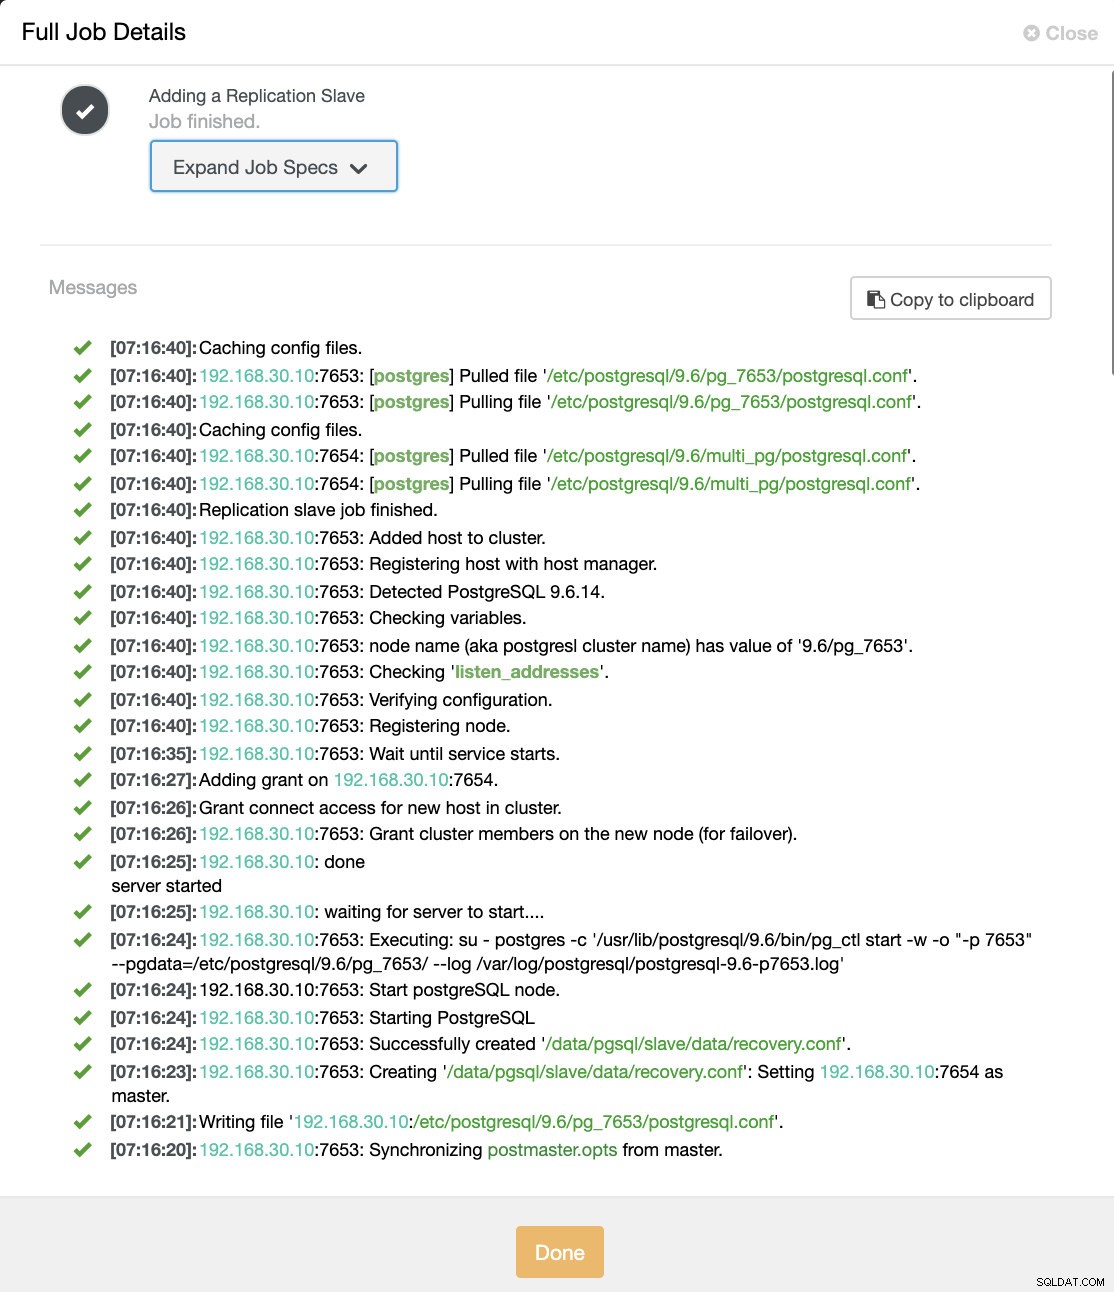
Puoi vedere che è stato impostato e installato correttamente. Tecnicamente, ClusterControl creerà una directory in /etc/postgresql/
Ora confermiamo con pg_lsclusters e verifica se l'istanza multi-PostgreSQL è in esecuzione in parallelo in un host. Vedi sotto:
example@sqldat.com:/var/log/postgresql# pg_lsclusters
Ver Cluster Port Status Owner Data directory Log file
9.2 main 5433 online postgres /var/lib/postgresql/9.2/main /var/log/postgresql/postgresql-9.2-main.log
9.6 multi_pg 7654 online postgres /data/pgsql/master/data /var/log/postgresql/postgresql-9.6-master.log
9.6 pg_7653 7653 online,recovery postgres /data/pgsql/slave/data pg_log/postgresql-%Y-%m-%d_%H%M%S.log
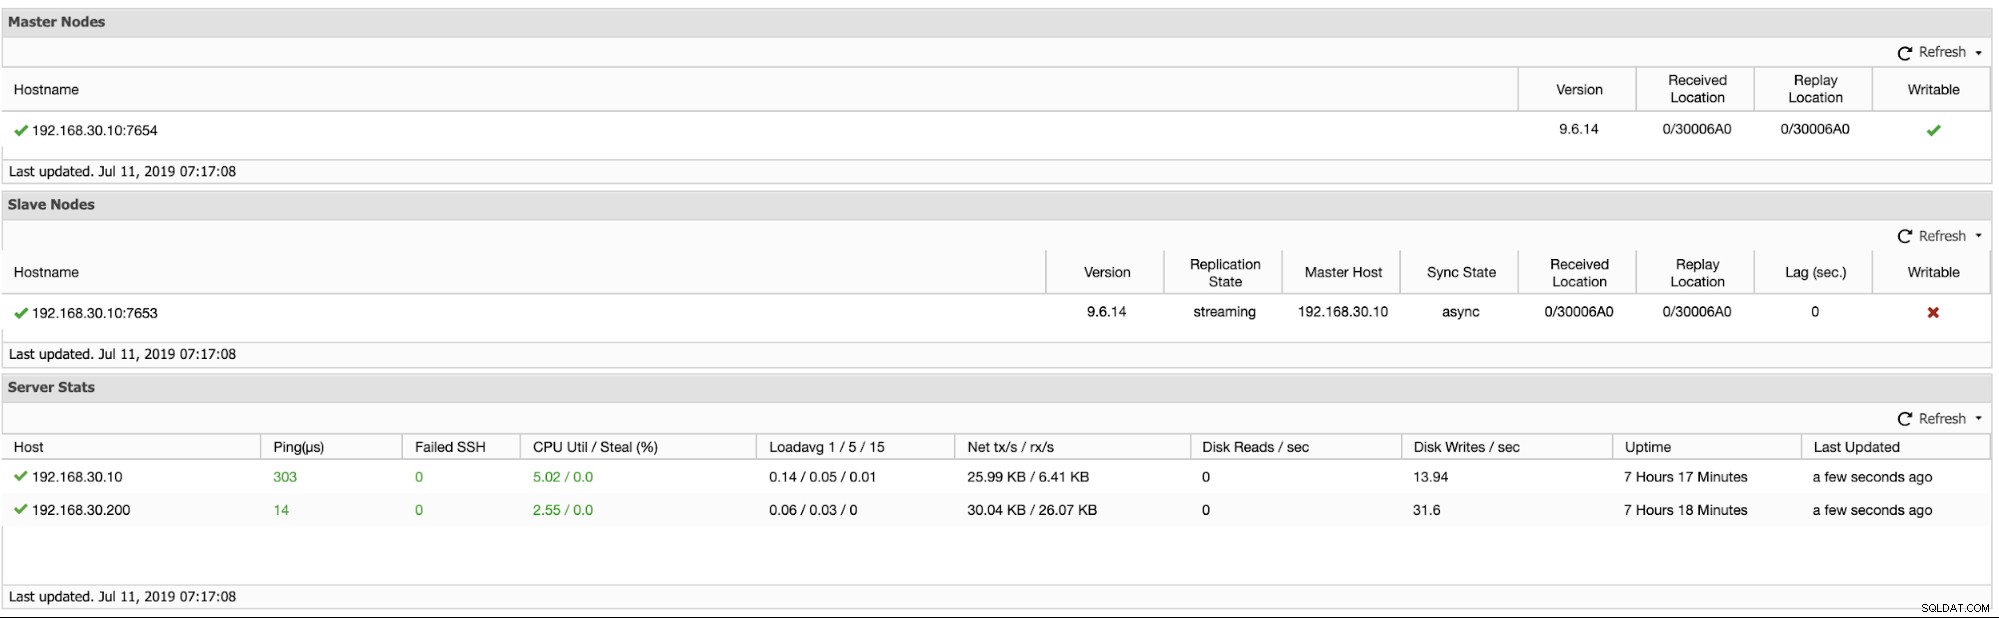
11 main 5432 online postgres /var/lib/postgresql/11/main /var/log/postgresql/postgresql-11-main.logOltre a questo, le metriche come per i cluster di Replica logica sono visualizzate di seguito:
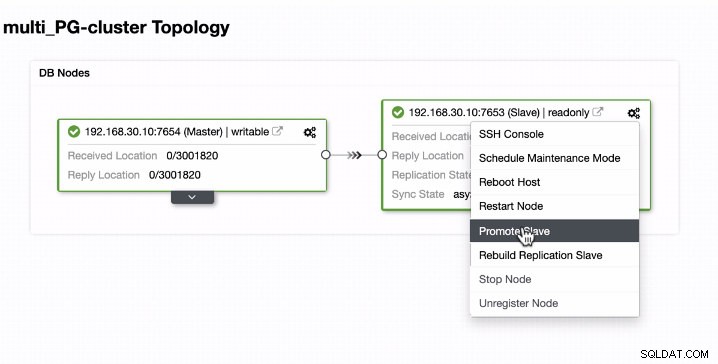
Promuovere lo slave in un'istanza in esecuzione multi-PostgreSQL in un host singolo
La promozione slave è facile per un multi-PostgreSQL che esegue istanze in un singolo host. Come puoi vedere di seguito, questo tipo di ambiente funziona perfettamente quando è gestito da ClusterControl.
Ora, vediamo cosa succede in background mentre ClusterControl promuove lo slave. Vedi le specifiche e i dettagli completi del lavoro
[09:01:02]:Successfully promoted a new master.
[09:01:02]:<em style='color: #1abc9c;'>192.168.30.10</em>:7653: promote finished (this is the new master).
[09:01:02]:Servers after promote:
<em style='color: #1abc9c;'>192.168.30.10</em>:7653:
• Role: master (slaves: 1)
• Status: CmonHostOnline (NODE_CONNECTED)
• Receive/replay: 0/30020C0; 0/30020C0
<em style='color: #1abc9c;'>192.168.30.10</em>:7654:
• Role: slave (slaves: 0)
• Status: CmonHostOnline (NODE_CONNECTED)
• Receive/replay: 0/30020C0; 0/30020C0
• Master: 192.168.30.10:7653
[09:01:02]:<em style='color: #1abc9c;'>192.168.30.10</em>:7654: Restarted with new master.
[09:01:02]:<em style='color: #1abc9c;'>192.168.30.10</em>:7654: Started PostgreSQL.
[09:00:53]:<em style='color: #1abc9c;'>192.168.30.10</em>: done
server started
[09:00:53]:<em style='color: #1abc9c;'>192.168.30.10</em>: waiting for server to start....
[09:00:52]:<em style='color: #1abc9c;'>192.168.30.10</em>:7654: Executing: su - postgres -c '/usr/lib/postgresql/9.6/bin/pg_ctl start -w -o "-p 7654" --pgdata=/etc/postgresql/9.6/multi_pg/ --log /var/log/postgresql/postgresql-11-main.log'
[09:00:51]:192.168.30.10:7654: Start postgreSQL node.
[09:00:51]:<em style='color: #1abc9c;'>192.168.30.10</em>:7654: Starting PostgreSQL.
[09:00:51]:<em style='color: #1abc9c;'>192.168.30.10</em>:7654: Successfully created '<em style='color: #109602;'>/data/pgsql/master/data/recovery.conf</em>'.
[09:00:50]:<em style='color: #1abc9c;'>192.168.30.10</em>:7654: Creating '<em style='color: #109602;'>/data/pgsql/master/data/recovery.conf</em>': Setting <em style='color: #1abc9c;'>192.168.30.10</em>:7653 as master.
[09:00:50]:<em style='color: #1abc9c;'>192.168.30.10</em>: servers diverged at WAL position 0/3001890 on timeline 1
no rewind required
[09:00:49]:Running /usr/lib/postgresql/9.6/bin/pg_rewind --target-pgdata=/data/pgsql/master/data --source-server="host=192.168.30.10 port=7653 user=dbapgadmin password=***** dbname=postgres"
[09:00:47]:<em style='color: #1abc9c;'>192.168.30.10</em>:7653: Granting host (<em style='color: #1abc9c;'>192.168.30.10</em>:7654).
[09:00:45]:<em style='color: #1abc9c;'>192.168.30.10</em>:7654: Stopped PostgreSQL.
[09:00:38]:<em style='color: #1abc9c;'>192.168.30.10</em>:7654: Waiting to stop.
[09:00:38]:192.168.30.10:7654: node is already stopped. No need to stop it.
[09:00:38]:192.168.30.10:7654: Stop postgreSQL node.
[09:00:38]:<em style='color: #1abc9c;'>192.168.30.10</em>:7654: Stopping PostgreSQL.
[09:00:38]:Switching slaves to the new master.
[09:00:38]:<em style='color: #1abc9c;'>192.168.30.10</em>:7653: Became master, ok.
[09:00:37]:<em style='color: #1abc9c;'>192.168.30.10</em>:7653: Waiting to become a master.
[09:00:37]:<em style='color: #1abc9c;'>192.168.30.10</em>: server promoting
[09:00:36]:<em style='color: #1abc9c;'>192.168.30.10</em>:7653: Attempting to promote using <strong style='color: #59a449;'>pg_ctl</strong>.
[09:00:36]:<em style='color: #1abc9c;'>192.168.30.10</em>:7653: Promoting host.
[09:00:35]:<em style='color: #1abc9c;'>192.168.30.10</em>:7654: Stopped PostgreSQL.
[09:00:28]:<em style='color: #1abc9c;'>192.168.30.10</em>:7654: Waiting to stop.
[09:00:28]:<em style='color: #1abc9c;'>192.168.30.10</em>: done
server stopped
[09:00:28]:<em style='color: #1abc9c;'>192.168.30.10</em>: waiting for server to shut down....
[09:00:27]:<em style='color: #1abc9c;'>192.168.30.10</em>:7654: Executing: su - postgres -c '/usr/lib/postgresql/9.6/bin/pg_ctl stop --pgdata=/etc/postgresql/9.6/multi_pg/'
[09:00:26]:192.168.30.10:7654: Stop postgreSQL node.
[09:00:26]:<em style='color: #1abc9c;'>192.168.30.10</em>:7654: Stopping PostgreSQL.
[09:00:26]:<em style='color: #1abc9c;'>192.168.30.10</em>:7654: Stopping the current master.
[09:00:26]:Switching over to <em style='color: #1abc9c;'>192.168.30.10</em>:7653 (previous master is <em style='color: #1abc9c;'>192.168.30.10</em>:7654)
[09:00:26]:Servers:
<em style='color: #1abc9c;'>192.168.30.10</em>:7653:
• Role: slave (slaves: 0)
• Status: CmonHostOnline (NODE_CONNECTED)
• Receive/replay: 0/3001820; 0/3001820
• Master: 192.168.30.10:7654
<em style='color: #1abc9c;'>192.168.30.10</em>:7654:
• Role: master (slaves: 1)
• Status: CmonHostOnline (NODE_CONNECTED)
• Receive/replay: 0/3001820; 0/3001820
[09:00:26]:<em style='color: #1abc9c;'>192.168.30.10</em>:7653: Current master is <em style='color: #1abc9c;'>192.168.30.10</em>:7654.
[09:00:26]:<em style='color: #1abc9c;'>192.168.30.10</em>:7653: Promoting server to master.
Job spec: {
"command": "promote_replication_slave",
"group_id": 1,
"group_name": "admins",
"job_data":
{
"clusterId": "6",
"slave_address": "192.168.30.10:7653"
},
"user_id": 1,
"user_name": "example@sqldat.com"
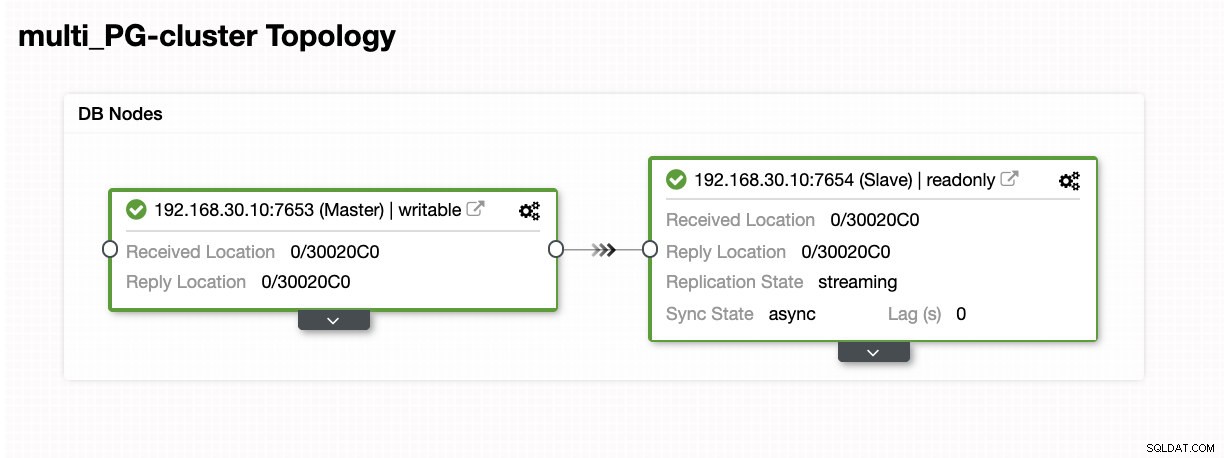
}Come vedi, è stato gestito senza problemi anche sullo stesso host. Il risultato della topologia mostra che è stata promossa con successo.
Conclusione
Siamo entusiasti del rilascio di ClusterControl 1.7.3 e pensiamo che abbia molto da offrire. Riteniamo inoltre che queste nuove istanze Multi-PostgreSQL in esecuzione sulla stessa funzionalità host siano un altro grande passo per migliorare il nostro supporto generale per PostgreSQL. Provalo e facci sapere quali sono le tue opinioni di seguito su questa nuova funzionalità.