Questo tutorial fornisce tutti i passaggi necessari per installare MySQL 8 su Ubuntu 18.04 LTS. Gli stessi passaggi potrebbero essere seguiti per altre versioni di Ubuntu.
Note :Per seguire questo post, devi rimuovere completamente l'installazione precedente del server MySQL installato utilizzando l'installer se è già installato sul sistema. Puoi seguire Come rimuovere completamente MySQL da Ubuntu per rimuovere completamente l'installazione precedente eseguita utilizzando il programma di installazione.
Potresti anche essere interessato ad altri tutorial specifici di MySQL, tra cui Come installare MySQL 8 su
Fase 1 - Scarica MySQL APT Repository
Da MySQL 8 non è incluso nei repository ufficiali di Ubuntu 18.04 , dobbiamo scaricare il suo pacchetto Debian . L'attuale versione ufficialmente disponibile di MySQL su Ubuntu 18.04 è 5.7.26 . Usa il comando indicato di seguito per scaricare il repository APT più recente.
# Download MySQL APT Repository
wget –c https://dev.mysql.com/get/mysql-apt-config_0.8.13-1_all.deb
Scaricherà il pacchetto ufficiale Debian per installare MySQL 8.
Passaggio 2:installazione del repository MySQL
Utilizzare il comando indicato di seguito per avviare l'installazione del repository MySQL utilizzando il repository scaricato da noi nel passaggio precedente.
sudo dpkg -i mysql-apt-config_0.8.13-1_all.deb
Chiederà di scegliere tra le opzioni disponibili come mostrato in Fig 1. Mantieni selezionata l'opzione predefinita e premi il tasto Invio per avviare l'installazione.

Fig 1
Nella schermata successiva, il programma di installazione chiederà di scegliere la versione di MySQL da installare come mostrato in Fig 2. Mantieni mysql-8 selezionato e premere il tasto Invio.
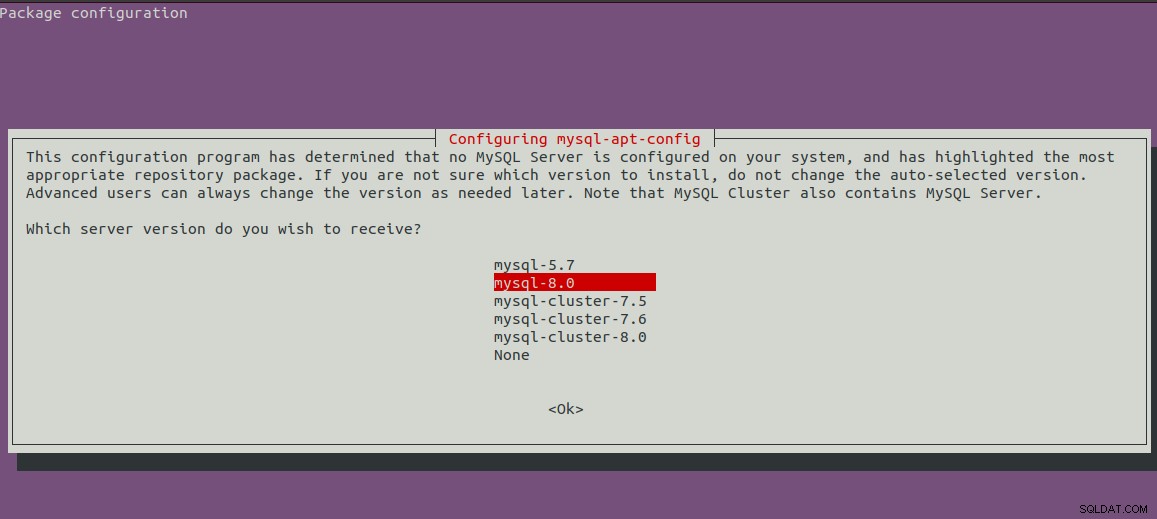
Fig 2
Mostrerà la prima schermata con la versione selezionata di MySQL. Ora premi il tasto freccia giù e il tasto freccia successivo per passare alle opzioni OK come mostrato in Fig 3.
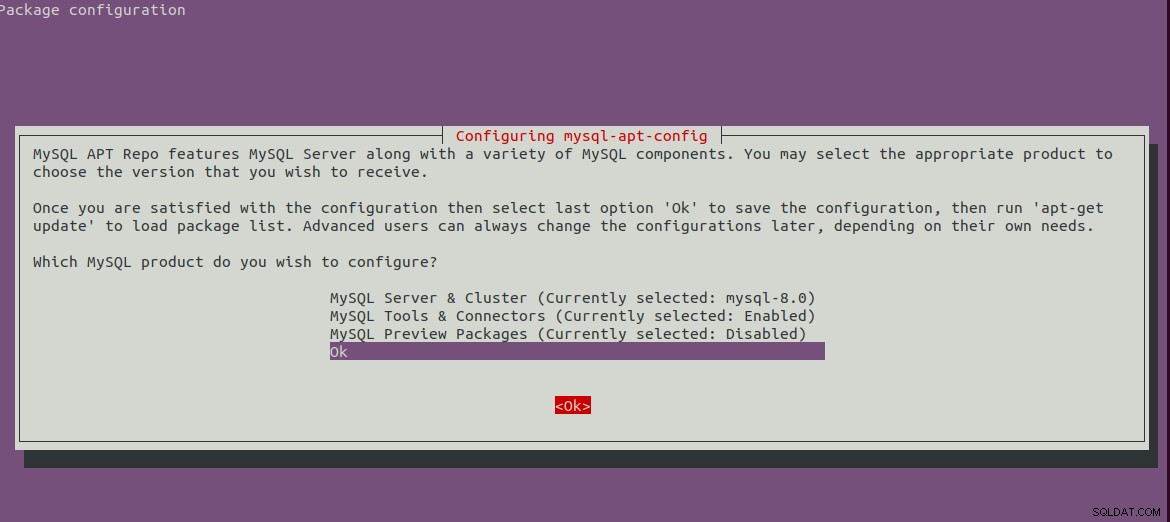
Fig 3
Premere il tasto Invio per avviare l'installazione. Mostrerà i messaggi sotto indicati dopo aver completato l'installazione.
bravo@pc1:/setups/database$ sudo dpkg -i mysql-apt-config_0.8.13-1_all.deb
Selecting previously unselected package mysql-apt-config.
(Reading database ... 200223 files and directories currently installed.)
Preparing to unpack mysql-apt-config_0.8.13-1_all.deb ...
Unpacking mysql-apt-config (0.8.13-1) ...
Setting up mysql-apt-config (0.8.13-1) ...
Warning: apt-key should not be used in scripts (called from postinst maintainerscript of the package mysql-apt-config)
Passaggio 3 - Aggiorna i repository di sistema
Ora aggiorna i repository di sistema usando il comando come indicato di seguito.
sudo apt-get update

# It must show MySQL 8 repos
bravo@pc1:/setups/database$ sudo apt-get update
Hit:1 https://repo.mysql.com/apt/ubuntu bionic InRelease
Hit:2 https://in.archive.ubuntu.com/ubuntu bionic InRelease
Hit:3 https://in.archive.ubuntu.com/ubuntu bionic-updates InRelease
Hit:4 https://in.archive.ubuntu.com/ubuntu bionic-backports InRelease
Hit:5 https://security.ubuntu.com/ubuntu bionic-security InRelease
Get:6 https://repo.mysql.com/apt/ubuntu bionic/mysql-8.0 Sources [962 B]
Get:7 https://repo.mysql.com/apt/ubuntu bionic/mysql-8.0 i386 Packages [7,472 B]
Get:8 https://repo.mysql.com/apt/ubuntu bionic/mysql-8.0 amd64 Packages [7,463 B]
Fetched 15.9 kB in 3s (5,556 B/s)
Reading package lists... Done
Aggiornerà la cache di sistema per ricevere aggiornamenti sulle versioni più recenti dei pacchetti disponibili.
Passaggio 4:installazione di MySQL Server
Dopo aver aggiornato la cache di sistema, possiamo iniziare a installare il server e il client MySQL utilizzando il comando indicato di seguito.
# Install MySQL Server 8
sudo apt-get install mysql-server mysql-client
Premere Y per confermare e continuare con l'installazione. Con questo, MySQL viene installato come facciamo con il pacchetto predefinito disponibile sui repository di Ubuntu. L'installazione chiederà anche di scegliere
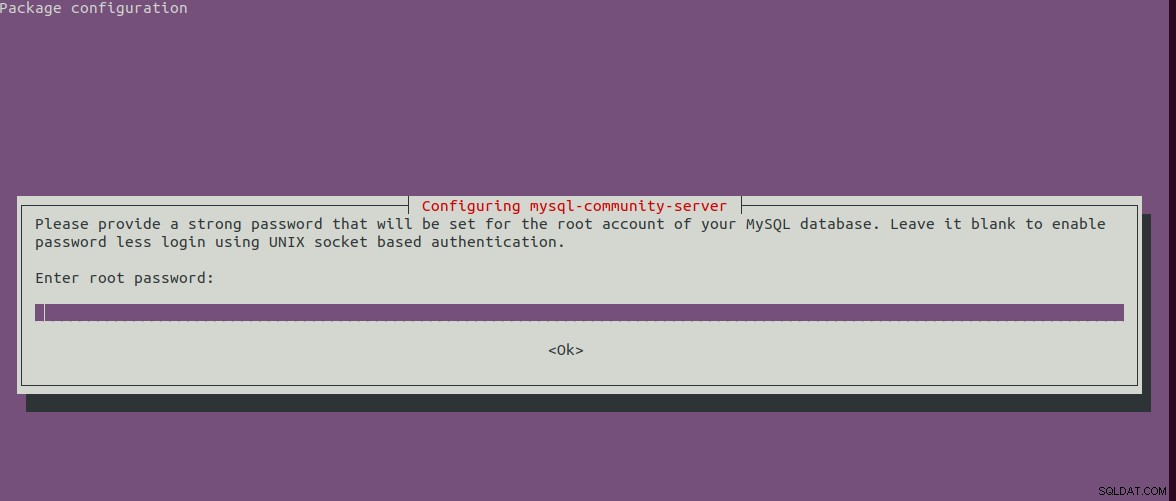
Fig 4
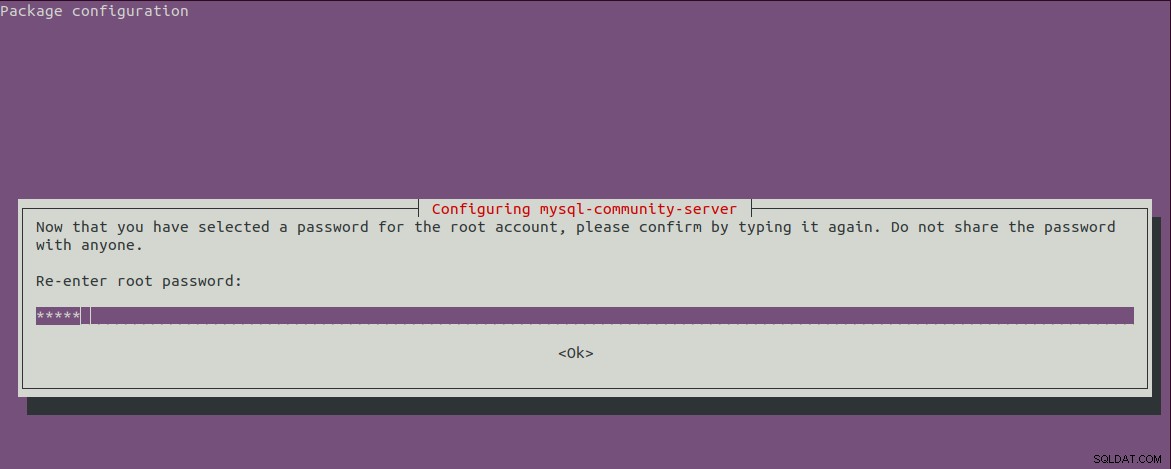
Fig 5
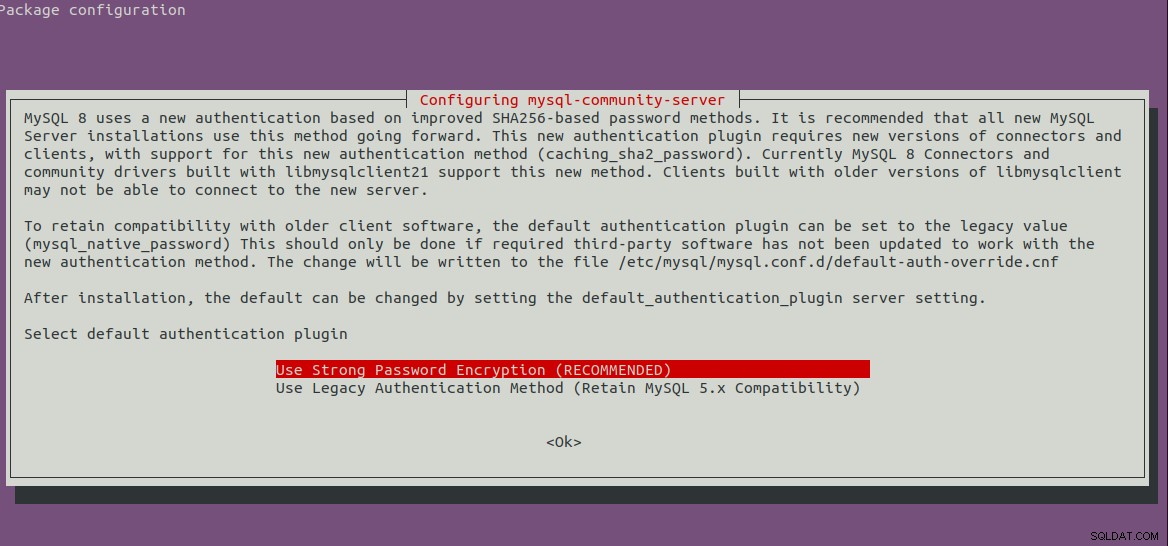
Fig 6
Passaggio 5:installazione sicura di MySQL
Dobbiamo anche proteggere l'installazione utilizzando il comando come indicato di seguito.
sudo mysql_secure_installation
Chiederà di impostare la password di root e alcune domande di sicurezza. I passaggi completi seguiti da me sono illustrati di seguito.
bravo@pc1:/setups/database$ sudo mysql_secure_installation

Securing the MySQL server deployment.

Enter password for user root:

VALIDATE PASSWORD COMPONENT can be used to test passwords
and improve security. It checks the strength of password
and allows the users to set only those passwords which are
secure enough. Would you like to setup VALIDATE PASSWORD component?

Press y|Y for Yes, any other key for No: y

There are three levels of password validation policy:

LOW    Length >= 8
MEDIUM Length >= 8, numeric, mixed case, and special characters
STRONG Length >= 8, numeric, mixed case, special characters and dictionary                  file

Please enter 0 = LOW, 1 = MEDIUM and 2 = STRONG: 1
Using existing password for root.

Estimated strength of the password: 25
Change the password for root ? ((Press y|Y for Yes, any other key for No) : n

 ... skipping.
By default, a MySQL installation has an anonymous user,
allowing anyone to log into MySQL without having to have
a user account created for them. This is intended only for
testing, and to make the installation go a bit smoother.
You should remove them before moving into a production
environment.

Remove anonymous users? (Press y|Y for Yes, any other key for No) : y
Success.


Normally, root should only be allowed to connect from
'localhost'. This ensures that someone cannot guess at
the root password from the network.

Disallow root login remotely? (Press y|Y for Yes, any other key for No) : y
Success.

By default, MySQL comes with a database named 'test' that
anyone can access. This is also intended only for testing,
and should be removed before moving into a production
environment.


Remove test database and access to it? (Press y|Y for Yes, any other key for No) : y
 - Dropping test database...
Success.

 - Removing privileges on test database...
Success.

Reloading the privilege tables will ensure that all changes
made so far will take effect immediately.

Reload privilege tables now? (Press y|Y for Yes, any other key for No) : y
Success.

All done!
bravo@pc1:/setups/database$
I passaggi precedenti rimuovono il database di test e gli utenti anonimi. Impedisce inoltre l'accesso remoto per garantire che il server sia accessibile localmente utilizzando 127.0.0.1 o host locale .
Utilizzare il comando indicato di seguito per verificare se il server MySQL è in esecuzione.
bravo@pc1:/setups/database$ systemctl status mysql
● mysql.service - MySQL Community Server
   Loaded: loaded (/lib/systemd/system/mysql.service; enabled; vendor preset: enabled)
   Active: active (running) since Thu 2019-08-15 10:40:47 IST; 4min 45s ago
     Docs: man:mysqld(8)
           https://dev.mysql.com/doc/refman/en/using-systemd.html
  Process: 28669 ExecStartPre=/usr/share/mysql-8.0/mysql-systemd-start pre (code=exited, status=0/SUCCESS)
 Main PID: 28708 (mysqld)
   Status: "Server is operational"
    Tasks: 38 (limit: 4915)
   CGroup: /system.slice/mysql.service
           └─28708 /usr/sbin/mysqld

Aug 15 10:40:45 bravo systemd[1]: Starting MySQL Community Server...
Aug 15 10:40:47 bravo systemd[1]: Started MySQL Community Server.
Fase 6:verifica versione e accesso
Verifica la versione del server da noi installato e assicurati anche che il server sia accessibile utilizzando la password di root da noi configurata.
# Check version
sudo mysql --version
mysql  Ver 8.0.17 for Linux on x86_64 (MySQL Community Server - GPL)

# Login
sudo mysql -u root -p
Fase 7 - Comandi importanti
Questa sezione mostra alcuni dei comandi importanti per avviare, arrestare e riavviare il server.
# Check server status
sudo service mysql status

# Stop server
sudo service mysql stop

# Start server
sudo service mysql start

# Restart server
sudo service mysql restart
Passaggio 8:utilizzo dei plug-in per password
Nel caso in cui tu abbia scelto di utilizzare l'opzione del plug-in password per la compatibilità delle backword con la versione 5.7, potrebbe essere necessario connettersi al server MySQL utilizzando l'account con
# Login to MySQL

# Check password plugin of root user
SELECT user,authentication_string,plugin,host FROM mysql.user;

# Note the password plugin of root user
+------------------+-------------------------------------------+-----------------------+-----------+
| user             | authentication_string                     | plugin                | host      |
+------------------+-------------------------------------------+-----------------------+-----------+
| root             |                                           | auth_socket           | localhost |
+------------------+-------------------------------------------+-----------------------+-----------+

# Change password plugin of root user to native
ALTER USER 'root'@'localhost' IDENTIFIED WITH mysql_native_password BY '<pw>';

# Apply changes
flush privileges;

# Check password scheme of user
SELECT user,authentication_string,plugin,host FROM mysql.user;

# Note the password plugin of root user
+------------------+-------------------------------------------+-----------------------+-----------+
| user             | authentication_string                     | plugin                | host      |
+------------------+-------------------------------------------+-----------------------+-----------+
| root             | *E5C4F73D963132CEF9BB4PA79LA818C08BAQC300 | mysql_native_password | localhost |
+------------------+-------------------------------------------+-----------------------+-----------+

# Change to new and recommended password plugin
ALTER USER 'root'@'localhost' IDENTIFIED WITH caching_sha2_password BY '<pw>';

# Apply changes
flush privileges;

# Check password scheme of user
SELECT user,authentication_string,plugin,host FROM mysql.user;

+------------------+------------------------------------------------------------------------+-----------------------+-----------+
| user             | authentication_string                                                  | plugin                | host      |
+------------------+------------------------------------------------------------------------+-----------------------+-----------+
| root             | $A$005$THISISACOMBINATIONOFINVALIDSALTANDPASSWORDTHATMUSTNEVERBRBEUSED | caching_sha2_password | localhost |
+------------------+------------------------------------------------------------------------+-----------------------+-----------+
Ecco come possiamo installare la versione più recente del server MySQL, ovvero MySQL 8 su Ubuntu 18.04 LTS.

