In questo tutorial SQL per principianti, creerai il tuo database, inserirai dati in quel database e quindi eseguirai query su quel database.
Questo tutorial SQL ti consentirà di eseguire query SQL in pochissimo tempo!
Esempio SQL
Ecco un esempio di istruzione SQL:
SELECT *
FROM Pets;
Questo è un perfetto esempio di quanto possa essere facile scrivere SQL. Questa semplice istruzione SQL in realtà fa molto. Restituisce l'intera tabella. Restituisce tutte le colonne e tutte le righe della tabella denominata Pets .
L'asterisco (* ) è un carattere jolly, che significa "tutte le colonne". È un modo semplice e veloce per ottenere tutte le colonne senza doverle digitare tutte.
Questa è una delle cose belle di SQL. Le query SQL più semplici sono in genere le più potenti. Se volessimo restituire meno dati, avremmo effettivamente bisogno di scrivere di più .
Ad esempio, se volessimo solo animali domestici di nome Recupera , vorremmo aggiungere un WHERE clausola che prevedeva tale requisito.
In questo modo:
SELECT *
FROM Pets
WHERE PetName = 'Fetch';
Il WHERE La clausola filtra la nostra query solo nelle righe in cui è presente il PetName la colonna ha un valore di Fetch .
Questa query presuppone che esista una colonna denominata PetName e una tabella chiamata Pets nella banca dati.
In questo tutorial SQL, ti mostrerò come creare un database di questo tipo utilizzando SQL.
Ti mostrerò anche come inserire dati in quel database, aggiornare i dati, eliminare dati ed eseguire query su di esso.
Cos'è SQL?
SQL è l'acronimo di Structured Query Language.
SQL è il linguaggio di query standard utilizzato per lavorare con i database relazionali.
SQL è utilizzato da tutti i principali sistemi di gestione di database relazionali (RDBMS), inclusi:
- Accesso Microsoft
- SQL Server
- Oracolo
- PostgreSQL
- MySQL
- SQLite
Cosa posso fare con SQL?
È possibile utilizzare SQL per eseguire query su un database, inserire record, aggiornare record ed eliminare record. È inoltre possibile creare nuovi oggetti di database come database e tabelle. Puoi anche eseguire attività di amministrazione del database, come la creazione di accessi, processi automatizzati, backup del database e molto altro.
Anche quando esegui operazioni utilizzando un'interfaccia utente grafica (GUI), il tuo sistema di gestione del database (DBMS) utilizzerà quasi sicuramente SQL dietro le quinte per svolgere tale attività.
Ad esempio, quando crei un database facendo clic su Crea database e inserendo i dettagli del nuovo database in una finestra di dialogo, dopo aver fatto clic su OK o Crea o qualunque cosa venga letto dal pulsante, il tuo sistema di database utilizzerà l'SQL CREATE DATABASE istruzione per andare avanti e creare il database come specificato.
Lo stesso vale per altre attività, come l'esecuzione di query, l'inserimento di dati, ecc.
SQL consente inoltre di eseguire azioni più avanzate come la creazione di procedure memorizzate (script autonomi), viste (query predefinite) e l'impostazione di autorizzazioni su oggetti di database (come tabelle, procedure memorizzate e viste).
Detto questo, non è necessario imparare tutte le cose avanzate per iniziare con SQL. La cosa buona di SQL è che alcune delle attività più comuni sono le più facili da scrivere.
Standard SQL
SQL è stato standardizzato in ANSI X3.135 nel 1986 e, nel giro di pochi mesi, è stato adottato dall'ISO come ISO 9075-1987. Da allora lo standard internazionale (ora ISO/IEC 9075) è stato rivisto periodicamente e attualmente esiste in 9 parti.
La maggior parte dei principali fornitori di database tende ad aderire allo standard SQL. La cosa buona è che non devi imparare un nuovo linguaggio di query ogni volta che impari un nuovo DBMS.
In pratica, tuttavia, esistono variazioni tra il modo in cui ciascun fornitore di database implementa lo standard SQL. Pertanto, il codice che scrivi in un DBMS potrebbe non funzionare sempre in un altro senza la necessità di modifiche.
La buona notizia è che tutti i principali DBMS supportano le attività più comuni generalmente allo stesso modo.
Pronuncia SQL
SQL è in genere pronunciato in due modi:
- "ess-que-el ” (ovvero compitare ogni lettera)
- "sequel ” (come nell'ortografia/pronuncia originale).
Vedi Si pronuncia SQL o Sequel se ti stai chiedendo perché.
Di cosa ho bisogno per questo tutorial SQL?
Per trarre davvero vantaggio da questo tutorial SQL, dovresti seguire gli esempi. Ciò significa che avrai bisogno di un posto dove inserire le query SQL. Avrai bisogno di qualcosa del genere:

Se intendi eseguire query SQL, avrai bisogno di:
- Un RDBMS installato (come SQL Server, MySQL, PostgreSQL, SQLite, ecc.).
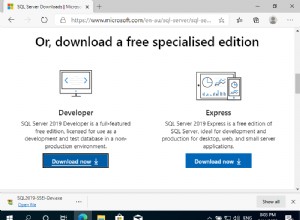
- Uno strumento di database che consente di eseguire query SQL su tale RDBMS (come MySQL WorkBench, Azure Data Studio (nella foto), DBeaver e SSMS).
Se ne hai già uno installato, fantastico! Puoi continuare con il tutorial.
Se non li hai installati, vedi Cosa mi serve per eseguire SQL? per istruzioni sull'installazione di un RDBMS e del relativo strumento di gestione del database, prima di tornare a questo tutorial SQL.
Crea un database
Dopo aver installato il tuo RDBMS e lo strumento di database appropriato, sei pronto per creare un database:
CREATE DATABASE PetHotel;Fatto!
Quella affermazione ha effettivamente creato un database. Un database vuoto, ma comunque un database.
Questo database conterrà le tabelle e i dati utilizzati in questo tutorial SQL. Quando creiamo una tabella o inseriamo dati, lo faremo all'interno di questo database.
Dovrei menzionare che SQLite utilizza una sintassi diversa per la creazione di database. Se stai usando SQLite, ecco come creare un database in SQLite.
Connetti al database
Prima di iniziare a creare tabelle, inserire dati e così via, devi essere sicuro di trovarti nel database giusto. La creazione di un database (come abbiamo appena fatto) non ti connette necessariamente a quel database.
In molti DBMS (come SQL Server , MySQL e MariaDB ), possiamo utilizzare quanto segue per passare al database specificato:
USE PetHotel;
Questo rende PetHotel il database corrente.
In SQLite , probabilmente sei già nel database dopo averlo creato. In caso contrario, puoi allegare il database (che lo creerà anche se non esiste già):
ATTACH DATABASE 'PetHotel.db' AS Pets;In PostgreSQL , se stai utilizzando lo strumento psql, puoi utilizzare quanto segue:
\connect PetHotelOppure la versione ridotta:
\c PetHotelDovrei menzionare che il processo di creazione e connessione ai database può differire ampiamente tra i DBMS.
Fortunatamente, la maggior parte degli strumenti della GUI ti consente di connetterti a un database facendo doppio clic sul database o facendo clic con il pulsante destro del mouse sul nome del database e selezionando una nuova scheda di query dal menu di scelta rapida. Se ti trovi bloccato in questo passaggio, usa la GUI per creare e/o connetterti al tuo DB.
Crea una tabella
Ora che ti sei connesso al database giusto, puoi procedere e creare alcune tabelle.
Per creare una tabella in SQL, usa CREATE TABLE dichiarazione.
Quando crei una tabella, devi specificare quali colonne saranno nella tabella, nonché i relativi tipi di dati. Puoi anche specificare altri dettagli, ma non andiamo avanti con noi stessi.
Creiamo una tabella:
CREATE TABLE PetTypes
(
    PetTypeId   int NOT NULL PRIMARY KEY,
    PetType     varchar(60) NOT NULL
);
In questo caso creiamo una tabella chiamata PetTypes . Lo sappiamo, perché il nome della tabella viene immediatamente dopo il CREATE TABLE po.
Successivamente viene visualizzato un elenco di colonne, racchiuse tra parentesi.
La tabella sopra contiene le seguenti colonne:
PetIdIdPetType
Ogni colonna è seguita dal relativo tipo di dati:
intsignifica che questa colonna accetta numeri interi. Per quanto ne so, la maggior parte dei principali DBMS supporta la dichiarazione di colonne comeint. In caso di problemi, prova a utilizzareinteger.varchar(60)significa che questa colonna accetta stringhe lunghe fino a 60 caratteri.varcharle colonne sono stringhe di lunghezza variabile. Un altro tipo di dati stringa èchar(che è una stringa di lunghezza fissa). Se hai problemi a definire una colonna comevarchar(60), prova a utilizzarechar(60).
NOT NULL Vincoli
In questo esempio, entrambe le colonne sono definite con NOT NULL vincoli. Il NOT NULL vincolo significa che questa colonna non può essere vuota. Quando viene inserita una nuova riga, qualsiasi NOT NULL colonne devono contengono un valore. Altre colonne possono rimanere vuote se non ci sono dati per quelle colonne.
Se NULL i valori sono consentiti nella colonna, puoi omettere il NOT NULL parte o dichiararlo come NULL (che significa NULL i valori sono consentiti in questa colonna).
Alcuni DBMS (come DB2) non supportano il NULL parola chiave comunque, e quindi dovrai ometterla quando lavori con tali DBMS.
Chiavi primarie
Abbiamo anche creato il PetTypeId colonna la chiave primaria. La chiave primaria è una o più colonne che identificano in modo univoco ogni riga della tabella. Specificare le colonne selezionate come chiave primaria utilizzando un vincolo di chiave primaria. Puoi farlo nel CREATE TABLE istruzione (come abbiamo fatto qui), oppure puoi aggiungerne una in seguito con un ALTER TABLE dichiarazione.
Le chiavi primarie devono contenere valori univoci. Cioè, per ogni riga in quella tabella, il valore nella/e colonna/e della chiave primaria deve essere diverso in ogni riga. Questo potrebbe essere semplice come avere numeri incrementali (come 1, 2, 3... ecc.) o potrebbe essere un codice prodotto (come pr4650, pr2784, pr5981... ecc.).
Inoltre, le chiavi primarie devono contenere un valore. Non può essere NULL .
Sebbene le chiavi primarie non siano richieste, è generalmente considerata una buona pratica definire una chiave primaria su ogni tabella.
Crea più tabelle
Creiamo altre due tabelle:
CREATE TABLE Owners
(
    OwnerId     int NOT NULL PRIMARY KEY,
    FirstName   varchar(60) NOT NULL,
    LastName    varchar(60) NOT NULL,
    Phone       varchar(20) NOT NULL,
    Email       varchar(254)
);

CREATE TABLE Pets
(
    PetId       int NOT NULL PRIMARY KEY,
    PetTypeId   int NOT NULL REFERENCES PetTypes (PetTypeId),
    OwnerId     int NOT NULL REFERENCES Owners (OwnerId),
    PetName     varchar(60) NOT NULL,
    DOB         date NULL
);
Entrambe queste tabelle sono simili alla prima, tranne per il fatto che hanno più righe e un paio di pezzi extra, che spiegherò di seguito.
Se sei interessato, dai un'occhiata a SQL CREATE TABLE for Beginners per alcuni esempi più semplici di creazione di tabelle in SQL.
Relazioni
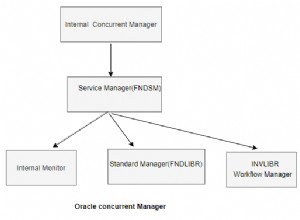
Quando abbiamo creato il nostro Pets table, abbiamo effettivamente creato una relazione tra le tre tabelle.
Tale relazione è illustrata nel diagramma seguente.

Le relazioni tra database sono una parte cruciale di SQL. Le relazioni ci consentono di interrogare più tabelle per dati correlati e ottenere risultati accurati e coerenti.
Nel nostro caso, vogliamo essere in grado di cercare animali domestici in base al proprietario o animali domestici per tipo di animale domestico, ecc. E vogliamo che i nostri risultati siano accurati e coerenti.
Per raggiungere questo obiettivo, dobbiamo insistere sul fatto che tutti gli animali domestici siano inseriti insieme al loro proprietario e al tipo di animale domestico. Pertanto, dobbiamo assicurarci che, ogni volta che un nuovo animale domestico viene aggiunto a Pets tabella, c'è già un proprietario corrispondente nella Owners tabella e un tipo di animale domestico corrispondente in PetTypes tavolo.
Fondamentalmente, i nostri requisiti sono i seguenti:
- Qualsiasi valore nel
Pets.PetTypeIdla colonna deve corrispondere a un valore inPetTypes.PetTypeIdcolonna. - Qualsiasi valore nel
Pets.OwnerIdla colonna deve corrispondere a un valore inOwners.OwnerIdcolonna.
Possiamo garantire i requisiti di cui sopra creando un vincolo di chiave esterna rispetto alle colonne applicabili. Una chiave straniera il vincolo viene utilizzato per specificare che una determinata colonna fa riferimento alla chiave primaria di un'altra tabella.
Il codice sopra ha effettivamente creato due vincoli di chiave esterna sui Pets tabella.
Nota che il PetTypeId e OwnerId le colonne hanno del codice aggiuntivo che inizia con REFERENCES... . Quelle sono le parti che hanno creato le due chiavi esterne.
Quando abbiamo creato il Pets tabella, il suo PetTypeId la colonna contiene un bit che va REFERENCES PetTypes (PetTypeId) . Ciò significa che il Pets.PetTypeId la colonna fa riferimento a PetTypeId colonna nella PetTypes tabella.
È lo stesso affare per OwnerId colonna. Fa riferimento a OwnerId colonna dei Owners tabella.
Nella maggior parte dei DBMS, le chiavi esterne possono essere create anche su una tabella esistente, utilizzando ALTER TABLE dichiarazione, ma non lo esamineremo qui. Vedi Come creare una relazione in SQL per ulteriori informazioni.
Ad ogni modo, le nostre chiavi esterne sono state create. Ora, ogni volta che qualcuno inserisce un nuovo animale domestico nel Pets tabella, il PetTypeId e OwnerId i valori dovranno avere un valore corrispondente in PetTypes e Owners rispettivamente tabelle. In caso contrario, il database restituirà un errore.
Questo è il vantaggio delle chiavi esterne. Aiuta a prevenire l'inserimento di dati errati. Aiuta a mantenere l'integrità dei dati e, più specificamente, l'integrità referenziale.
Verifica vincoli
Un vincolo di controllo è un altro tipo di vincolo di cui dovresti essere a conoscenza. Un vincolo di controllo controlla i dati prima che entrino nel database. Quando una tabella ha un vincolo di controllo abilitato, i dati possono entrare nella tabella solo se non viola tale vincolo. I dati che violano il vincolo non possono entrare nella tabella.
Ad esempio, potresti creare un vincolo di controllo su un Price colonna per assicurarsi che accetti solo valori maggiori di zero. Oppure potremmo applicare un vincolo di controllo ai nostri Pets tabella per garantire che il DOB colonna non è in futuro.
Per un esempio, vedi Che cos'è un vincolo CHECK?
Spazi bianchi
Potresti aver notato che i miei esempi includono spazi bianchi. Ad esempio, ho distanziato il codice su più righe e ho utilizzato le schede per indentare i tipi di dati, ecc.
Questo è perfettamente valido in SQL. Puoi farlo in sicurezza e non influirà sul risultato. SQL ti consente di distribuire il tuo codice su più righe, se lo desideri, e ti consente di utilizzare più spazi o tabulazioni per migliorare la leggibilità.
Commenti
Puoi anche includere commenti all'interno del tuo codice. I commenti possono essere utili una volta che inizi a scrivere script SQL più lunghi. Una volta che uno script diventa piuttosto lungo, i commenti possono rendere più facile identificare rapidamente ciò che fa ciascuna parte.
Commenti in linea
Puoi creare commenti in linea anteponendo al tuo commento due trattini (-- ):
SELECT * FROM Pets; --This is a comment

-- This is a comment
SELECT * FROM Owners;
In questo esempio, entrambe le query verranno eseguite senza problemi. I commenti verranno ignorati dal DBMS.
Commenti su più righe
Puoi distribuire i commenti su più righe circondando il commento con /* e */ :
/*
This is a longer comment so
it's spread across multiple lines
*/
SELECT * FROM Pets;
In questo esempio, entrambe le query verranno eseguite senza problemi. I commenti verranno ignorati dal DBMS.
MySQL
Se stai usando MySQL, puoi anche usare il segno numerico/hash (# ) per commenti a riga singola.
# This is a comment
SELECT * FROM Pets;
Codice commenti
Un altro interessante vantaggio dei commenti è che puoi commentare codice. Ad esempio, se hai uno script SQL lungo che fa molte cose, ma vuoi eseguirne solo una o due parti, puoi commentare il resto della sceneggiatura.
Ecco un esempio:
-- SELECT * FROM Pets;

SELECT * FROM Owners;
In questo caso, il primo SELECT l'istruzione è stata commentata, quindi solo la seconda SELECT verrà eseguita l'istruzione.
Puoi anche usare commenti multilinea per questa tecnica.
Inserisci dati
Ora che abbiamo creato tre tabelle e creato le chiavi esterne appropriate, possiamo procedere e aggiungere dati.
Il modo più comune per inserire dati in SQL è con INSERT dichiarazione. Funziona più o meno così:
INSERT INTO MyTable( Column1, Column2, Column3, ... )
VALUES( Value1, Value2, Value3, ... );
Sostituisci semplicemente MyTable con il nome della tabella in cui stai inserendo i dati. Allo stesso modo, sostituisci Column1 , ecc con i nomi delle colonne e Value1 , ecc con i valori che vanno in quelle colonne.
Ad esempio, potremmo fare questo:
INSERT INTO Pets( PetId, PetTypeId, OwnerId, PetName, DOB )
VALUES( 1, 2, 3, 'Fluffy', '2020-12-20' );
Ciascun valore è nello stesso ordine in cui è specificata la colonna.
Nota che i nomi delle colonne corrispondono ai nomi che abbiamo usato quando abbiamo creato la tabella.
Puoi omettere i nomi delle colonne se stai inserendo i dati in tutte le colonne. Quindi potremmo cambiare l'esempio sopra in questo modo:
INSERT INTO Pets
VALUES( 1, 2, 3, 'Fluffy', '2020-12-20' );
Per questo tutorial, aggiungeremo alcune righe in più, quindi aggiungeremo più INSERT INTO istruzioni:una per ogni riga che vogliamo inserire.
Quindi andiamo avanti e popolaamo le nostre tabelle.
INSERT INTO Owners( OwnerId, FirstName, LastName, Phone, Email )
VALUES( 1, 'Homer', 'Connery', '(308) 555-0100', 'example@sqldat.com' );
INSERT INTO Owners(OwnerId, FirstName, LastName, Phone, Email)
VALUES( 2, 'Bart', 'Pitt', '(231) 465-3497', 'example@sqldat.com' );
INSERT INTO Owners(OwnerId, FirstName, LastName, Phone)
VALUES( 3, 'Nancy', 'Simpson', '(489) 591-0408' );
INSERT INTO Owners(OwnerId, FirstName, LastName, Phone)
VALUES( 4, 'Boris', 'Trump', '(349) 611-8908' );

INSERT INTO PetTypes( PetTypeId, PetType )
VALUES( 1, 'Bird' );
INSERT INTO PetTypes( PetTypeId, PetType )
VALUES( 2, 'Cat' );
INSERT INTO PetTypes( PetTypeId, PetType )
VALUES( 3, 'Dog' );
INSERT INTO PetTypes( PetTypeId, PetType )
VALUES( 4, 'Rabbit' );

INSERT INTO Pets( PetId, PetTypeId, OwnerId, PetName, DOB )
VALUES( 1, 2, 3, 'Fluffy', '2020-11-20' );
INSERT INTO Pets( PetId, PetTypeId, OwnerId, PetName, DOB )
VALUES( 2, 3, 3, 'Fetch', '2019-08-16' );
INSERT INTO Pets( PetId, PetTypeId, OwnerId, PetName, DOB )
VALUES( 3, 2, 2, 'Scratch', '2018-10-01' );
INSERT INTO Pets( PetId, PetTypeId, OwnerId, PetName, DOB )
VALUES( 4, 3, 3, 'Wag', '2020-03-15' );
INSERT INTO Pets( PetId, PetTypeId, OwnerId, PetName, DOB )
VALUES( 5, 1, 1, 'Tweet', '2020-11-28' );
INSERT INTO Pets( PetId, PetTypeId, OwnerId, PetName, DOB )
VALUES( 6, 3, 4, 'Fluffy', '2020-09-17' );
INSERT INTO Pets( PetId, PetTypeId, OwnerId, PetName )
VALUES( 7, 3, 2, 'Bark' );
INSERT INTO Pets( PetId, PetTypeId, OwnerId, PetName )
VALUES( 8, 2, 4, 'Meow' );
Nota che abbiamo popolato i Pets ultimo tavolo. C'è una ragione per questo.
Se avessimo provato a inserire i dati nel Pets tabella prima di popolare gli altri due, avremmo ricevuto un errore, a causa del nostro vincolo di chiave esterna. E per una buona ragione. Dopotutto, avremmo cercato di inserire valori nelle colonne della chiave esterna che non esistevano ancora nelle colonne della chiave primaria sulle altre tabelle. Questo è un grande "no no" quando si tratta di chiavi esterne.
Quindi compilando i Owners e PetTypes tabelle prima, ci siamo assicurati che i valori appropriati fossero già nelle colonne della chiave primaria prima di popolare le colonne della chiave esterna in Pets tabella.
Vedi SQL INSERT per principianti per altri esempi di inserimento di dati nelle tabelle.
Controlla i nostri dati
Uff! Finalmente possiamo iniziare a eseguire query sul nostro database.
Controlliamo i dati in tutte le nostre tabelle.
SELECT * FROM Pets;
SELECT * FROM PetTypes;
SELECT * FROM Owners;
Risultato:
+---------+-------------+-----------+-----------+------------+
| PetId   | PetTypeId   | OwnerId   | PetName   | DOB        |
|---------+-------------+-----------+-----------+------------|
| 1       | 2           | 3         | Fluffy    | 2020-11-20 |
| 2       | 3           | 3         | Fetch     | 2019-08-16 |
| 3       | 2           | 2         | Scratch   | 2018-10-01 |
| 4       | 3           | 3         | Wag       | 2020-03-15 |
| 5       | 1           | 1         | Tweet     | 2020-11-28 |
| 6       | 3           | 4         | Fluffy    | 2020-09-17 |
| 7       | 3           | 2         | Bark      | NULL       |
| 8       | 2           | 4         | Meow      | NULL       |
+---------+-------------+-----------+-----------+------------+
(8 rows affected)
+-------------+-----------+
| PetTypeId   | PetType   |
|-------------+-----------|
| 1           | Bird      |
| 2           | Cat       |
| 3           | Dog       |
| 4           | Rabbit    |
+-------------+-----------+
(4 rows affected)
+-----------+-------------+------------+----------------+-------------------+
| OwnerId   | FirstName   | LastName   | Phone          | Email             |
|-----------+-------------+------------+----------------+-------------------|
| 1         | Homer       | Connery    | (308) 555-0100 | example@sqldat.com |
| 2         | Bart        | Pitt       | (231) 465-3497 | example@sqldat.com  |
| 3         | Nancy       | Simpson    | (489) 591-0408 | NULL              |
| 4         | Boris       | Trump      | (349) 611-8908 | NULL              |
+-----------+-------------+------------+----------------+-------------------+
(4 rows affected)
Ottimo, quindi sembra che i dati siano stati inseriti correttamente.
Seleziona colonne specifiche
È generalmente considerata una cattiva pratica selezionare tutte le righe e tutte le colonne da una tabella (come abbiamo fatto nell'esempio precedente), a meno che non sia davvero necessario. Questa operazione può influire sulle prestazioni del server del database, soprattutto se nella tabella sono presenti molte righe.
Non è un problema quando utilizzi piccoli set di dati come noi qui, o se ti trovi in un ambiente di sviluppo o simili. In caso contrario, di solito è meglio selezionare solo le colonne desiderate.
Pertanto, se volessimo gli ID, i nomi e le date di nascita di tutti gli animali domestici, potremmo farlo:
SELECT PetId, PetName, DOB
FROM Pets;
Risultato:
+---------+-----------+------------+
| PetId   | PetName   | DOB        |
|---------+-----------+------------|
| 1       | Fluffy    | 2020-11-20 |
| 2       | Fetch     | 2019-08-16 |
| 3       | Scratch   | 2018-10-01 |
| 4       | Wag       | 2020-03-15 |
| 5       | Tweet     | 2020-11-28 |
| 6       | Fluffy    | 2020-09-17 |
| 7       | Bark      | NULL       |
| 8       | Meow      | NULL       |
+---------+-----------+------------+
Se volessimo gli ID e la data di nascita di tutti gli animali domestici di nome Fluffy, potremmo usare questo:
SELECT PetId, DOB
FROM Pets
WHERE PetName = 'Fluffy';
Risultato:
+---------+------------+
| PetId   | DOB        |
|---------+------------|
| 1       | 2020-11-20 |
| 6       | 2020-09-17 |
+---------+------------+
Puoi anche usare il SELECT istruzione per restituire dati senza tabella. Cioè, può restituire dati che non sono archiviati in una tabella. Vedi SQL SELECT Dichiarazione per principianti per vedere un esempio.
Ordinamento
SQL fornisce il ORDER BY clausola che ci consente di ordinare i dati.
Possiamo aggiungere un ORDER BY clausola del nostro esempio precedente in modo che gli animali domestici siano ordinati per nome:
SELECT PetId, PetName, DOB
FROM Pets
ORDER BY PetName ASC;
Risultato:
+---------+-----------+------------+
| PetId   | PetName   | DOB        |
|---------+-----------+------------|
| 7       | Bark      | NULL       |
| 2       | Fetch     | 2019-08-16 |
| 1       | Fluffy    | 2020-11-20 |
| 6       | Fluffy    | 2020-09-17 |
| 8       | Meow      | NULL       |
| 3       | Scratch   | 2018-10-01 |
| 5       | Tweet     | 2020-11-28 |
| 4       | Wag       | 2020-03-15 |
+---------+-----------+------------+
Il ASC parte significa ascendente . Quando usi il ORDER BY clausola, per impostazione predefinita è ascendente, quindi puoi omettere ASC parte se lo desideri.
Per ordinarlo in decrescente ordinare, utilizzare DESC .
SELECT PetId, PetName, DOB
FROM Pets
ORDER BY PetName DESC;
Risultato:
+---------+-----------+------------+
| PetId   | PetName   | DOB        |
|---------+-----------+------------|
| 4       | Wag       | 2020-03-15 |
| 5       | Tweet     | 2020-11-28 |
| 3       | Scratch   | 2018-10-01 |
| 8       | Meow      | NULL       |
| 1       | Fluffy    | 2020-11-20 |
| 6       | Fluffy    | 2020-09-17 |
| 2       | Fetch     | 2019-08-16 |
| 7       | Bark      | NULL       |
+---------+-----------+------------+
Puoi anche ordinare i risultati utilizzando più colonne. Ordina in base alla prima colonna specificata, quindi se sono presenti duplicati in quella colonna, li ordina in base alla seconda colonna specificata e così via.
SELECT PetId, PetName, DOB
FROM Pets
ORDER BY PetName DESC, DOB ASC;
Risultato:
+---------+-----------+------------+
| PetId   | PetName   | DOB        |
|---------+-----------+------------|
| 4       | Wag       | 2020-03-15 |
| 5       | Tweet     | 2020-11-28 |
| 3       | Scratch   | 2018-10-01 |
| 8       | Meow      | NULL       |
| 6       | Fluffy    | 2020-09-17 |
| 1       | Fluffy    | 2020-11-20 |
| 2       | Fetch     | 2019-08-16 |
| 7       | Bark      | NULL       |
+---------+-----------+------------+
Guarda come i due Fluffy si sono scambiati di posizione.
Se non utilizzi il ORDER BY clausola, non c'è alcuna garanzia in quale ordine saranno i tuoi risultati. Anche se potrebbe sembrare come se il tuo database stesse ordinando i risultati in base a una colonna particolare, questo potrebbe non essere effettivamente il caso. In generale, senza un ORDER BY clausola, i dati verranno ordinati nell'ordine in cui sono stati caricati nella tabella. Tuttavia, se le righe sono state eliminate o aggiornate, l'ordine sarà influenzato dal modo in cui il DBMS riutilizza lo spazio di archiviazione recuperato.
Pertanto, non fare affidamento sul DBMS per ordinare i risultati in un ordine significativo.
In conclusione:se vuoi che i tuoi risultati siano ordinati, usa ORDER BY .
Vedi SQL ORDER BY Clausola per principianti per ulteriori esempi.
Conta le righe in un set di risultati
Puoi usare il COUNT() funzione di aggregazione per contare le righe che verranno restituite in una query.
SELECT COUNT(*) AS Count
FROM Pets;
Risultato:
+---------+
| Count   |
|---------|
| 8       |
+---------+
Questo ci dice che ci sono 8 righe nella tabella. Lo sappiamo perché abbiamo selezionato tutte le righe e tutte le colonne.
Puoi usare COUNT() su qualsiasi query, ad esempio query che utilizzano un WHERE clausola per filtrare i risultati.
Puoi anche specificare una particolare colonna da contare. Il COUNT() la funzione conta solo non NULL risultati, quindi se specifichi una colonna che contiene NULL valori, quei valori non verranno conteggiati.
Ecco un esempio per dimostrare cosa intendo.
SELECT COUNT(DOB) AS Count
FROM Pets;
Risultato:
+---------+
| Count   |
|---------|
| 6       |
+---------+
Warning: Null value is eliminated by an aggregate or other SET operation.
Potresti ricordare che il Pets la tabella contiene due NULL valori nel DOB colonna (due animali domestici non hanno fornito la loro data di nascita), e quindi COUNT(DOB) restituisce 6, invece di 8 quando abbiamo usato COUNT(*) . Il motivo COUNT(*) restituito tutte le righe, è perché quelle due righe hanno fatto avere dati nelle altre colonne.
Nel mio esempio, anche il mio DBMS ha restituito un avviso al riguardo. Potresti ricevere o meno un avviso, a seconda del tuo DBMS e della tua configurazione specifica.
Vedi SQL COUNT per principianti per altri esempi.
Altre funzioni aggregate includono:AVG() , SUM() , MIN() e MAX() .
Raggruppa per
Un'altra clausola utile è GROUP BY clausola. Questo fa più o meno ciò che il suo nome promette. Ti permette di raggruppare i risultati per una determinata colonna.
SELECT
    PetTypeId,
    COUNT(PetTypeId) AS Count
FROM Pets
GROUP BY PetTypeId
ORDER BY Count DESC;
Risultato:
+-------------+---------+
| PetTypeId   | Count   |
|-------------+---------|
| 3           | 4       |
| 2           | 3       |
| 1           | 1       |
+-------------+---------+
In questo esempio, contiamo quanti animali abbiamo per ogni tipo di animale domestico, quindi li ordiniamo in ordine decrescente (con il conteggio più alto in alto).
Vedi SQL GROUP BY Clausola per principianti per ulteriori esempi.
Il HAVING Clausola
Possiamo usare il HAVING clausola per filtrare i risultati nel GROUP BY clausola. Il HAVING la clausola restituisce righe in cui i valori aggregati soddisfano condizioni specificate.
Ecco un esempio.
SELECT
    PetTypeId,
    COUNT(PetTypeId) AS Count
FROM Pets
GROUP BY PetTypeId
HAVING COUNT(PetTypeId) > 2
ORDER BY Count DESC;
Risultato:
+-------------+---------+
| PetTypeId   | Count   |
|-------------+---------|
| 3           | 4       |
| 2           | 3       |
+-------------+---------+
In questo caso, abbiamo restituito i dati solo per i tipi di animali domestici a cui sono stati assegnati più di 2 animali domestici.
Vedi SQL HAVING Clausola per principianti per ulteriori esempi.
Unisciti
In SQL, un join è dove esegui una query che combina i dati di più tabelle.
I due esempi precedenti vanno bene, ma sarebbe meglio se restituissero i tipi di animali domestici effettivi (ad es. Gatto, Cane, Uccello, ecc.) piuttosto che l'ID (ad es. 1, 2, 3, ecc.).
L'unico problema sono i Pets la tabella non contiene quei dati. Quei dati sono nei PetTypes tabella.
Fortunatamente per noi, possiamo fare un join tra questi due tavoli. Ecco un esempio che utilizza un LEFT JOIN :
SELECT
    PetTypes.PetType,
    COUNT(Pets.PetTypeId) AS Count
FROM Pets
LEFT JOIN PetTypes
ON Pets.PetTypeId = PetTypes.PetTypeId
GROUP BY PetTypes.PetType
ORDER BY Count DESC;
Risultato:
+-----------+---------+
| PetType   | Count   |
|-----------+---------|
| Dog       | 4       |
| Cat       | 3       |
| Bird      | 1       |
+-----------+---------+
Questo set di risultati è molto più facile da leggere rispetto ai precedenti. È più facile capire quanti animali di ogni tipo ci sono nella tabella.
La sintassi utilizza il tipo di join (in questo caso LEFT JOIN ), seguito dalla prima tabella (a sinistra), seguita da ON , seguito dalla condizione di unione.
Usiamo un INNER JOIN per restituire tutti i nomi di animali domestici con i rispettivi tipi di animali domestici.
SELECT
    Pets.PetName,
    PetTypes.PetType
FROM Pets
INNER JOIN PetTypes
ON Pets.PetTypeId = PetTypes.PetTypeId;
Risultato:
+-----------+-----------+
| PetName   | PetType   |
|-----------+-----------|
| Fluffy    | Cat       |
| Fetch     | Dog       |
| Scratch   | Cat       |
| Wag       | Dog       |
| Tweet     | Bird      |
| Fluffy    | Dog       |
| Bark      | Dog       |
| Meow      | Cat       |
+-----------+-----------+
I join aprono davvero le nostre opzioni, perché ora possiamo acquisire dati da più tabelle e presentarli come se fosse una singola tabella.
Noterai che negli esempi di join qualifichiamo i nomi delle nostre colonne con i nomi delle tabelle. The reason we do this is to avoid any ambiguity regarding the column column names between the tables. Both tables could have columns of the same name (like in our example), and in such cases, the DBMS won’t know which column you’re referring to. Prefixing the column names with their table names ensures that you’re referencing the right column, and prevents any errors that could result from any ambiguity about which column you’re referring to.
See my SQL Joins Tutorial for more examples and an explanation of the various join types.
Aliases
We can go a step further and assign an alias to each table name and column name.
SELECT
    p.PetName AS Pet,
    pt.PetType AS "Pet Type"
FROM PetTypes pt
LEFT JOIN Pets p
ON p.PetTypeId = pt.PetTypeId;
Risultato:
+---------+------------+
| Pet     | Pet Type   |
|---------+------------|
| Tweet   | Bird       |
| Fluffy  | Cat        |
| Scratch | Cat        |
| Meow    | Cat        |
| Fetch   | Dog        |
| Wag     | Dog        |
| Fluffy  | Dog        |
| Bark    | Dog        |
| NULL    | Rabbit     |
+---------+------------+
This has resulted in new column headers, plus the code is more concise.
An alias allows you to temporarily assign another name to a table or column for the duration of a SELECT query. This can be particularly useful when tables and/or columns have very long or complex names.
An alias is assigned through the use of the AS keyword, although this keyword is optional, so you can safely omit it. Note that Oracle doesn’t support the AS keyword on table aliases (but it does on column aliases).
In the above example, I’ve included the AS keyword when assigning the column aliases, but omitted it when assigning the table aliases.
An alias name could be anything, but is usually kept short for readability purposes.
In our case, we changed the two tables to p and pt , and the column names to Pet and Pet Type . Note that I surrounded Pet Type in double quotes. I did this, because there’s a space in the name. For aliases without spaces, you don’t need to do this. In SQL Server, you can alternatively use square brackets ([] ) instead of double quotes (although it also supports double quotes).
The practice of using spaces in columns and aliases is generally discouraged, as it can cause all sorts of problems with some client applications.
Note that we still needed to use the full column names when referencing them in the join (after the ON keyword).
Devo sottolineare che l'assegnazione di un alias non rinomina effettivamente la colonna o la tabella.
See SQL Alias Explained for more examples.
Updating Data
You can use the UPDATE statement to update data in your tables.
The basic syntax is pretty simple:
UPDATE Owners
SET LastName = 'Stallone'
WHERE OwnerId = 3;
In that example, we update the LastName column to have a new value of Stallone where the OwnerId is 3 .
To update multiple columns, use a comma to separate each column/value pair.
But whatever you do, don’t forget the WHERE clause (unless you actually intend to update every row in the table with the same value).
See SQL UPDATE for Beginners for more examples and a more detailed explanation.
Deleting Data
You can use the DELETE statement to delete data from your tables.
The basic syntax is even more simple than the UPDATE statement:
DELETE FROM Owners
WHERE OwnerId = 5;
Here, we’re deleting owner number 5 from the Owners table.
As with the UPDATE statement, don’t forget the WHERE clause (unless you intend to delete every row in the table ).
See SQL DELETE for Beginners for more examples and a detailed explanation.
Dropping Objects
While we’re on the subject of deleting things, when you delete a database object (such as a table, view, stored procedure, etc), it’s said that you “drop” that object. For example, if you no longer need a table, you “drop it”.
The syntax is extremely simple, and it goes like this:
DROP TABLE Customers;
Those three words completely obliterated a table called Customers . The table and all its data is now gone.
As you can imagine, this can be a very dangerous statement, and should be used with extreme caution.
The same syntax can be used for other object types, except you would replace table with the object type (for example DROP VIEW vPets drops a view called vPets ).
If you try to drop a table that is referenced by a foreign key, you’ll probably get an error. In this case, you’ll need to either drop the foreign key (using the ALTER TABLE statement) or the child table itself.
SQL Operators
In SQL, an operator is a symbol specifying an action that is performed on one or more expressions.
Operators manipulate individual data items and return a result. The data items are called operands or arguments . In SQL, operators are represented by special characters or by keywords.
We’ve already seen some operators in action. Some of our previous example queries had a WHERE clause that included the Equals operator (= ). We also ran a query that used the Greater Than operator (> ). These are both comparison operators – they compare two expressions.
See 12 Commonly Used Operators in SQL for examples of operators that you’re likely to need when working with SQL.
You can also use this list of SQL Operators as a reference for the operators available in SQL.
SQL Views
In SQL, a view is a query that’s saved to the database as a database object (just like a table). The term can also be used to refer to the result set of a stored query. Views are often referred to as virtual tables .
To create a view, you write a query, then save it as a view. You do this using the CREATE VIEW syntax.
Here’s an example of creating a view:
CREATE VIEW vPetTypeCount AS
SELECT
    PetTypes.PetType,
    COUNT(Pets.PetTypeId) AS Count
FROM Pets
LEFT JOIN PetTypes
ON Pets.PetTypeId = PetTypes.PetTypeId
GROUP BY PetTypes.PetType;
Running that code creates the view and stores it as an object in the database.
We can now query the view, just like we’d query a table.
Risultato:
SELECT * FROM vPetTypeCount;+-----------+---------+ | PetType | Count | |-----------+---------| | Bird | 1 | | Cat | 3 | | Dog | 4 | +-----------+---------+
So we get the same result as we would have got if we’d run the original query, but saving it in a view made it a lot easier to query.
This benefit would become greater, the more complex the query is.
Views and the ORDER BY Clause
One thing I should point out is that the original query had an ORDER BY clause, but I didn’t include that in the view. The SQL standard does not allow the ORDER BY clause in any view definition. Also, most RDBMSs will raise an error if you try to include an ORDER BY clausola.
This isn’t a problem though, because you can sort the results when you query the view. Therefore, we can do something like this:
SELECT * FROM vPetTypeCount
ORDER BY Count DESC;
Risultato:
+-----------+---------+
| PetType   | Count   |
|-----------+---------|
| Dog       | 4       |
| Cat       | 3       |
| Bird      | 1       |
+-----------+---------+
Most RDBMSs also include a large set of system views that you can use to retrieve information about the system.
For more about views, see What is a View?
Stored Procedures
A stored procedure is a series of SQL statements compiled and saved to the database. Stored procedures are similar to views in some respects, but very different in other respects.
One of the benefits of stored procedures is that they allow you to store complex scripts on the server. Stored procedures often contain conditional programming such as IF... ELSE statements, for example. Stored procedures can also accept parameters.
Here’s an example of creating a simple stored procedure in SQL Server to get pet information from our database:
CREATE PROCEDURE uspGetPetById
    @PetId int
AS
    SET NOCOUNT ON;
    SELECT
        p.PetName,
        p.DOB,
        pt.PetType,
        CONCAT(o.FirstName, ' ', o.LastName) AS OwnerName
    FROM Pets p
    INNER JOIN PetTypes pt
    ON p.PetTypeId = pt.PetTypeId
    INNER JOIN Owners o
    ON o.OwnerId = p.OwnerId
    WHERE p.PetId = @PetId;
This stored procedure accepts a parameter called @PetId . This means that when you call the procedure, you need to pass the ID of the pet that you’d like information about. The procedure then selects data from various tables and returns it.
To call the stored procedure, use the EXECUTE dichiarazione. You can alternatively shorten it to EXEC . In PostgreSQL, use the CALL dichiarazione.
EXEC uspGetPetById @PetId = 3;Risultato:
+-----------+------------+-----------+-------------+
| PetName   | DOB        | PetType   | OwnerName   |
|-----------+------------+-----------+-------------|
| Scratch   | 2018-10-01 | Cat       | Bart Pitt   |
+-----------+------------+-----------+-------------+
In this case I was interested in pet number 3, and so that’s the info that I got.
I should mention that the syntax for creating stored procedures can differ quite significantly between DBMSs (as well as their implementations of various SQL statements and commands that you’d use inside a procedure), so I would suggest that you look at the documentation for your particular DBMS if you want to create a stored procedure.
Most RDBMSs also include a large set of system stored procedures that you can use to perform various administration tasks, and to retrieve information about the system.
For a basic overview of stored procedures, including their benefits, see What is a Stored Procedure?
Also, if you’re interested, see How to Create a Stored Procedure in SQL Server to see another example of creating a stored procedure in SQL Server. That example includes some screenshots.
SQL Triggers
A trigger is a special type of stored procedure that automatically executes when an event occurs in the database server.
Most major RDBMSs support DML triggers, which execute when a user tries to modify data through a data manipulation language (DML) event. DML events are INSERT , UPDATE , or DELETE dichiarazioni.
Some DBMSs (such as SQL Server and PostgreSQL) allow triggers to be associated with both tables and views. Others only allow triggers to be associated with tables.
SQL Server also supports DDL triggers and logon triggers.
DDL triggers execute in response to DDL events, such as CREATE , ALTER , and DROP statements, and certain system stored procedures that perform DDL-like operations.
Logon triggers are fired in response to the LOGON event that’s raised when a user’s session is being established.
Here are some articles explaining how to do various things with triggers in SQL Server:
- Create a DML Trigger in SQL Server
- Create a “last modified” column
- Automatically send an email when someone tries to delete a record
- Update a column’s value whenever another column is updated
- Update a column’s value whenever certain other columns are updated
SQL Transactions
SQL transactions are an important part of transactional databases, where data consistency is paramount.
A transaction manages a sequence of SQL statements that must be executed as a single unit of work. This is to ensure that the database never contains the results of partial operations.
When a transaction makes multiple changes to the database, either all the changes succeed when the transaction is committed, or all the changes are undone when the transaction is rolled back.
Transactions help maintain data integrity by ensuring that a sequence of SQL statements execute completely or not at all.
A classic example of a transaction is to move money from one bank account to another. You wouldn’t want money to be deducted from the first bank account, but not appear in the second bank account.
Therefore, you could use a transaction which goes along the lines of this:
START TRANSACTION
Debit account 1
Credit account 2
Record transaction in transaction journal
END TRANSACTION
You could write conditional logic inside that transaction that rolls back the transaction if anything goes wrong.
The end result is that, either the transaction is completed in its entirety, or it’s not completed at all. It’s never half-done.
See my SQL Transactions Tutorial for examples of SQL transactions.
SQL Functions
A function is a routine that can take parameters, perform calculations or other actions, and return a result.
Most DBMSs provide you with the ability to create your own functions, while also providing a range of inbuilt functions.
User-Defined Functions
A user-defined function (UDF) is a function that you create for a specific purpose, and save to the database. You would create such a function for tasks that aren’t catered for by an inbuilt function.
See Introduction to User-Defined Functions in SQL Server for an overview. Although that article is written for SQL Server, most of the general concepts also apply to other DBMSs.
Inbuilt Functions
Most DBMSs have a large range of inbuilt functions that you can use in your SQL queries. For example, there are functions that return the current date and time, functions that format dates and numbers, functions that convert data from one data type to another, and more.
The range of inbuilt functions can be pretty extensive, and depend on the DBMS in use, so I won’t go over them in this SQL tutorial. But I would encourage you to try to find out what inbuilt functions your DBMS supports.
To get you started, the following articles contain some of the most commonly used functions in SQL programming.
SQL Server
- SQL Server String Functions
- SQL Server Mathematical Functions
- SQL Server Date &Time Functions
MySQL
- MySQL String Functions
- MySQL Mathematical Functions
PostgreSQL
- PostgreSQL Date &Time Functions
- PostgreSQL Math Functions
SQLite
- SQLite Aggregate Functions
- SQLite Date &Time Functions