MySQL è uno dei sistemi di gestione di database (DBMS) più diffusi oggi sul mercato. Si è classificato secondo solo al DBMS Oracle nella classifica dei motori DB di quest'anno. Poiché la maggior parte delle applicazioni software ha bisogno di interagire con i dati in qualche forma, i linguaggi di programmazione come Python forniscono strumenti per archiviare e accedere a queste origini dati.
Utilizzando le tecniche discusse in questo tutorial, sarai in grado di integrare in modo efficiente un database MySQL con un'applicazione Python. Svilupperai un piccolo database MySQL per un sistema di classificazione dei film e imparerai come interrogarlo direttamente dal tuo codice Python.
Entro la fine di questo tutorial, sarai in grado di:
- Identifica le caratteristiche uniche di MySQL
- Collega la tua applicazione in un database MySQL
- Interroga il database per recuperare i dati richiesti
- Gestisci le eccezioni che si verificano durante l'accesso al database
- Utilizza le best practice durante la creazione di applicazioni di database
Per ottenere il massimo da questo tutorial, dovresti avere una conoscenza pratica dei concetti di Python come for loop, funzioni, gestione delle eccezioni e installazione di pacchetti Python utilizzando pip . Dovresti anche avere una conoscenza di base dei sistemi di gestione dei database relazionali e delle query SQL come SELECT , DROP , CREATE e JOIN .
Download gratuito: Ottieni un capitolo di esempio da Python Tricks:The Book che mostra le migliori pratiche di Python con semplici esempi che puoi applicare immediatamente per scrivere codice Pythonic più bello.
Confronto tra MySQL e altri database SQL
SQL sta per Structured Query Language ed è un linguaggio di programmazione ampiamente utilizzato per la gestione di database relazionali. Potresti aver sentito parlare delle diverse versioni dei DBMS basati su SQL. I più popolari includono MySQL, PostgreSQL, SQLite e SQL Server. Tutti questi database sono conformi agli standard SQL ma con diversi gradi di conformità.
Essere open source sin dal suo inizio nel 1995, MySQL è diventato rapidamente un leader di mercato tra le soluzioni SQL. MySQL fa anche parte dell'ecosistema Oracle. Sebbene le sue funzionalità principali siano completamente gratuite, ci sono anche alcuni componenti aggiuntivi a pagamento. Attualmente, MySQL è utilizzato da tutte le principali aziende tecnologiche, tra cui Google, LinkedIn, Uber, Netflix, Twitter e altri.
Oltre a una vasta comunità open source per il supporto, ci sono molte altre ragioni per il successo di MySQL:
-
Facilità di installazione: MySQL è stato progettato per essere intuitivo. È abbastanza semplice configurare un database MySQL e diversi strumenti di terze parti ampiamente disponibili, come phpMyAdmin, semplificano ulteriormente il processo di installazione. MySQL è disponibile per tutti i principali sistemi operativi, inclusi Windows, macOS, Linux e Solaris.
-
Velocità: MySQL ha la reputazione di essere una soluzione di database estremamente veloce. Ha un ingombro relativamente ridotto ed è estremamente scalabile a lungo termine.
-
Privilegi utente e sicurezza: MySQL viene fornito con uno script che consente di impostare il livello di sicurezza della password, assegnare password di amministratore e aggiungere e rimuovere i privilegi dell'account utente. Questo script semplifica il processo di amministrazione per un portale di gestione degli utenti di hosting web. Altri DBMS, come PostgreSQL, utilizzano file di configurazione più complicati da usare.
Sebbene MySQL sia famoso per la sua velocità e facilità d'uso, puoi ottenere funzionalità più avanzate con PostgreSQL. Inoltre, MySQL non è completamente conforme a SQL e presenta alcune limitazioni funzionali, come nessun supporto per FULL JOIN clausole.
Potresti anche dover affrontare alcuni problemi con la lettura e la scrittura simultanee in MySQL. Se il tuo software ha molti utenti che scrivono dati su di esso contemporaneamente, PostgreSQL potrebbe essere una scelta più adatta.
Nota: Per un confronto più approfondito di MySQL e PostgreSQL in un contesto reale, consulta Perché Uber Engineering è passato da Postgres a MySQL.
SQL Server è anche un DBMS molto popolare ed è noto per la sua affidabilità, efficienza e sicurezza. È preferito dalle aziende, soprattutto nel settore bancario, che si occupano regolarmente di grandi carichi di lavoro di traffico. È una soluzione commerciale ed è uno dei sistemi più compatibili con i servizi Windows.
Nel 2010, quando Oracle ha acquisito Sun Microsystems e MySQL, molti erano preoccupati per il futuro di MySQL. A quel tempo, Oracle era il più grande concorrente di MySQL. Gli sviluppatori temevano che si trattasse di un'acquisizione ostile di Oracle con l'obiettivo di distruggere MySQL.
Diversi sviluppatori guidati da Michael Widenius, l'autore originale di MySQL, hanno creato un fork della base di codice MySQL e hanno gettato le basi di MariaDB. L'obiettivo era proteggere l'accesso a MySQL e mantenerlo libero per sempre.
Ad oggi, MariaDB rimane completamente con licenza GPL, mantenendola completamente di dominio pubblico. Alcune funzionalità di MySQL, invece, sono disponibili solo con licenze a pagamento. Inoltre, MariaDB fornisce diverse funzionalità estremamente utili che non sono supportate dal server MySQL, come SQL distribuito e storage a colonne. Puoi trovare più differenze tra MySQL e MariaDB elencate sul sito Web di MariaDB.
MySQL utilizza una sintassi molto simile all'SQL standard. Ci sono, tuttavia, alcune differenze notevoli menzionate nella documentazione ufficiale.
Installazione di MySQL Server e MySQL Connector/Python
Ora, per iniziare a lavorare su questo tutorial, devi configurare due cose:un server MySQL e un connettore MySQL . Il server MySQL fornirà tutti i servizi necessari per la gestione del database. Una volta che il server è attivo e funzionante, puoi connettere la tua applicazione Python con esso utilizzando MySQL Connector/Python.
Installazione del server MySQL
La documentazione ufficiale descrive in dettaglio il modo consigliato per scaricare e installare il server MySQL. Troverai le istruzioni per tutti i sistemi operativi più diffusi, inclusi Windows, macOS, Solaris, Linux e molti altri.
Per Windows, il modo migliore è scaricare MySQL Installer e lasciare che si occupi dell'intero processo. Il gestore dell'installazione aiuta anche a configurare le impostazioni di sicurezza del server MySQL. Nella pagina Account e ruoli, devi inserire una password per il root (amministratore) e, facoltativamente, aggiungi altri utenti con privilegi diversi:
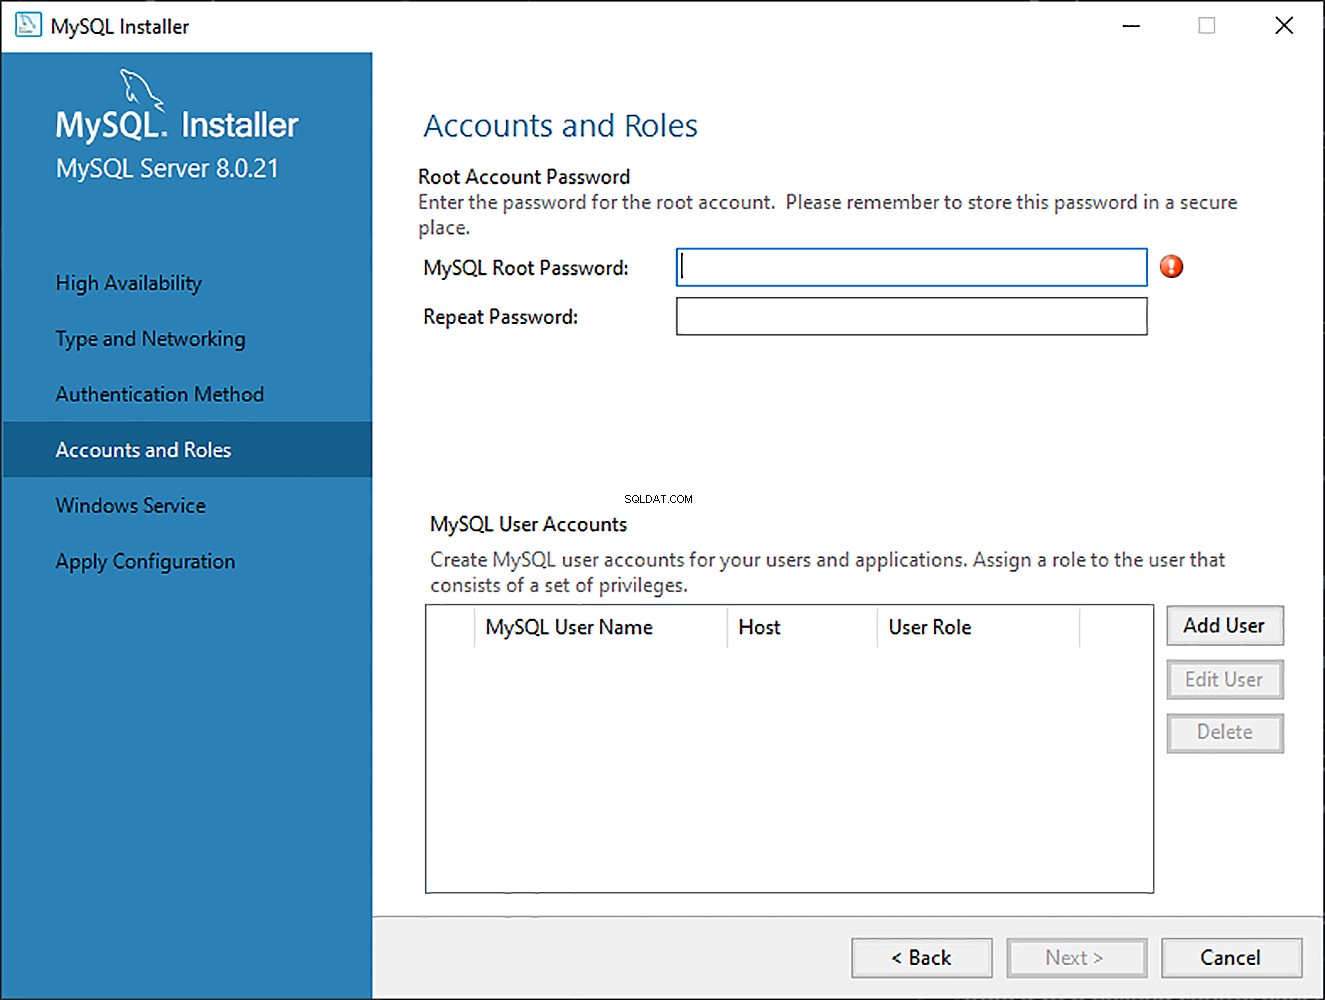
Sebbene tu debba specificare le credenziali per l'account root durante la configurazione, puoi modificare queste impostazioni in seguito.
Nota: Ricorda il nome host, il nome utente e la password poiché saranno necessari per stabilire una connessione con il server MySQL in seguito.
Sebbene per questo tutorial sia necessario solo il server MySQL, puoi anche configurare altri strumenti utili come MySQL Workbench utilizzando questi programmi di installazione. Se non desideri installare MySQL direttamente nel tuo sistema operativo, la distribuzione di MySQL su Linux con Docker è un'alternativa conveniente.
Installazione di MySQL Connector/Python
Un driver di database è un software che consente a un'applicazione di connettersi e interagire con un sistema di database. I linguaggi di programmazione come Python necessitano di un driver speciale prima di poter parlare con un database di un fornitore specifico.
Questi driver sono in genere ottenuti come moduli di terze parti. L'API del database Python (DB-API) definisce l'interfaccia standard a cui devono essere conformi tutti i driver di database Python. Questi dettagli sono documentati in PEP 249. Tutti i driver di database Python, come sqlite3 per SQLite, psycopg per PostgreSQL e MySQL Connector/Python per MySQL, seguono queste regole di implementazione.
Nota: La documentazione ufficiale di MySQL utilizza il termine connettore invece di driver . Tecnicamente, i connettori sono associati solo alla connessione a un database, non all'interazione con esso. Tuttavia, il termine è spesso usato per l'intero modulo di accesso al database che comprende il connettore e l'autista.
Per mantenere la coerenza con la documentazione, vedrai il termine connettore ogni volta che viene menzionato MySQL.
Molti linguaggi di programmazione popolari hanno la propria API di database. Ad esempio, Java dispone dell'API Java Database Connectivity (JDBC). Se devi connettere un'applicazione Java a un database MySQL, devi utilizzare il connettore MySQL JDBC, che segue l'API JDBC.
Allo stesso modo, in Python è necessario installare un connettore MySQL Python per interagire con un database MySQL. Molti pacchetti seguono gli standard DB-API, ma il più popolare è MySQL Connector/Python. Puoi ottenerlo con pip :
$ pip install mysql-connector-python
pip installa il connettore come modulo di terze parti nell'ambiente virtuale attualmente attivo. Si consiglia di configurare un ambiente virtuale isolato per il progetto insieme a tutte le dipendenze.
Per verificare se l'installazione è andata a buon fine, digita il seguente comando sul tuo terminale Python:
>>>>>> import mysql.connector
Se il codice sopra viene eseguito senza errori, allora mysql.connector è installato e pronto per l'uso. Se riscontri errori, assicurati di essere nell'ambiente virtuale corretto e di utilizzare l'interprete Python corretto.
Assicurati di installare il mysql-connector-python corretto pacchetto, che è un'implementazione di Python puro. Fai attenzione ai connettori con nomi simili ma ora deprezzati come mysql-connector .
Stabilire una connessione con MySQL Server
MySQL è un basato su server sistema di gestione della banca dati. Un server potrebbe contenere più database. Per interagire con un database, devi prima stabilire una connessione con il server. Il flusso di lavoro generale di un programma Python che interagisce con un database basato su MySQL è il seguente:
- Connettiti al server MySQL.
- Crea un nuovo database.
- Connettiti al database appena creato o esistente.
- Esegui una query SQL e recupera i risultati.
- Informa il database se vengono apportate modifiche a una tabella.
- Chiudi la connessione al server MySQL.
Si tratta di un flusso di lavoro generico che potrebbe variare a seconda della singola applicazione. Ma qualunque sia l'applicazione, il primo passo è connettere il tuo database con la tua applicazione.
Stabilire una connessione
Il primo passo per interagire con un server MySQL è stabilire una connessione. Per fare ciò, hai bisogno di connect() dal mysql.connector modulo. Questa funzione accetta parametri come host , user e password e restituisce un MySQLConnection oggetto. Puoi ricevere queste credenziali come input dall'utente e passarle a connect() :
from getpass import getpass
from mysql.connector import connect, Error

try:
    with connect(
        host="localhost",
        user=input("Enter username: "),
        password=getpass("Enter password: "),
    ) as connection:
        print(connection)
except Error as e:
    print(e)
Il codice sopra utilizza le credenziali di accesso immesse per stabilire una connessione con il tuo server MySQL. In cambio, ottieni un MySQLConnection oggetto, che è memorizzato nella connection variabile. D'ora in poi, utilizzerai questa variabile per accedere al tuo server MySQL.
Ci sono diverse cose importanti da notare nel codice sopra:
-
Dovresti sempre occuparti delle eccezioni che potrebbero essere sollevate mentre stabilisci una connessione al server MySQL. Questo è il motivo per cui usi un
try…exceptblocca per catturare e stampare eventuali eccezioni che potresti incontrare. -
Dovresti sempre chiudere la connessione dopo aver terminato l'accesso al database. Lasciare connessioni aperte inutilizzate può causare diversi errori imprevisti e problemi di prestazioni. Il codice sopra si avvale di un gestore di contesto che utilizza
with, che astrae il processo di pulizia della connessione. -
Non dovresti mai codificare le tue credenziali di accesso , ovvero il tuo nome utente e password, direttamente in uno script Python. Questa è una cattiva pratica per la distribuzione e rappresenta una seria minaccia alla sicurezza. Il codice sopra richiede all'utente le credenziali di accesso. Utilizza il
getpassintegrato modulo per nascondere la password. Sebbene sia meglio dell'hard-coding, esistono altri modi più sicuri per archiviare informazioni sensibili, come l'utilizzo di variabili di ambiente.
Ora hai stabilito una connessione tra il tuo programma e il tuo server MySQL, ma devi comunque creare un nuovo database o connetterti a un database esistente all'interno del server.
Creazione di un nuovo database
Nell'ultima sezione, hai stabilito una connessione con il tuo server MySQL. Per creare un nuovo database, devi eseguire un'istruzione SQL:
CREATE DATABASE books_db;
L'istruzione precedente creerà un nuovo database con il nome books_db .
Nota: In MySQL, è obbligatorio inserire un punto e virgola (; ) alla fine di un'istruzione, che denota la conclusione di una query. Tuttavia, MySQL Connector/Python aggiunge automaticamente un punto e virgola alla fine delle query, quindi non è necessario utilizzarlo nel codice Python.
Per eseguire una query SQL in Python, dovrai utilizzare un cursore, che astrae l'accesso ai record del database. MySQL Connector/Python ti fornisce il MySQLCursor class, che istanzia oggetti che possono eseguire query MySQL in Python. Un'istanza di MySQLCursor la classe è anche chiamata cursor .
cursor gli oggetti utilizzano una MySQLConnection oggetto per interagire con il tuo server MySQL. Per creare un cursor , usa il .cursor() metodo della tua connection variabile:
cursor = connection.cursor()
Il codice sopra fornisce un'istanza di MySQLCursor classe.
Una query che deve essere eseguita viene inviata a cursor.execute() in formato stringa. In questa particolare occasione, invierai il CREATE DATABASE interrogare su cursor.execute() :
from getpass import getpass
from mysql.connector import connect, Error

try:
    with connect(
        host="localhost",
        user=input("Enter username: "),
        password=getpass("Enter password: "),
    ) as connection:
        create_db_query = "CREATE DATABASE online_movie_rating"
        with connection.cursor() as cursor:
            cursor.execute(create_db_query)
except Error as e:
    print(e)
Dopo aver eseguito il codice sopra, avrai un nuovo database chiamato online_movie_rating nel tuo server MySQL.
Il CREATE DATABASE query viene memorizzata come stringa in create_db_query variabile e quindi passato a cursor.execute() per l'esecuzione. Il codice utilizza un gestore di contesto con il cursor oggetto per gestire il processo di pulizia.
Potresti ricevere un errore qui se esiste già un database con lo stesso nome nel tuo server. Per confermare ciò, puoi visualizzare il nome di tutti i database nel tuo server. Usando lo stesso MySQLConnection oggetto di prima, eseguire SHOW DATABASES dichiarazione:
>>> show_db_query = "SHOW DATABASES"
>>> with connection.cursor() as cursor:
...     cursor.execute(show_db_query)
...     for db in cursor:
...         print(db)
...
('information_schema',)
('mysql',)
('online_movie_rating',)
('performance_schema',)
('sys',)
Il codice sopra stampa i nomi di tutti i database attualmente nel tuo server MySQL. Il SHOW DATABASES comando restituisce anche alcuni database che non hai creato nel tuo server, come information_schema , performance_schema , e così via. Questi database vengono generati automaticamente dal server MySQL e forniscono l'accesso a una varietà di metadati del database e alle impostazioni del server MySQL.
Hai creato un nuovo database in questa sezione eseguendo CREATE DATABASE dichiarazione. Nella prossima sezione, vedrai come connetterti a un database già esistente.
Connessione a un database esistente
Nell'ultima sezione, hai creato un nuovo database chiamato online_movie_rating . Tuttavia, non ti sei ancora connesso ad esso. In molte situazioni, avrai già un database MySQL che desideri connettere con la tua applicazione Python.
Puoi farlo usando lo stesso connect() funzione che hai utilizzato in precedenza inviando un parametro aggiuntivo chiamato database :
from getpass import getpass
from mysql.connector import connect, Error

try:
    with connect(
        host="localhost",
        user=input("Enter username: "),
        password=getpass("Enter password: "),
        database="online_movie_rating",
    ) as connection:
        print(connection)
except Error as e:
    print(e)
Il codice precedente è molto simile allo script di connessione utilizzato in precedenza. L'unico cambiamento qui è un database aggiuntivo parametro, dove il nome del tuo database viene passato a connect() . Una volta eseguito questo script, sarai connesso al online_movie_rating banca dati.
Creazione, modifica e rilascio di una tabella
In questa sezione imparerai come eseguire alcune query DDL di base come CREATE , DROP e ALTER con Python. Darai una rapida occhiata al database MySQL che utilizzerai nel resto di questo tutorial. Creerai anche tutte le tabelle richieste per il database e imparerai come eseguire modifiche su queste tabelle in seguito.
Definizione dello schema del database
Puoi iniziare creando uno schema di database per un sistema di classificazione dei film online. Il database sarà composto da tre tabelle:
moviescontiene informazioni generali sui film e ha i seguenti attributi:idtitlerelease_yeargenrecollection_in_mil
reviewerscontiene informazioni sulle persone che hanno pubblicato recensioni o valutazioni e ha i seguenti attributi:idfirst_namelast_name
ratingscontiene informazioni sulle valutazioni che sono state pubblicate e ha i seguenti attributi:movie_id(chiave straniera)reviewer_id(chiave straniera)ratings
Un sistema di classificazione dei film nel mondo reale, come IMDb, dovrebbe memorizzare un sacco di altri attributi, come e-mail, elenchi di cast di film e così via. Se lo desideri, puoi aggiungere più tabelle e attributi a questo database. Ma queste tre tabelle saranno sufficienti per lo scopo di questo tutorial.
L'immagine seguente mostra lo schema del database:
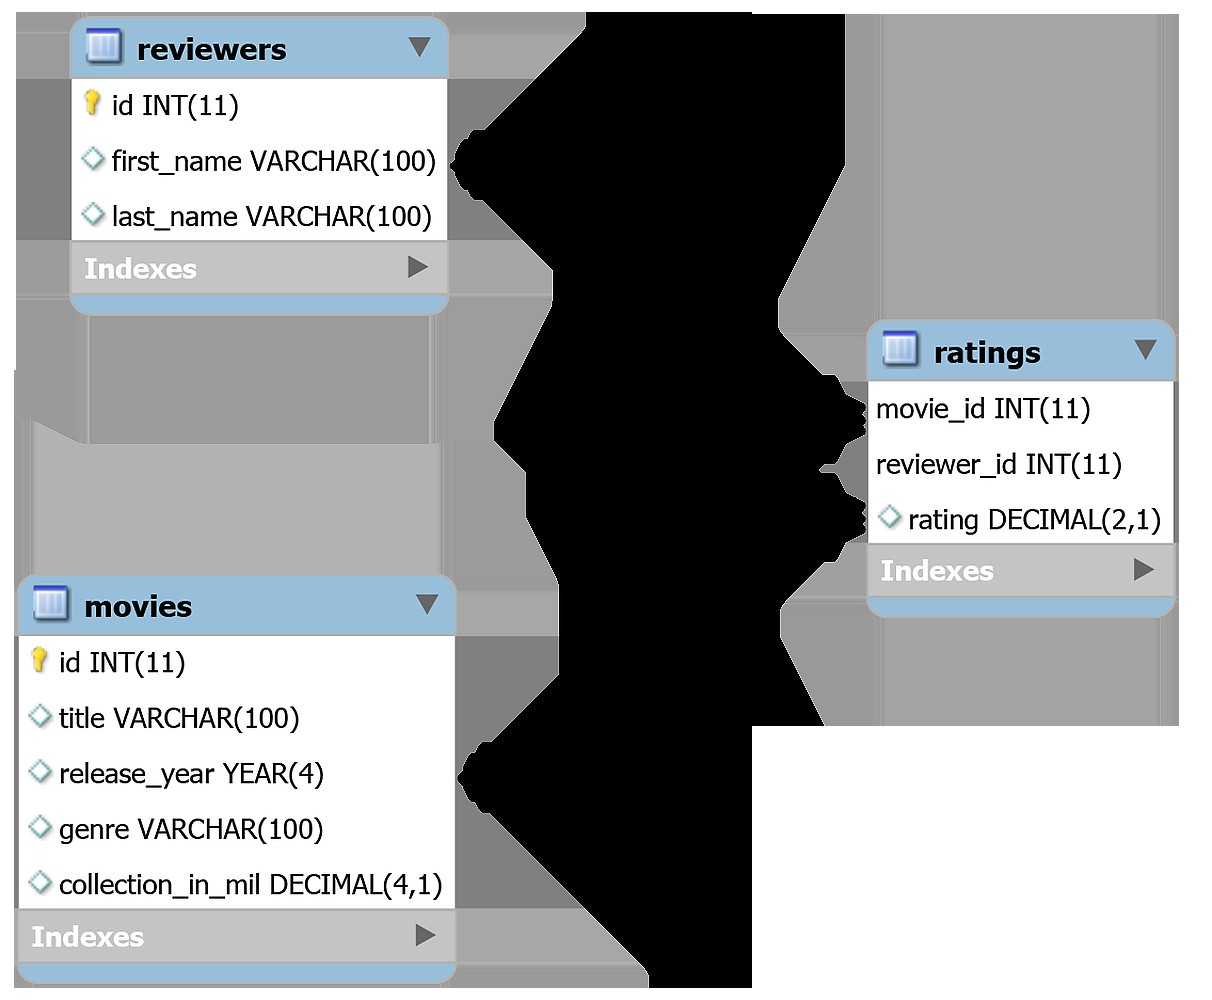
Le tabelle in questo database sono correlate tra loro. movies e reviewers avrà un molti-a-molti relazione poiché un film può essere recensito da più revisori e un revisore può rivedere più film. Le ratings la tabella collega i movies tabella con i reviewers tabella.
Creazione di tabelle utilizzando CREATE TABLE Dichiarazione
Ora, per creare una nuova tabella in MySQL, devi usare CREATE TABLE dichiarazione. La seguente query MySQL creerà i movies tabella per il tuo online_movie_rating banca dati:
CREATE TABLE movies(
    id INT AUTO_INCREMENT PRIMARY KEY,
    title VARCHAR(100),
    release_year YEAR(4),
    genre VARCHAR(100),
    collection_in_mil INT
);
Se hai già esaminato le istruzioni SQL, la maggior parte della query precedente potrebbe avere senso. Ma ci sono alcune differenze nella sintassi di MySQL di cui dovresti essere a conoscenza.
Ad esempio, MySQL ha un'ampia varietà di tipi di dati per la tua lettura, incluso YEAR , INT , BIGINT , e così via. Inoltre, MySQL usa AUTO_INCREMENT parola chiave quando il valore di una colonna deve essere incrementato automaticamente all'inserimento di nuovi record.
Per creare una nuova tabella, devi passare questa query a cursor.execute() , che accetta una query MySQL ed esegue la query sul database MySQL connesso:
create_movies_table_query = """
CREATE TABLE movies(
    id INT AUTO_INCREMENT PRIMARY KEY,
    title VARCHAR(100),
    release_year YEAR(4),
    genre VARCHAR(100),
    collection_in_mil INT
)
"""
with connection.cursor() as cursor:
    cursor.execute(create_movies_table_query)
    connection.commit()
Ora hai i movies tabella nel database. Passi create_movies_table_query a cursor.execute() , che esegue l'esecuzione richiesta.
Nota: La connection la variabile si riferisce a MySQLConnection oggetto restituito durante la connessione al database.
Nota anche il connection.commit() dichiarazione alla fine del codice. Per impostazione predefinita, il tuo connettore MySQL non esegue il commit automatico delle transazioni. In MySQL, le modifiche menzionate in una transazione si verificano solo quando si utilizza un COMMIT comando alla fine. Chiama sempre questo metodo dopo ogni transazione per apportare modifiche alla tabella effettiva.
Come hai fatto con i movies tabella, eseguire il seguente script per creare i reviewers tabella:
create_reviewers_table_query = """
CREATE TABLE reviewers (
    id INT AUTO_INCREMENT PRIMARY KEY,
    first_name VARCHAR(100),
    last_name VARCHAR(100)
)
"""
with connection.cursor() as cursor:
    cursor.execute(create_reviewers_table_query)
    connection.commit()
Se necessario, puoi aggiungere ulteriori informazioni su un revisore, come il suo ID e-mail o informazioni demografiche. Ma first_name e last_name servirà al tuo scopo per ora.
Infine, puoi creare le ratings tabella utilizzando il seguente script:
create_ratings_table_query = """
CREATE TABLE ratings (
    movie_id INT,
    reviewer_id INT,
    rating DECIMAL(2,1),
    FOREIGN KEY(movie_id) REFERENCES movies(id),
    FOREIGN KEY(reviewer_id) REFERENCES reviewers(id),
    PRIMARY KEY(movie_id, reviewer_id)
)
"""
with connection.cursor() as cursor:
    cursor.execute(create_ratings_table_query)
    connection.commit()
L'implementazione delle relazioni di chiave esterna in MySQL è leggermente diversa e limitata rispetto all'SQL standard. In MySQL, sia il genitore che il figlio nel vincolo di chiave esterna devono utilizzare lo stesso motore di archiviazione .
Un motore di archiviazione è il componente software sottostante utilizzato da un sistema di gestione del database per eseguire operazioni SQL. In MySQL, i motori di archiviazione sono disponibili in due versioni diverse:
-
Motori di archiviazione transazionali sono sicure per le transazioni e ti consentono di annullare le transazioni utilizzando semplici comandi come
rollback. Molti motori MySQL popolari, inclusi InnoDB e NDB, appartengono a questa categoria. -
Motori di archiviazione non transazionali dipendono dall'elaborato codice manuale per annullare le istruzioni commesse su un database. MyISAM, MEMORY e molti altri motori MySQL non sono transazionali.
InnoDB è il motore di archiviazione predefinito e più popolare. Aiuta a mantenere l'integrità dei dati supportando i vincoli di chiave esterna. Ciò significa che qualsiasi operazione CRUD su una chiave esterna viene verificata per garantire che non porti a incoerenze tra tabelle diverse.
Inoltre, nota che le ratings la tabella utilizza le colonne movie_id e reviewer_id , entrambe le chiavi esterne, insieme come chiave primaria . Questo passaggio garantisce che un revisore non possa valutare due volte lo stesso film.
Puoi scegliere di riutilizzare lo stesso cursore per più esecuzioni. In tal caso, tutte le esecuzioni diventerebbero una transazione atomica anziché più transazioni separate. Ad esempio, puoi eseguire tutti i CREATE TABLE dichiarazioni con un cursore e quindi eseguire il commit della transazione una sola volta:
with connection.cursor() as cursor:
    cursor.execute(create_movies_table_query)
    cursor.execute(create_reviewers_table_query)
    cursor.execute(create_ratings_table_query)
    connection.commit()
Il codice sopra eseguirà prima tutti e tre i CREATE dichiarazioni. Quindi invierà un COMMIT comando al server MySQL che esegue il commit della transazione. Puoi anche usare .rollback() per inviare un ROLLBACK comando al server MySQL e rimuovere tutte le modifiche ai dati dalla transazione.
Mostrare uno schema di tabella usando DESCRIBE Dichiarazione
Ora che hai creato tutte e tre le tabelle, puoi guardare il loro schema usando la seguente istruzione SQL:
DESCRIBE <table_name>;
Per ottenere alcuni risultati dal cursor oggetto, devi usare cursor.fetchall() . Questo metodo recupera tutte le righe dall'ultima istruzione eseguita. Supponendo che tu abbia già MySQLConnection oggetto nella connection variabile, puoi stampare tutti i risultati recuperati da cursor.fetchall() :
>>> show_table_query = "DESCRIBE movies"
>>> with connection.cursor() as cursor:
...     cursor.execute(show_table_query)
...     # Fetch rows from last executed query
...     result = cursor.fetchall()
...     for row in result:
...         print(row)
...
('id', 'int(11)', 'NO', 'PRI', None, 'auto_increment')
('title', 'varchar(100)', 'YES', '', None, '')
('release_year', 'year(4)', 'YES', '', None, '')
('genre', 'varchar(100)', 'YES', '', None, '')
('collection_in_mil', 'int(11)', 'YES', '', None, '')
Dopo aver eseguito il codice sopra, dovresti ricevere una tabella contenente informazioni su tutte le colonne in movies tavolo. Per ogni colonna, riceverai dettagli come il tipo di dati della colonna, se la colonna è una chiave primaria e così via.
Modifica dello schema di una tabella utilizzando ALTER Dichiarazione
Nei movies tabella, hai una colonna chiamata collection_in_mil , che contiene milioni di dollari di incassi al botteghino di un film. Puoi scrivere la seguente istruzione MySQL per modificare il tipo di dati di collection_in_mil attributo da INT a DECIMAL :
ALTER TABLE movies MODIFY COLUMN collection_in_mil DECIMAL(4,1);
DECIMAL(4,1) indica un numero decimale che può avere un massimo di 4 cifre, di cui 1 è decimale, come 120.1 , 3.4 , 38.0 , e così via. Dopo aver eseguito ALTER TABLE istruzione, puoi mostrare lo schema della tabella aggiornato usando DESCRIBE :
>>> alter_table_query = """
... ALTER TABLE movies
... MODIFY COLUMN collection_in_mil DECIMAL(4,1)
... """
>>> show_table_query = "DESCRIBE movies"
>>> with connection.cursor() as cursor:
...     cursor.execute(alter_table_query)
...     cursor.execute(show_table_query)
...     # Fetch rows from last executed query
...     result = cursor.fetchall()
...     print("Movie Table Schema after alteration:")
...     for row in result:
...         print(row)
...
Movie Table Schema after alteration
('id', 'int(11)', 'NO', 'PRI', None, 'auto_increment')
('title', 'varchar(100)', 'YES', '', None, '')
('release_year', 'year(4)', 'YES', '', None, '')
('genre', 'varchar(100)', 'YES', '', None, '')
('collection_in_mil', 'decimal(4,1)', 'YES', '', None, '')
Come mostrato nell'output, il collection_in_mil l'attributo è ora di tipo DECIMAL(4,1) . Nota anche che nel codice sopra, chiami cursor.execute() due volte. Ma cursor.fetchall() recupera le righe solo dall'ultima query eseguita, che è show_table_query .
Eliminazione di tabelle utilizzando il DROP Dichiarazione
Per eliminare una tabella, devi eseguire DROP TABLE istruzione in MySQL. L'eliminazione di una tabella è un irreversibile processi. Se esegui il codice seguente, dovrai chiamare CREATE TABLE interroga di nuovo per utilizzare i ratings tabella nelle prossime sezioni.
Per eliminare le ratings tabella, invia drop_table_query a cursor.execute() :
drop_table_query = "DROP TABLE ratings"
with connection.cursor() as cursor:
    cursor.execute(drop_table_query)
Se esegui il codice sopra, avrai eliminato con successo i ratings tabella.
Inserimento di record nelle tabelle
Nell'ultima sezione, hai creato tre tabelle nel tuo database:movies , reviewers e ratings . Ora devi popolare queste tabelle con i dati. Questa sezione tratterà due modi diversi per inserire record in MySQL Connector per Python.
Il primo metodo, .execute() , funziona bene quando il numero di record è piccolo e i record possono essere codificati. Il secondo metodo, .executemany() , è più popolare ed è più adatto per scenari del mondo reale.
Utilizzo di .execute()
Il primo approccio utilizza lo stesso cursor.execute() metodo che hai utilizzato fino ad ora. Scrivi il INSERT INTO interrogare in una stringa e passarla a cursor.execute() . Puoi usare questo metodo per inserire dati nei movies tabella.
Per riferimento, i movies la tabella ha cinque attributi:
idtitlerelease_yeargenrecollection_in_mil
Non è necessario aggiungere dati per id come AUTO_INCREMENT calcola automaticamente id per te. Il seguente script inserisce i record nei movies tabella:
insert_movies_query = """
INSERT INTO movies (title, release_year, genre, collection_in_mil)
VALUES
    ("Forrest Gump", 1994, "Drama", 330.2),
    ("3 Idiots", 2009, "Drama", 2.4),
    ("Eternal Sunshine of the Spotless Mind", 2004, "Drama", 34.5),
    ("Good Will Hunting", 1997, "Drama", 138.1),
    ("Skyfall", 2012, "Action", 304.6),
    ("Gladiator", 2000, "Action", 188.7),
    ("Black", 2005, "Drama", 3.0),
    ("Titanic", 1997, "Romance", 659.2),
    ("The Shawshank Redemption", 1994, "Drama",28.4),
    ("Udaan", 2010, "Drama", 1.5),
    ("Home Alone", 1990, "Comedy", 286.9),
    ("Casablanca", 1942, "Romance", 1.0),
    ("Avengers: Endgame", 2019, "Action", 858.8),
    ("Night of the Living Dead", 1968, "Horror", 2.5),
    ("The Godfather", 1972, "Crime", 135.6),
    ("Haider", 2014, "Action", 4.2),
    ("Inception", 2010, "Adventure", 293.7),
    ("Evil", 2003, "Horror", 1.3),
    ("Toy Story 4", 2019, "Animation", 434.9),
    ("Air Force One", 1997, "Drama", 138.1),
    ("The Dark Knight", 2008, "Action",535.4),
    ("Bhaag Milkha Bhaag", 2013, "Sport", 4.1),
    ("The Lion King", 1994, "Animation", 423.6),
    ("Pulp Fiction", 1994, "Crime", 108.8),
    ("Kai Po Che", 2013, "Sport", 6.0),
    ("Beasts of No Nation", 2015, "War", 1.4),
    ("Andadhun", 2018, "Thriller", 2.9),
    ("The Silence of the Lambs", 1991, "Crime", 68.2),
    ("Deadpool", 2016, "Action", 363.6),
    ("Drishyam", 2015, "Mystery", 3.0)
"""
with connection.cursor() as cursor:
    cursor.execute(insert_movies_query)
    connection.commit()
The movies table is now loaded with thirty records. The code calls connection.commit() at the end. It’s crucial to call .commit() after preforming any modifications to a table.
Using .executemany()
The previous approach is more suitable when the number of records is fairly small and you can write these records directly into the code. But this is rarely true. You’ll often have this data stored in some other file, or the data will be generated by a different script and will need to be added to the MySQL database.
This is where .executemany() comes in handy. It accepts two parameters:
- A query that contains placeholders for the records that need to be inserted
- A list that contains all records that you wish to insert
The following example inserts records for the reviewers tabella:
insert_reviewers_query = """
INSERT INTO reviewers
(first_name, last_name)
VALUES ( %s, %s )
"""
reviewers_records = [
    ("Chaitanya", "Baweja"),
    ("Mary", "Cooper"),
    ("John", "Wayne"),
    ("Thomas", "Stoneman"),
    ("Penny", "Hofstadter"),
    ("Mitchell", "Marsh"),
    ("Wyatt", "Skaggs"),
    ("Andre", "Veiga"),
    ("Sheldon", "Cooper"),
    ("Kimbra", "Masters"),
    ("Kat", "Dennings"),
    ("Bruce", "Wayne"),
    ("Domingo", "Cortes"),
    ("Rajesh", "Koothrappali"),
    ("Ben", "Glocker"),
    ("Mahinder", "Dhoni"),
    ("Akbar", "Khan"),
    ("Howard", "Wolowitz"),
    ("Pinkie", "Petit"),
    ("Gurkaran", "Singh"),
    ("Amy", "Farah Fowler"),
    ("Marlon", "Crafford"),
]
with connection.cursor() as cursor:
    cursor.executemany(insert_reviewers_query, reviewers_records)
    connection.commit()
In the script above, you pass both the query and the list of records as arguments to .executemany() . These records could have been fetched from a file or from the user and stored in the reviewers_records elenco.
The code uses %s as a placeholder for the two strings that had to be inserted in the insert_reviewers_query . Placeholders act as format specifiers and help reserve a spot for a variable inside a string. The specified variable is then added to this spot during execution.
You can similarly use .executemany() to insert records in the ratings tabella:
insert_ratings_query = """
INSERT INTO ratings
(rating, movie_id, reviewer_id)
VALUES ( %s, %s, %s)
"""
ratings_records = [
    (6.4, 17, 5), (5.6, 19, 1), (6.3, 22, 14), (5.1, 21, 17),
    (5.0, 5, 5), (6.5, 21, 5), (8.5, 30, 13), (9.7, 6, 4),
    (8.5, 24, 12), (9.9, 14, 9), (8.7, 26, 14), (9.9, 6, 10),
    (5.1, 30, 6), (5.4, 18, 16), (6.2, 6, 20), (7.3, 21, 19),
    (8.1, 17, 18), (5.0, 7, 2), (9.8, 23, 3), (8.0, 22, 9),
    (8.5, 11, 13), (5.0, 5, 11), (5.7, 8, 2), (7.6, 25, 19),
    (5.2, 18, 15), (9.7, 13, 3), (5.8, 18, 8), (5.8, 30, 15),
    (8.4, 21, 18), (6.2, 23, 16), (7.0, 10, 18), (9.5, 30, 20),
    (8.9, 3, 19), (6.4, 12, 2), (7.8, 12, 22), (9.9, 15, 13),
    (7.5, 20, 17), (9.0, 25, 6), (8.5, 23, 2), (5.3, 30, 17),
    (6.4, 5, 10), (8.1, 5, 21), (5.7, 22, 1), (6.3, 28, 4),
    (9.8, 13, 1)
]
with connection.cursor() as cursor:
    cursor.executemany(insert_ratings_query, ratings_records)
    connection.commit()
All three tables are now populated with data. You now have a fully functional online movie rating database. The next step is to understand how to interact with this database.
Reading Records From the Database
Until now, you’ve been building your database. Now it’s time to perform some queries on it and find some interesting properties from this dataset. In this section, you’ll learn how to read records from database tables using the SELECT dichiarazione.
Reading Records Using the SELECT Statement
To retrieve records, you need to send a SELECT query to cursor.execute() . Then you use cursor.fetchall() to extract the retrieved table in the form of a list of rows or records.
Try writing a MySQL query to select all records from the movies table and send it to .execute() :
>>> select_movies_query = "SELECT * FROM movies LIMIT 5"
>>> with connection.cursor() as cursor:
...     cursor.execute(select_movies_query)
...     result = cursor.fetchall()
...     for row in result:
...         print(row)
...
(1, 'Forrest Gump', 1994, 'Drama', Decimal('330.2'))
(2, '3 Idiots', 2009, 'Drama', Decimal('2.4'))
(3, 'Eternal Sunshine of the Spotless Mind', 2004, 'Drama', Decimal('34.5'))
(4, 'Good Will Hunting', 1997, 'Drama', Decimal('138.1'))
(5, 'Skyfall', 2012, 'Action', Decimal('304.6'))
The result variable holds the records returned from using .fetchall() . It’s a list of tuples representing individual records from the table.
In the query above, you use the LIMIT clause to constrain the number of rows that are received from the SELECT dichiarazione. Developers often use LIMIT to perform pagination when handling large volumes of data.
In MySQL, the LIMIT clause takes one or two nonnegative numeric arguments. When using one argument, you specify the maximum number of rows to return. Since your query includes LIMIT 5 , only the first 5 records are fetched. When using both arguments, you can also specify the offset of the first row to return:
SELECT * FROM movies LIMIT 2,5;
The first argument specifies an offset of 2 , and the second argument constrains the number of returned rows to 5 . The above query will return rows 3 to 7.
You can also query for selected columns:
>>>>>> select_movies_query = "SELECT title, release_year FROM movies LIMIT 5"
>>> with connection.cursor() as cursor:
... cursor.execute(select_movies_query)
... for row in cursor.fetchall():
... print(row)
...
('Forrest Gump', 1994)
('3 Idiots', 2009)
('Eternal Sunshine of the Spotless Mind', 2004)
('Good Will Hunting', 1997)
('Skyfall', 2012)
Now, the code outputs values only from the two specified columns:title and release_year .
Filtering Results Using the WHERE Clause
You can filter table records by specific criteria using the WHERE clausola. For example, to retrieve all movies with a box office collection greater than $300 million, you could run the following query:
SELECT title, collection_in_mil
FROM movies
WHERE collection_in_mil > 300;
You can also use ORDER BY clause in the last query to sort the results from the highest to the lowest earner:
>>> select_movies_query = """
... SELECT title, collection_in_mil
... FROM movies
... WHERE collection_in_mil > 300
... ORDER BY collection_in_mil DESC
... """
>>> with connection.cursor() as cursor:
...     cursor.execute(select_movies_query)
...     for movie in cursor.fetchall():
...         print(movie)
...
('Avengers: Endgame', Decimal('858.8'))
('Titanic', Decimal('659.2'))
('The Dark Knight', Decimal('535.4'))
('Toy Story 4', Decimal('434.9'))
('The Lion King', Decimal('423.6'))
('Deadpool', Decimal('363.6'))
('Forrest Gump', Decimal('330.2'))
('Skyfall', Decimal('304.6'))
MySQL offers a plethora of string formatting operations like CONCAT for concatenating strings. Often, websites will show the movie title along with its release year to avoid confusion. To retrieve the titles of the top five grossing movies, concatenated with their release years, you can write the following query:
>>> select_movies_query = """
... SELECT CONCAT(title, " (", release_year, ")"),
...       collection_in_mil
... FROM movies
... ORDER BY collection_in_mil DESC
... LIMIT 5
... """
>>> with connection.cursor() as cursor:
...     cursor.execute(select_movies_query)
...     for movie in cursor.fetchall():
...         print(movie)
...
('Avengers: Endgame (2019)', Decimal('858.8'))
('Titanic (1997)', Decimal('659.2'))
('The Dark Knight (2008)', Decimal('535.4'))
('Toy Story 4 (2019)', Decimal('434.9'))
('The Lion King (1994)', Decimal('423.6'))
If you don’t want to use the LIMIT clause and you don’t need to fetch all the records, then the cursor object has .fetchone() and .fetchmany() methods as well:
.fetchone()retrieves either the next row of the result, as a tuple, orNoneif no more rows are available..fetchmany()retrieves the next set of rows from the result as a list of tuples. It has asizeargument, which defaults to1, that you can use to specify the number of rows you need to fetch. If no more rows are available, then the method returns an empty list.
Try retrieving the titles of the five highest-grossing movies concatenated with their release years again, but this time use .fetchmany() :
>>> select_movies_query = """
... SELECT CONCAT(title, " (", release_year, ")"),
...       collection_in_mil
... FROM movies
... ORDER BY collection_in_mil DESC
... """
>>> with connection.cursor() as cursor:
...     cursor.execute(select_movies_query)
...     for movie in cursor.fetchmany(size=5):
...         print(movie)
...     cursor.fetchall()
...
('Avengers: Endgame (2019)', Decimal('858.8'))
('Titanic (1997)', Decimal('659.2'))
('The Dark Knight (2008)', Decimal('535.4'))
('Toy Story 4 (2019)', Decimal('434.9'))
('The Lion King (1994)', Decimal('423.6'))
The output with .fetchmany() is similar to what you received when you used the LIMIT clausola. You might have noticed the additional cursor.fetchall() call at the end. You do this to clean all the remaining results that weren’t read by .fetchmany() .
It’s necessary to clean all unread results before executing any other statements on the same connection. Otherwise, an InternalError: Unread result found exception will be raised.
Handling Multiple Tables Using the JOIN Statement
If you found the queries in the last section to be quite straightforward, don’t worry. You can make your SELECT queries as complex as you want using the same methods from the last section.
Let’s look at some slightly more complex JOIN interrogazioni. If you want to find out the name of the top five highest-rated movies in your database, then you can run the following query:
>>> select_movies_query = """
... SELECT title, AVG(rating) as average_rating
... FROM ratings
... INNER JOIN movies
...     ON movies.id = ratings.movie_id
... GROUP BY movie_id
... ORDER BY average_rating DESC
... LIMIT 5
... """
>>> with connection.cursor() as cursor:
...     cursor.execute(select_movies_query)
...     for movie in cursor.fetchall():
...         print(movie)
...
('Night of the Living Dead', Decimal('9.90000'))
('The Godfather', Decimal('9.90000'))
('Avengers: Endgame', Decimal('9.75000'))
('Eternal Sunshine of the Spotless Mind', Decimal('8.90000'))
('Beasts of No Nation', Decimal('8.70000'))
As shown above, Night of the Living Dead and The Godfather are tied as the highest-rated movies in your online_movie_rating banca dati.
To find the name of the reviewer who gave the most ratings, write the following query:
>>>>>> select_movies_query = """
... SELECT CONCAT(first_name, " ", last_name), COUNT(*) as num
... FROM reviewers
... INNER JOIN ratings
... ON reviewers.id = ratings.reviewer_id
... GROUP BY reviewer_id
... ORDER BY num DESC
... LIMIT 1
... """
>>> with connection.cursor() as cursor:
... cursor.execute(select_movies_query)
... for movie in cursor.fetchall():
... print(movie)
...
('Mary Cooper', 4)
Mary Cooper is the most frequent reviewer in this database. As seen above, it doesn’t matter how complicated the query is because it’s ultimately handled by the MySQL server. Your process for executing a query will always remain the same:pass the query to cursor.execute() and fetch the results using .fetchall() .
Updating and Deleting Records From the Database
In this section, you’ll be updating and deleting records from the database. Both of these operations can be performed on either a single record or multiple records in the table. You’ll select the rows that need to be modified using the WHERE clausola.
UPDATE Command
One of the reviewers in your database, Amy Farah Fowler , is now married to Sheldon Cooper . Her last name has now changed to Cooper , so you need to update your database accordingly. For updating records, MySQL uses the UPDATE dichiarazione:
update_query = """
UPDATE
    reviewers
SET
    last_name = "Cooper"
WHERE
    first_name = "Amy"
"""
with connection.cursor() as cursor:
    cursor.execute(update_query)
    connection.commit()
The code passes the update query to cursor.execute() , and .commit() brings the required changes to the reviewers tabella.
Nota: In the UPDATE query, the WHERE clause helps specify the records that need to be updated. If you don’t use WHERE , then all records will be updated!
Suppose you need to provide an option that allows reviewers to modify ratings. A reviewer will provide three values, movie_id , reviewer_id , and the new ratings . The code will display the record after performing the specified modification.
Assuming that movie_id = 18 , reviewer_id = 15 , and the new rating = 5.0 , you can use the following MySQL queries to perform the required modification:
UPDATE
    ratings
SET
    rating = 5.0
WHERE
    movie_id = 18 AND reviewer_id = 15;

SELECT *
FROM ratings
WHERE
    movie_id = 18 AND reviewer_id = 15;
The above queries first update the rating and then display it. You can create a complete Python script that establises a connection with the database and allows the reviewer to modify a rating:
from getpass import getpass
from mysql.connector import connect, Error

movie_id = input("Enter movie id: ")
reviewer_id = input("Enter reviewer id: ")
new_rating = input("Enter new rating: ")
update_query = """
UPDATE
    ratings
SET
    rating = "%s"
WHERE
    movie_id = "%s" AND reviewer_id = "%s";

SELECT *
FROM ratings
WHERE
    movie_id = "%s" AND reviewer_id = "%s"
""" % (
    new_rating,
    movie_id,
    reviewer_id,
    movie_id,
    reviewer_id,
)

try:
    with connect(
        host="localhost",
        user=input("Enter username: "),
        password=getpass("Enter password: "),
        database="online_movie_rating",
    ) as connection:
        with connection.cursor() as cursor:
            for result in cursor.execute(update_query, multi=True):
                if result.with_rows:
                    print(result.fetchall())
            connection.commit()
except Error as e:
    print(e)
Save this code to a file named modify_ratings.py . The above code uses %s placeholders to insert the received input in the update_query corda. For the first time in this tutorial, you have multiple queries inside a single string. To pass multiple queries to a single cursor.execute() , you need to set the method’s multi argument to True .
If multi is True , then cursor.execute() returns an iterator. Each item in the iterator corresponds to a cursor object that executes a statement passed in the query. The above code runs a for loop on this iterator and then calls .fetchall() on each cursor oggetto.
Nota: Running .fetchall() on all cursor objects is important. To execute a new statement on the same connection, you must ensure that there are no unread results from previous executions. If there are unread results, then you’ll receive an exception.
If no result set is fetched on an operation, then .fetchall() raises an exception. To avoid this error, in the code above you use the cursor.with_rows property, which indicates whether the most recently executed operation produced rows.
While this code should solve your purpose, the WHERE clause is a prime target for web hackers in its current state. It’s vulnerable to what is called a SQL injection attack, which can allow malicious actors to either corrupt or misuse your database.
Warning :Don’t try the below inputs on your database! They will corrupt your table and you’ll need to recreate it.
For example, if a user sends movie_id=18 , reviewer_id=15 , and the new rating=5.0 as input, then the output looks like this:
$ python modify_ratings.py
Enter movie id: 18
Enter reviewer id: 15
Enter new rating: 5.0
Enter username: <user_name>
Enter password:
[(18, 15, Decimal('5.0'))]
The ratings with movie_id=18 and reviewer_id=15 has been changed to 5.0 . But if you were hacker, then you might send a hidden command in your input:
$ python modify_ratings.py
Enter movie id: 18
Enter reviewer id: 15"; UPDATE reviewers SET last_name = "A
Enter new rating: 5.0
Enter username: <user_name>
Enter password:
[(18, 15, Decimal('5.0'))]
Again, the output shows that the specified ratings has been changed to 5.0 . What’s changed?
The hacker sneaked in an update query while entering the reviewer_id . The update query, update reviewers set last_name = "A , changes the last_name of all records in the reviewers table to "A" . You can see this change if you print out the reviewers tabella:
>>> select_query = """
... SELECT first_name, last_name
... FROM reviewers
... """
>>> with connection.cursor() as cursor:
...     cursor.execute(select_query)
...     for reviewer in cursor.fetchall():
...         print(reviewer)
...
('Chaitanya', 'A')
('Mary', 'A')
('John', 'A')
('Thomas', 'A')
('Penny', 'A')
('Mitchell', 'A')
('Wyatt', 'A')
('Andre', 'A')
('Sheldon', 'A')
('Kimbra', 'A')
('Kat', 'A')
('Bruce', 'A')
('Domingo', 'A')
('Rajesh', 'A')
('Ben', 'A')
('Mahinder', 'A')
('Akbar', 'A')
('Howard', 'A')
('Pinkie', 'A')
('Gurkaran', 'A')
('Amy', 'A')
('Marlon', 'A')
The above code displays the first_name and last_name for all records in the reviewers tavolo. The SQL injection attack corrupted this table by changing the last_name of all records to "A" .
There’s a quick fix to prevent such attacks. Don’t add the query values provided by the user directly to your query string. Instead, update the modify_ratings.py script to send these query values as arguments to .execute() :
from getpass import getpass
from mysql.connector import connect, Error

movie_id = input("Enter movie id: ")
reviewer_id = input("Enter reviewer id: ")
new_rating = input("Enter new rating: ")
update_query = """
UPDATE
    ratings
SET
    rating = %s
WHERE
    movie_id = %s AND reviewer_id = %s;

SELECT *
FROM ratings
WHERE
    movie_id = %s AND reviewer_id = %s
"""
val_tuple = (
    new_rating,
    movie_id,
    reviewer_id,
    movie_id,
    reviewer_id,
)

try:
    with connect(
        host="localhost",
        user=input("Enter username: "),
        password=getpass("Enter password: "),
        database="online_movie_rating",
    ) as connection:
        with connection.cursor() as cursor:
            for result in cursor.execute(update_query, val_tuple, multi=True):
                if result.with_rows:
                    print(result.fetchall())
            connection.commit()
except Error as e:
    print(e)
Notice that the %s placeholders are no longer in string quotes. Strings passed to the placeholders might contain some special characters. If necessary, these can be correctly escaped by the underlying library.
cursor.execute() makes sure that the values in the tuple received as argument are of the required data type. If a user tries to sneak in some problematic characters, then the code will raise an exception:
$ python modify_ratings.py
Enter movie id: 18
Enter reviewer id: 15"; UPDATE reviewers SET last_name = "A
Enter new rating: 5.0
Enter username: <user_name>
Enter password:
1292 (22007): Truncated incorrect DOUBLE value: '15";
UPDATE reviewers SET last_name = "A'
cursor.execute() will raise an exception if it finds any unwanted characters in the user input. You should use this approach whenever you incorporate user input in a query. There are other ways of preventing SQL injection attacks as well.
DELETE Command
Deleting records works very similarly to updating records. You use the DELETE statement to remove selected records.
Nota: Deleting is an irreversible processi. If you don’t use the WHERE clause, then all records from the specified table will be deleted. You’ll need to run the INSERT INTO query again to get back the deleted records.
It’s recommended that you first run a SELECT query with the same filter to make sure that you’re deleting the right records. For example, to remove all ratings given by reviewer_id = 2 , you should first run the corresponding SELECT domanda:
>>> select_movies_query = """
... SELECT reviewer_id, movie_id FROM ratings
... WHERE reviewer_id = 2
... """
>>> with connection.cursor() as cursor:
...     cursor.execute(select_movies_query)
...     for movie in cursor.fetchall():
...         print(movie)
...
(2, 7)
(2, 8)
(2, 12)
(2, 23)
The above code snippet outputs the reviewer_id and movie_id for records in the ratings table where reviewer_id = 2 . Once you’ve confirmed that these are the records that you need to delete, you can run a DELETE query with the same filter:
delete_query = "DELETE FROM ratings WHERE reviewer_id = 2"
with connection.cursor() as cursor:
    cursor.execute(delete_query)
    connection.commit()
With this query, you remove all ratings given by the reviewer with reviewer_id = 2 from the ratings tabella.
Other Ways to Connect Python and MySQL
In this tutorial, you saw MySQL Connector/Python, which is the officially recommended means of interacting with a MySQL database from a Python application. There are two other popular connectors:
-
mysqlclient is a library that is a close competitor to the official connector and is actively updated with new features. Because its core is written in C, it has better performance than the pure-Python official connector. A big drawback is that it’s fairly difficult to set up and install, especially on Windows.
-
MySQLdb is a legacy software that’s still used in commercial applications. It’s written in C and is faster than MySQL Connector/Python but is available only for Python 2.
These connectors act as interfaces between your program and a MySQL database, and you send your SQL queries through them. But many developers prefer using an object-oriented paradigm rather than SQL queries to manipulate data.
Object-relational mapping (ORM) is a technique that allows you to query and manipulate data from a database directly using an object-oriented language. An ORM library encapsulates the code needed to manipulate data, which eliminates the need to use even a tiny bit of SQL. Here are the most popular Python ORMs for SQL-based databases:
-
SQLAlchemy is an ORM that facilitates communication between Python and other SQL databases. You can create different engines for different databases like MySQL, PostgreSQL, SQLite, and so on. SQLAlchemy is commonly used alongside the pandas library to provide complete data-handling functionality.
-
peewee is a lightweight and fast ORM that’s quick to set up. This is quite useful when your interaction with the database is limited to extracting a few records. For example, if you need to copy selected records from a MySQL database into a CSV file, then peewee might be your best choice.
-
Django ORM is one of the most powerful features of Django and is supplied alongside the Django web framework. It can interact with a variety of databases such as SQLite, PostgreSQL, and MySQL. Many Django-based applications use the Django ORM for data modeling and basic queries but often switch to SQLAlchemy for more complex requirements.
You might find one of these approaches to be more suitable for your application. If you’re not sure which one to use, then it’s best to go with the officially recommended MySQL Connector/Python that you saw in action in this tutorial.
Conclusione
In this tutorial, you saw how to use MySQL Connector/Python to integrate a MySQL database with your Python application. You also saw some unique features of a MySQL database that differentiate it from other SQL databases.
Along the way, you learned some programming best practices that are worth considering when it comes to establishing a connection, creating tables, and inserting and updating records in a database application. You also developed a sample MySQL database for an online movie rating system and interacted with it directly from your Python application.
In this tutorial, you learned how to:
- Connect your Python app with a MySQL database
- Bring data from a MySQL database into Python for further analysis
- Execute SQL queries from your Python application
- Handle exceptions while accessing the database
- Prevent SQL injection attacks on your application
If you’re interested, Python also has connectors for other DBMSs like MongoDB and PostgreSQL. For more information, check out Python Database Tutorials.