La creazione di applicazioni che utilizzano un database SQL è un'attività di programmazione abbastanza comune. I database SQL sono ovunque e hanno un ottimo supporto in Python. Nella programmazione della GUI, PyQt fornisce un supporto per database SQL solido e multipiattaforma che ti consente di creare, connetterti e gestire i tuoi database in modo coerente.
Il supporto SQL di PyQt si integra completamente con la sua architettura Model-View per aiutarti nel processo di creazione di applicazioni di database.
In questo tutorial imparerai come:
- Utilizza il supporto SQL di PyQt per connettersi in modo affidabile a un database
- Esegui query SQL su un database utilizzando PyQt
- Utilizza l'architettura Model-View di PyQt nelle applicazioni di database
- Visualizza e modifica i dati utilizzando diversi widget PyQt
Gli esempi in questo tutorial richiedono una conoscenza di base del linguaggio SQL, in particolare del sistema di gestione dei database SQLite. Sarà utile anche una certa conoscenza precedente della programmazione GUI con Python e PyQt.
Bonus gratuito: 5 pensieri su Python Mastery, un corso gratuito per sviluppatori Python che ti mostra la roadmap e la mentalità di cui avrai bisogno per portare le tue abilità in Python al livello successivo.
Collegamento di PyQt a un database SQL
Collegare un'applicazione a un database relazionale e fare in modo che l'applicazione crei, legga, aggiorni ed elimini i dati archiviati in quel database è un'attività comune nella programmazione. I database relazionali sono generalmente organizzati in un insieme di tabelle o relazioni . Una determinata riga in una tabella viene definita record o tupla e una colonna è denominata attributo .
Nota: Il termine campo è comunemente usato per identificare un singolo dato memorizzato in una cella di un dato record in una tabella. D'altra parte, il termine nome campo viene utilizzato per identificare il nome di una colonna.
Ogni colonna memorizza un tipo specifico di informazioni, come nomi, date o numeri. Ogni riga rappresenta un insieme di dati strettamente correlati e ogni riga ha la stessa struttura generale. Ad esempio, in un database che memorizza i dati sui dipendenti di un'azienda, una riga specifica rappresenta un singolo dipendente.
La maggior parte dei sistemi di database relazionali utilizza SQL (linguaggio di query strutturato) per eseguire query, manipolare e mantenere i dati contenuti nel database. SQL è un linguaggio di programmazione dichiarativo e specifico del dominio appositamente progettato per comunicare con i database.
Al giorno d'oggi i sistemi di database relazionali e SQL sono ampiamente utilizzati. Troverai diversi sistemi di gestione di database, come SQLite, PostgreSQL, MySQL, MariaDB e molti altri. Puoi connettere Python a uno qualsiasi di questi sistemi di database utilizzando una libreria Python SQL dedicata.
Nota: Anche se il supporto SQL integrato di PyQt è l'opzione preferita per la gestione dei database SQL in PyQt, puoi anche utilizzare qualsiasi altra libreria per gestire la connessione al database. Alcune di queste librerie includono SQLAlchemy, Pandas, SQLite e così via.
Tuttavia, l'utilizzo di una libreria diversa per gestire i database presenta alcuni inconvenienti. Non potrai sfruttare l'integrazione tra le classi SQL di PyQt e l'architettura Model-View. Inoltre, aggiungerai dipendenze extra alla tua applicazione.
Quando si tratta di programmazione GUI con Python e PyQt, PyQt fornisce un solido set di classi per lavorare con i database SQL. Questo insieme di classi sarà il tuo miglior alleato quando dovrai connettere la tua applicazione a un database SQL.
Nota: Sfortunatamente, la documentazione ufficiale di PyQt5 ha alcune sezioni incomplete. Per ovviare a questo problema, puoi consultare la documentazione di PyQt4, la documentazione di Qt For Python o la documentazione Qt originale. In questo tutorial, alcuni collegamenti portano alla documentazione Qt originale, che nella maggior parte dei casi è una migliore fonte di informazioni.
In questo tutorial imparerai le nozioni di base su come utilizzare il supporto SQL di PyQt per creare applicazioni GUI che interagiscono in modo affidabile con i database relazionali per leggere, scrivere, eliminare e visualizzare i dati.
Creazione di una connessione al database
La connessione delle applicazioni a un database SQL fisico è un passaggio importante nel processo di sviluppo di applicazioni di database con PyQt. Per eseguire correttamente questo passaggio, sono necessarie alcune informazioni generali su come è impostato il database.
Ad esempio, devi sapere su quale sistema di gestione del database è basato il tuo database e potresti anche aver bisogno di un nome utente, una password, un nome host e così via.
In questo tutorial utilizzerai SQLite 3, che è un sistema di database ben collaudato con supporto su tutte le piattaforme e requisiti di configurazione minimi. SQLite ti consente di leggere e scrivere direttamente sui database nel tuo disco locale senza la necessità di un processo server separato. Ciò lo rende un'opzione facile da usare per l'apprendimento dello sviluppo di applicazioni di database.
Un altro vantaggio dell'utilizzo di SQLite è che la libreria viene fornita con Python e anche con PyQt, quindi non è necessario installare nient'altro per iniziare a lavorarci.
In PyQt, puoi creare una connessione al database usando il QSqlDatabase classe. Questa classe rappresenta una connessione e fornisce un'interfaccia per l'accesso al database. Per creare una connessione, chiama semplicemente .addDatabase() su QSqlDatabase . Questo metodo statico accetta un driver SQL e un nome di connessione facoltativo come argomenti e restituisce una connessione al database:
QSqlDatabase.addDatabase(
    driver, connectionName=QSqlDatabase.defaultConnection
)
Il primo argomento, driver , è un argomento obbligatorio che contiene una stringa contenente il nome di un driver SQL supportato da PyQt. Il secondo argomento, connectionName , è un argomento facoltativo che contiene una stringa con il nome della connessione. connectionName il valore predefinito è QSqlDatabase.defaultConnection , che normalmente contiene la stringa "qt_sql_default_connection" .
Se hai già una connessione chiamata connectionName , la connessione viene rimossa e sostituita con una nuova connessione e .addDatabase() restituisce al chiamante la connessione al database appena aggiunta.
Una chiamata a .addDatabase() aggiunge una connessione al database a un elenco di connessioni disponibili. Questo elenco è un registro globale che PyQt mantiene dietro le quinte per tenere traccia delle connessioni disponibili in un'applicazione. Registrazione delle tue connessioni con un connectionName significativo ti consentirà di gestire più connessioni in un'applicazione di database.
Dopo aver creato una connessione, potrebbe essere necessario impostare diversi attributi su di essa. L'insieme specifico di attributi dipenderà dal driver che stai utilizzando. In generale, dovrai impostare attributi come il nome del database, il nome utente e la password per accedere al database.
Ecco un riepilogo dei metodi setter che puoi utilizzare per impostare gli attributi o le proprietà più comunemente usati di una connessione al database:
| Metodo | Descrizione |
|---|---|
.setDatabaseName(name) | Imposta il nome del database su name , che è una stringa che rappresenta un nome di database valido |
.setHostName(host) | Imposta il nome host su host , che è una stringa che rappresenta un nome host valido |
.setUserName(username) | Imposta il nome utente su username , che è una stringa che rappresenta un nome utente valido |
.setPassword(password) | Imposta la password su password , che è una stringa che rappresenta una password valida |
Nota che la password che passi come argomento a .setPassword() è memorizzato in testo normale e può essere recuperato in seguito chiamando .password() . Questo è un serio rischio per la sicurezza che dovresti evitare di introdurre nelle tue applicazioni di database. Imparerai un approccio più sicuro nella sezione Apertura di una connessione al database più avanti in questo tutorial.
Per creare una connessione a un database SQLite utilizzando QSqlDatabase , apri una sessione interattiva Python e digita il codice seguente:
>>> from PyQt5.QtSql import QSqlDatabase

>>> con = QSqlDatabase.addDatabase("QSQLITE")
>>> con.setDatabaseName("contacts.sqlite")

>>> con
<PyQt5.QtSql.QSqlDatabase object at 0x7f0facec0c10>

>>> con.databaseName()
'contacts.sqlite'

>>> con.connectionName()
'qt_sql_default_connection'
Questo codice creerà un oggetto di connessione al database usando "QSQLITE" come driver della connessione e "contacts.sqlite" come nome del database della connessione. Poiché non passi un nome di connessione a .addDatabase() , quella appena creata diventa la tua connessione predefinita, il cui nome è "qt_sql_default_connection" .
Nel caso dei database SQLite, il nome del database è normalmente un nome file o un percorso che include il nome file del database. Puoi anche usare il nome speciale ":memory:" per un database in memoria.
Gestione di più connessioni
Potrebbero verificarsi situazioni in cui è necessario utilizzare più connessioni a un singolo database. Ad esempio, potresti voler registrare le interazioni degli utenti con il database utilizzando una connessione specifica per ciascun utente.
In altre situazioni, potrebbe essere necessario connettere l'applicazione a diversi database. Ad esempio, potresti voler connetterti a diversi database remoti per raccogliere dati per popolare o aggiornare un database locale.
Per gestire queste situazioni, puoi fornire nomi specifici per le tue diverse connessioni e fare riferimento a ciascuna connessione con il suo nome. Se vuoi dare un nome alla tua connessione al database, passa quel nome come secondo argomento a .addDatabase() :
>>> from PyQt5.QtSql import QSqlDatabase

>>> # First connection
>>> con1 = QSqlDatabase.addDatabase("QSQLITE", "con1")
>>> con1.setDatabaseName("contacts.sqlite")

>>> # Second connection
>>> con2 = QSqlDatabase.addDatabase("QSQLITE", "con2")
>>> con2.setDatabaseName("contacts.sqlite")

>>> con1
<PyQt5.QtSql.QSqlDatabase object at 0x7f367f5fbf90>
>>> con2
<PyQt5.QtSql.QSqlDatabase object at 0x7f3686dd7510>

>>> con1.databaseName()
'contacts.sqlite'
>>> con2.databaseName()
'contacts.sqlite'

>>> con1.connectionName()
'con1'
>>> con2.connectionName()
'con2'
Qui crei due diverse connessioni allo stesso database, contacts.sqlite . Ogni connessione ha il proprio nome di connessione. È possibile utilizzare il nome della connessione per ottenere un riferimento a una connessione specifica in qualsiasi momento successivo nel codice in base alle proprie esigenze. Per fare ciò, puoi chiamare .database() con un nome di connessione:
>>> from PyQt5.QtSql import QSqlDatabase

>>> db = QSqlDatabase.database("con1", open=False)

>>> db.databaseName()
'contacts.sqlite'
>>> db.connectionName()
'con1'
In questo esempio, vedi che .database() accetta due argomenti:
connectionNamecontiene il nome della connessione che è necessario utilizzare. Se non trasmetti un nome di connessione, verrà utilizzata la connessione predefinita.opencontiene un valore booleano che dice a.database()se si desidera aprire automaticamente la connessione o meno. SeopenèTrue(impostazione predefinita) e la connessione non è aperta, la connessione viene aperta automaticamente.
Il valore restituito di .database() è un riferimento all'oggetto connessione chiamato connectionName . Puoi utilizzare nomi di connessione diversi per ottenere riferimenti a oggetti di connessione specifici e quindi utilizzarli per gestire il tuo database.
Utilizzo di diversi SQL Divers
Finora hai imparato a creare una connessione al database usando il driver SQLite . Questo non è l'unico driver disponibile in PyQt. La libreria fornisce un ricco set di driver SQL che consentono di utilizzare diversi tipi di sistemi di gestione di database in base alle proprie esigenze specifiche:
| Nome del conducente | Sistema di gestione del database |
|---|---|
| QDB2 | IBM Db2 (versione 7.1 e successive) |
| QIBASE | Borland InterBase |
| QMYSQL/MARIADB | MySQL o MariaDB (versione 5.0 e successive) |
| QOCI | Interfaccia Oracle Call |
| QODBC | Apri Connettività database (ODBC) |
| QPSQL | PostgreSQL (versioni 7.3 e successive) |
| QSQLITE2 | SQLite 2 (obsoleto dalla Qt 5.14) |
| QSQLITE | SQLite 3 |
| QTDS | Sybase Adaptive Server (obsoleto dalla Qt 4.7) |
La colonna Nome driver contiene le stringhe di identificazione che devi passare a .addDatabase() come primo argomento per utilizzare il driver associato. A differenza del driver SQLite, quando si utilizza un driver diverso, potrebbe essere necessario impostare diversi attributi, come databaseName , hostName , username e password , affinché la connessione funzioni correttamente.
I driver del database sono derivati da QSqlDriver . Puoi creare i tuoi driver di database sottoclassi QSqlDriver , ma tale argomento va oltre lo scopo di questo tutorial. Se sei interessato a creare i tuoi driver di database, dai un'occhiata a Come scrivere il tuo driver di database per maggiori dettagli.
Apertura di una connessione al database
Una volta che hai una connessione al database, devi aprire quella connessione per poter interagire con il tuo database. Per farlo, chiami .open() sull'oggetto di connessione. .open() ha le seguenti due varianti:
.open()apre una connessione al database utilizzando i valori di connessione correnti..open(username, password)apre una connessione al database utilizzando ilusernamefornito epassword.
Entrambe le varianti restituiscono True se la connessione è riuscita. In caso contrario, restituiscono False . Se non è possibile stabilire la connessione, puoi chiamare .lastError() per avere informazioni sull'accaduto. Questa funzione restituisce informazioni sull'ultimo errore segnalato dal database.
Nota: Come hai appreso prima, .setPassword(password) memorizza le password come testo normale, il che rappresenta un rischio per la sicurezza. D'altra parte, .open() non memorizza affatto le password. Passa la password direttamente al driver all'apertura della connessione. Dopodiché, elimina la password. Quindi, usando .open() gestire le tue password è la strada da percorrere se vuoi prevenire problemi di sicurezza.
Ecco un esempio di come aprire una connessione al database SQLite utilizzando la prima variazione di .open() :
>>> from PyQt5.QtSql import QSqlDatabase

>>> # Create the connection
>>> con = QSqlDatabase.addDatabase("QSQLITE")
>>> con.setDatabaseName("contacts.sqlite")

>>> # Open the connection
>>> con.open()
True
>>> con.isOpen()
True
Nell'esempio sopra, crei prima una connessione al tuo database SQLite e apri quella connessione usando .open() . Da .open() restituisce True , la connessione è riuscita. A questo punto, puoi controllare la connessione usando .isOpen() , che restituisce True se la connessione è aperta e False altrimenti.
Nota: Se chiami .open() su una connessione che utilizza il driver SQLite e il file di database non esiste, verrà creato automaticamente un nuovo file di database vuoto.
Nelle applicazioni del mondo reale, è necessario assicurarsi di disporre di una connessione valida al database prima di provare a eseguire qualsiasi operazione sui dati. In caso contrario, l'applicazione potrebbe interrompersi e non riuscire. Ad esempio, cosa succede se non si dispone delle autorizzazioni di scrittura per la directory in cui si sta tentando di creare quel file di database? Devi assicurarti di gestire qualsiasi errore che può verificarsi durante l'apertura di una connessione.
Un modo comune per chiamare .open() è racchiuderlo in un'istruzione condizionale. Ciò consente di gestire gli errori che possono verificarsi durante l'apertura della connessione:
>>> import sys
>>> from PyQt5.QtSql import QSqlDatabase

>>> # Create the connection
>>> con = QSqlDatabase.addDatabase("QSQLITE")
>>> con.setDatabaseName("contacts.sqlite")

>>> # Open the connection and handle errors
>>> if not con.open():
...     print("Unable to connect to the database")
...     sys.exit(1)
Avvolgere la chiamata a .open() in un'istruzione condizionale consente di gestire qualsiasi errore che si verifica quando si apre la connessione. In questo modo, puoi informare i tuoi utenti di eventuali problemi prima dell'esecuzione dell'applicazione. Tieni presente che l'applicazione esce con uno stato di uscita di 1 , solitamente utilizzato per indicare un errore del programma.
Nell'esempio sopra, usi .open() in una sessione interattiva, quindi usi print() per presentare messaggi di errore agli utenti. Tuttavia, nelle applicazioni GUI, invece di usare print() , normalmente usi un QMessageBox oggetto. Con QMessageBox , puoi creare piccole finestre di dialogo per presentare informazioni ai tuoi utenti.
Ecco un'applicazione GUI di esempio che illustra un modo per gestire gli errori di connessione:
 1import sys
 2
 3from PyQt5.QtSql import QSqlDatabase
 4from PyQt5.QtWidgets import QApplication, QMessageBox, QLabel
 5
 6# Create the connection
 7con = QSqlDatabase.addDatabase("QSQLITE")
 8con.setDatabaseName("/home/contacts.sqlite")
 9
10# Create the application
11app = QApplication(sys.argv)
12
13# Try to open the connection and handle possible errors
14if not con.open():
15    QMessageBox.critical(
16        None,
17        "App Name - Error!",
18        "Database Error: %s" % con.lastError().databaseText(),
19    )
20    sys.exit(1)
21
22# Create the application's window
23win = QLabel("Connection Successfully Opened!")
24win.setWindowTitle("App Name")
25win.resize(200, 100)
26win.show()
27sys.exit(app.exec_())
Il if l'istruzione nella riga 14 controlla se la connessione non è riuscita. Se il /home/ directory non esiste o se non hai il permesso per scriverci, allora la chiamata a .open() non riesce perché non è possibile creare il file di database. In questa situazione, il flusso di esecuzione inserisce il if blocco codice istruzione e mostra un messaggio sullo schermo.
Se modifichi il percorso in qualsiasi altra directory in cui puoi scrivere, allora la chiamata a .open() avrà esito positivo e vedrai una finestra che mostra il messaggio Connection Successfully Opened! Avrai anche un nuovo file di database chiamato contacts.sqlite nella directory selezionata.
Nota che superi None come genitore del messaggio perché, al momento della visualizzazione del messaggio, non hai ancora creato una finestra, quindi non hai un genitore valido per la finestra del messaggio.
Esecuzione di query SQL con PyQt
Con una connessione al database completamente funzionale, sei pronto per iniziare a lavorare con il tuo database. Per farlo, puoi utilizzare query SQL basate su stringhe e QSqlQuery oggetti. QSqlQuery ti consente di eseguire qualsiasi tipo di query SQL nel tuo database. Con QSqlQuery , puoi eseguire istruzioni DML (Data Manipulation Language), come SELECT , INSERT , UPDATE e DELETE , nonché istruzioni DDL (Data Definition Language), come CREATE TABLE e così via.
Il costruttore di QSqlQuery ha diverse varianti, ma in questo tutorial ne imparerai due:
-
QSqlQuery(query, connection)costruisce un oggetto query utilizzando unaquerySQL basata su stringhe e un databaseconnection. Se non specifichi una connessione o se la connessione specificata non è valida, viene utilizzata la connessione al database predefinita. Sequerynon è una stringa vuota, verrà eseguita immediatamente. -
QSqlQuery(connection)costruisce un oggetto query usandoconnection. Seconnectionnon è valido, viene utilizzata la connessione predefinita.
Puoi anche creare QSqlQuery oggetti senza passare alcun argomento al costruttore. In tal caso, la query utilizzerà la connessione al database predefinita, se presente.
Per eseguire una query, devi chiamare .exec() sull'oggetto della query. Puoi usare .exec() in due modi diversi:
-
.exec(query)esegue la query SQL basata su stringhe contenuta inquery. RestituisceTruese la query ha avuto esito positivo e in caso contrario restituisceFalse. -
.exec()esegue una query SQL preparata in precedenza. RestituisceTruese la query ha avuto esito positivo e in caso contrario restituisceFalse.
Nota: PyQt implementa anche variazioni di QSqlQuery.exec() con il nome .exec_() . Questi forniscono la compatibilità con le versioni precedenti di Python in cui exec era una parola chiave della lingua.
Ora che conosci le basi dell'utilizzo di QSqlQuery per creare ed eseguire query SQL, sei pronto per imparare a mettere in pratica le tue conoscenze.
Esecuzione di query SQL statiche
Per iniziare a creare ed eseguire query con PyQt, avvierai il tuo editor di codice o IDE preferito e creerai uno script Python chiamato queries.py . Salva lo script e aggiungi il codice seguente:
 1import sys
 2
 3from PyQt5.QtSql import QSqlDatabase, QSqlQuery
 4
 5# Create the connection
 6con = QSqlDatabase.addDatabase("QSQLITE")
 7con.setDatabaseName("contacts.sqlite")
 8
 9# Open the connection
10if not con.open():
11    print("Database Error: %s" % con.lastError().databaseText())
12    sys.exit(1)
13
14# Create a query and execute it right away using .exec()
15createTableQuery = QSqlQuery()
16createTableQuery.exec(
17    """
18    CREATE TABLE contacts (
19        id INTEGER PRIMARY KEY AUTOINCREMENT UNIQUE NOT NULL,
20        name VARCHAR(40) NOT NULL,
21        job VARCHAR(50),
22        email VARCHAR(40) NOT NULL
23    )
24    """
25)
26
27print(con.tables())
In questo script, inizi importando i moduli e le classi con cui lavorerai. Quindi crei una connessione al database usando .addDatabase() con il driver SQLite. Hai impostato il nome del database su "contacts.sqlite" e apri la connessione.
Per creare la tua prima query, istanzia QSqlQuery senza alcun argomento. Con l'oggetto query in posizione, chiami .exec() , passando una query SQL basata su stringhe come argomento. Questo tipo di query è noto come query statico perché non ottiene alcun parametro dall'esterno della query.
La query SQL precedente crea una nuova tabella chiamata contacts nel tuo database. Quella tabella avrà le seguenti quattro colonne:
| Colonna | Contenuto |
|---|---|
id | Un numero intero con la chiave primaria della tabella |
name | Una stringa con il nome di un contatto |
job | Una stringa con il titolo professionale di un contatto |
email | Una stringa con l'e-mail di un contatto |
L'ultima riga dello script precedente stampa l'elenco delle tabelle contenute nel database. Se esegui lo script, noterai che un nuovo file di database chiamato contacts.sqlite viene creato nella directory corrente. Riceverai anche qualcosa come ['contacts', 'sqlite_sequence'] stampato sul tuo schermo. Questo elenco contiene i nomi delle tabelle nel database.
Nota: Una query SQL basata su stringhe deve utilizzare una sintassi appropriata in base al database SQL specifico che stai interrogando. Se la sintassi è sbagliata, allora .exec() ignora la query e restituisce False .
Nel caso di SQLite, la query può contenere solo un'istruzione alla volta.
Chiamando .exec() su un QSqlQuery object è un modo comune per eseguire immediatamente query SQL basate su stringhe sui database, ma cosa succede se si desidera preparare le query in anticipo per l'esecuzione successiva? Questo è l'argomento della prossima sezione.
Esecuzione di query dinamiche:formattazione di stringhe
Finora, hai imparato come eseguire query statiche su un database. Le query statiche sono quelle che non accettano parametri , quindi la query viene eseguita così com'è. Anche se queste query sono abbastanza utili, a volte è necessario creare query che recuperino dati in risposta a determinati parametri di input.
Le query che accettano parametri al momento dell'esecuzione sono note come query dinamiche . L'uso dei parametri consente di ottimizzare la query e recuperare i dati in risposta a valori di parametro specifici. Valori diversi produrranno risultati diversi. Puoi prendere parametri di input in una query utilizzando uno dei due approcci seguenti:
- Costruisci la query in modo dinamico, utilizzando la formattazione delle stringhe per interpolare i valori dei parametri.
- Prepara la query utilizzando parametri segnaposto e quindi associa valori specifici ai parametri.
Il primo approccio consente di creare rapidamente query dinamiche. Tuttavia, per utilizzare in sicurezza questo approccio, devi assicurarti che i valori dei parametri provengano da una fonte attendibile. In caso contrario, potresti dover affrontare attacchi SQL injection.
Ecco un esempio di come utilizzare la formattazione delle stringhe per creare query dinamiche in PyQt:
>>>>>> from PyQt5.QtSql import QSqlQuery, QSqlDatabase
>>> con = QSqlDatabase.addDatabase("QSQLITE")
>>> con.setDatabaseName("contacts.sqlite")
>>> con.open()
True
>>> name = "Linda"
>>> job = "Technical Lead"
>>> email = "linda@example.com"
>>> query = QSqlQuery()
>>> query.exec(
... f"""INSERT INTO contacts (name, job, email)
... VALUES ('{name}', '{job}', '{email}')"""
... )
True
In questo esempio, si utilizza una stringa f per creare una query dinamica interpolando valori specifici in una query SQL basata su stringhe. La query finale inserisce i dati nei tuoi contacts tabella, che ora contiene dati su Linda .
Nota: Più avanti in questo tutorial, vedrai come recuperare e navigare tra i dati archiviati in un database.
Si noti che affinché questo tipo di query dinamica funzioni, è necessario assicurarsi che i valori da inserire abbiano il tipo di dati corretto. Quindi, usi le virgolette singole attorno al segnaposto nella stringa f perché quei valori devono essere stringhe.
Esecuzione di query dinamiche:parametri segnaposto
Il secondo approccio per l'esecuzione di query dinamiche richiede di preparare le query in anticipo utilizzando un modello con segnaposto per i parametri. PyQt supporta due stili di segnaposto di parametri:
- Stile Oracle utilizza segnaposto denominati come
:nameo:email. - Stile ODBC usa un punto interrogativo (
?) come segnaposto posizionale.
Tieni presente che questi stili non possono essere combinati nella stessa query. Puoi consultare Approcci ai valori di associazione per ulteriori esempi su come utilizzare i segnaposto.
Nota: ODBC sta per Open Database Connectivity.
Per creare questo tipo di query dinamica in PyQt, devi prima creare un modello con un segnaposto per ogni parametro della query e quindi passare quel modello come argomento a .prepare() , che analizza, compila e prepara il modello di query per l'esecuzione. Se il modello presenta problemi, come un errore di sintassi SQL, allora .prepare() non riesce a compilare il modello e restituisce False .
Se il processo di preparazione ha esito positivo, prepare() restituisce True . Successivamente, puoi passare un valore specifico a ciascun parametro utilizzando .bindValue() con parametri denominati o posizionali o utilizzando .addBindValue() con parametri posizionali. .bindValue() ha le seguenti due varianti:
.bindValue(placeholder, val).bindValue(pos, val)
Nella prima variante, placeholder rappresenta un segnaposto in stile Oracle. Nella seconda variante, pos rappresenta un numero intero in base zero con la posizione di un parametro nella query. In entrambe le varianti, val contiene il valore da associare a un parametro specifico.
.addBindValue() aggiunge un valore all'elenco dei segnaposto utilizzando l'associazione posizionale. Ciò significa che l'ordine delle chiamate a .addBindValue() determina quale valore sarà associato a ciascun parametro segnaposto nella query preparata.
Per iniziare a utilizzare le query preparate, puoi preparare un INSERT INTO Istruzione SQL per popolare il database con alcuni dati di esempio. Torna allo script che hai creato nella sezione Esecuzione di query SQL statiche e aggiungi il codice seguente subito dopo la chiamata a print() :
28# Creating a query for later execution using .prepare()
29insertDataQuery = QSqlQuery()
30insertDataQuery.prepare(
31    """
32    INSERT INTO contacts (
33        name,
34        job,
35        email
36    )
37    VALUES (?, ?, ?)
38    """
39)
40
41# Sample data
42data = [
43    ("Joe", "Senior Web Developer", "joe@example.com"),
44    ("Lara", "Project Manager", "lara@example.com"),
45    ("David", "Data Analyst", "david@example.com"),
46    ("Jane", "Senior Python Developer", "jane@example.com"),
47]
48
49# Use .addBindValue() to insert data
50for name, job, email in data:
51    insertDataQuery.addBindValue(name)
52    insertDataQuery.addBindValue(job)
53    insertDataQuery.addBindValue(email)
54    insertDataQuery.exec()
Il primo passo è creare un QSqlQuery oggetto. Quindi chiami .prepare() sull'oggetto della query. In questo caso, si utilizza lo stile ODBC per i segnaposto. La tua richiesta assumerà valori per il name del tuo contatto , job e email , quindi hai bisogno di tre segnaposto. Dal momento che l'id colonna è un numero intero autoincrementato, non è necessario fornire valori per esso.
Quindi crei alcuni dati di esempio per popolare il database. data contiene un elenco di tuple e ogni tupla contiene tre elementi:il nome, il lavoro e l'e-mail di ciascun contatto.
Il passaggio finale è associare i valori che vuoi passare a ciascun segnaposto e quindi chiamare .exec() per eseguire la query. Per farlo, usi un for ciclo continuo. L'intestazione del ciclo decomprime ogni tupla in data in tre variabili separate con nomi convenienti. Quindi chiami .addBindValue() on the query object to bind the values to the placeholders.
Note that you’re using positional placeholders , so the order in which you call .addBindValue() will define the order in which each value is passed to the corresponding placeholder.
This approach for creating dynamic queries is handy when you want to customize your queries using values that come from your user’s input. Anytime you take the user’s input to complete a query on a database, you face the security risk of SQL injection.
In PyQt, combining .prepare() , .bindValue() , and .addBindValue() fully protects you against SQL injection attacks, so this is the way to go when you’re taking untrusted input to complete your queries.
Navigating the Records in a Query
If you execute a SELECT statement, then your QSqlQuery object will retrieve zero or more records from one or more tables in your database. The query will hold records containing data that matches the query’s criteria. If no data matches the criteria, then your query will be empty.
QSqlQuery provides a set of navigation methods that you can use to move throughout the records in a query result:
| Metodo | Retrieves |
|---|---|
.next() | The next record |
.previous() | The previous record |
.first() | The first record |
.last() | The last record |
.seek(index, relative=False) | The record at position index |
All these methods position the query object on the retrieved record if that record is available. Most of these methods have specific rules that apply when using them. With these methods, you can move forward, backward, or arbitrarily through the records in a query result. Since they all return either True or False , you can use them in a while loop to navigate all the records in one go.
These methods work with active queries . A query is active when you’ve successfully run .exec() on it, but the query isn’t finished yet. Once an active query is on a valid record, you can retrieve data from that record using .value(index) . This method takes a zero-based integer number, index , and returns the value at that index (column) in the current record.
Nota: If you execute a SELECT * type of query, then the columns in the result won’t follow a known order. This might cause problems when you use .value() to retrieve the value at a given column because there’s no way of knowing if you’re using the right column index.
You’ll look at a few examples of how to use some of the navigation methods to move throughout a query below. But first, you need to create a connection to your database:
>>>>>> from PyQt5.QtSql import QSqlDatabase, QSqlQuery
>>> con = QSqlDatabase.addDatabase("QSQLITE")
>>> con.setDatabaseName("contacts.sqlite")
>>> con.open()
True
Here, you create and open a new connection to contacts.sqlite . If you’ve been following along with this tutorial so far, then this database already contains some sample data. Now you can create a QSqlQuery object and execute it on that data:
>>> # Create and execute a query
>>> query = QSqlQuery()
>>> query.exec("SELECT name, job, email FROM contacts")
True
This query retrieves data about the name , job , and email of all the contacts stored in the contacts tavolo. Since .exec() returned True , the query was successful and is now an active query. You can navigate the records in this query using any of the navigation methods you saw before. You can also retrieve the data at any column in a record using .value() :
>>> # First record
>>> query.first()
True

>>> # Named indices for readability
>>> name, job, email = range(3)

>>> # Retrieve data from the first record
>>> query.value(name)
'Linda'

>>> # Next record
>>> query.next()
True
>>> query.value(job)
'Senior Web Developer'

>>> # Last record
>>> query.last()
True
>>> query.value(email)
'jane@example.com'
With the navigation methods, you can move around the query result. With .value() , you can retrieve the data at any column in a given record.
You can also iterate through all the records in your query using a while loop along with .next() :
>>> query.exec()
True

>>> while query.next():
...     print(query.value(name), query.value(job), query.value(email))
...
Linda Technical Lead linda@example.com
Joe Senior Web Developer joe@example.com
...
With .next() , you navigate all the records in a query result. .next() works similar to the iterator protocol in Python. Once you’ve iterated over the records in a query result, .next() starts returning False until you run .exec() ancora. A call to .exec() retrieves data from a database and places the query object’s internal pointer one position before the first record, so when you call .next() , you get the first record again.
You can also loop in reverse order using .previous() :
>>> while query.previous():
...     print(query.value(name), query.value(job), query.value(email))
...
Jane Senior Python Developer jane@example.com
David Data Analyst david@example.com
...
.previous() works similar to .next() , but the iteration is done in reverse order. In other words, the loop goes from the query pointer’s position back to the first record.
Sometimes you might want to get the index that identifies a given column in a table by using the name of that column. To do that, you can call .indexOf() on the return value of .record() :
>>> query.first()
True

>>> # Get the index of name
>>> name = query.record().indexOf("name")

>>> query.value(name)
'Linda'

>>> # Finish the query object if unneeded
>>> query.finish()
>>> query.isActive()
False
The call to .indexOf() on the result of .record() returns the index of the "name" colonna. If "name" doesn’t exist, then .indexOf() restituisce -1 . This is handy when you use a SELECT * statement in which the order of columns is unknown. Finally, if you’re done with a query object, then you can turn it inactive by calling .finish() . This will free the system memory associated with the query object at hand.
Closing and Removing Database Connections
In practice, some of your PyQt applications will depend on a database, and others won’t. An application that depends on a database often creates and opens a database connection just before creating any window or graphical component and keeps the connection open until the application is closed.
On the other hand, applications that don’t depend on a database but use a database to provide some of their functionalities typically connect to that database only when needed, if at all. In these cases, you can close the connection after use and free the resources associated with that connection, such as system memory.
To close a connection in PyQt, you call .close() on the connection. This method closes the connection and frees any acquired resources. It also invalidates any associated QSqlQuery objects because they can’t work properly without an active connection.
Here’s an example of how to close an active database connection using .close() :
>>> from PyQt5.QtSql import QSqlDatabase

>>> con = QSqlDatabase.addDatabase("QSQLITE")
>>> con.setDatabaseName("contacts.sqlite")

>>> con.open()
True
>>> con.isOpen()
True

>>> con.close()
>>> con.isOpen()
False
You can call .close() on a connection to close it and free all its associated resources. To make sure that a connection is closed, you call .isOpen() .
Note that QSqlQuery objects remain in memory after closing their associated connection, so you must make your queries inactive by calling .finish() or .clear() , or by deleting the QSqlQuery object before closing the connection. Otherwise, residual memory is left out in your query object.
You can reopen and reuse any previously closed connection. That’s because .close() doesn’t remove connections from the list of available connections, so they remain usable.
You can also completely remove your database connections using .removeDatabase() . To do this safely, first finish your queries using .finish() , then close the database using .close() , and finally remove the connection. You can use .removeDatabase(connectionName) to remove the database connection called connectionName from the list of available connections. Removed connections are no longer available for use in the application at hand.
To remove the default database connection, you can call .connectionName() on the object returned by .database() and pass the result to .removeDatabase() :
>>> # The connection is closed but still in the list of connections
>>> QSqlDatabase.connectionNames()
['qt_sql_default_connection']

>>> # Remove the default connection
>>> QSqlDatabase.removeDatabase(QSqlDatabase.database().connectionName())

>>> # The connection is no longer in the list of connections
>>> QSqlDatabase.connectionNames()
[]

>>> # Try to open a removed connection
>>> con.open()
False
Here, the call to .connectionNames() returns the list of available connections. In this case, you have only one connection, the default. Then you remove the connection using .removeDatabase() .
Nota: Before closing and removing a database connection, you need to make sure that everything that uses the connection is deleted or set to use a different data source. Otherwise, you can have a resource leak .
Since you need a connection name to use .removeDatabase() , you call .connectionName() on the result of .database() to get the name of the default connection. Finally, you call .connectionNames() again to make sure that the connection is no longer in the list of available connections. Trying to open a removed connection will return False because the connection no longer exists.
Displaying and Editing Data With PyQt
A common requirement in GUI applications that use databases is the ability to load, display, and edit data from the database using different widgets. Table, list, and tree widgets are commonly used in GUIs to manage data.
PyQt provides two different kind of widgets for managing data:
- Standard widgets include internal containers for storing data.
- View widgets don’t maintain internal data containers but use models to access data.
For small GUI applications that manage small databases, you can use the first approach. The second approach is handy when you’re building complex GUI applications that manage large databases.
The second approach takes advantage of PyQt’s Model-View programming. With this approach, you have widgets that represent views such as tables, lists, and trees on one hand and model classes that communicate with your data on the other hand.
Understanding PyQt’s Model-View Architecture
The Model-View-Controller (MVC) design pattern is a general software pattern intended to divide an application’s code into three general layers, each with a different role.
The model takes care of the business logic of the application, the view provides on-screen representations, and the controller connects the model and the view to make the application work.
Qt provides a custom variation of MVC. They call it the Model-View architecture, and it’s available for PyQt as well. The pattern also separates the logic into three components:
-
Models communicate with and access the data. They also define an interface that’s used by views and delegates to access the data. All models are based on
QAbstractItemModel. Some commonly used models includeQStandardItemModel,QFileSystemModel, and SQL-related models. -
Views are responsible for displaying the data to the user. They also have similar functionality to the controller in the MVC pattern. All views are based on
QAbstractItemView. Some commonly used views areQListView,QTableView, andQTreeView. -
Delegates paint view items and provide editor widgets for modifying items. They also communicate back with the model if an item has been modified. The base class is
QAbstractItemDelegate.
Separating classes into these three components implies that changes on models will be reflected on associated views or widgets automatically, and changes on views or widgets through delegates will update the underlying model automatically.
In addition, you can display the same data in different views without the need for multiple models.
Using Standard Widget Classes
PyQt provides a bunch of standard widgets for displaying and editing data in your GUI applications. These standard widgets provide views such as tables, trees, and lists. They also provide an internal container for storing data and convenient delegates for editing the data. All these features are grouped into a single class.
Here are three of these standard classes:
| Standard Class | Displays |
|---|---|
QListWidget | A list of items |
QTreeWidget | A hierarchical tree of items |
QTableWidget | A table of items |
QTableWidget is arguably the most popular widget when it comes to displaying and editing data. It creates a 2D array of QTableWidgetItem objects. Each item holds an individual value as a string. All these values are displayed and organized in a table of rows and columns.
You can perform at least the following operations on a QTableWidget object:
- Editing the content of its items using delegate objects
- Adding new items using
.setItem() - Setting the number of rows and columns using
.setRowCount()and.setColumnCount() - Adding vertical and horizontal header labels using
setHorizontalHeaderLabels()and.setVerticalHeaderLabels
Here’s a sample application that shows how to use a QTableWidget object to display data in a GUI. The application uses the database you created and populated in previous sections, so if you want to run it, then you need to save the code into the same directory in which you have the contacts.sqlite banca dati:
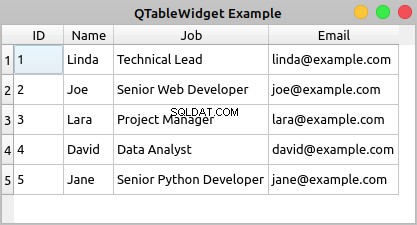
If you double-click any cell of the table, then you’ll be able to edit the content of the cell. However, your changes won’t be saved to your database.
Here’s the code for your application:
 1import sys
 2
 3from PyQt5.QtSql import QSqlDatabase, QSqlQuery
 4from PyQt5.QtWidgets import (
 5    QApplication,
 6    QMainWindow,
 7    QMessageBox,
 8    QTableWidget,
 9    QTableWidgetItem,
10)
11
12class Contacts(QMainWindow):
13    def __init__(self, parent=None):
14        super().__init__(parent)
15        self.setWindowTitle("QTableView Example")
16        self.resize(450, 250)
17        # Set up the view and load the data
18        self.view = QTableWidget()
19        self.view.setColumnCount(4)
20        self.view.setHorizontalHeaderLabels(["ID", "Name", "Job", "Email"])
21        query = QSqlQuery("SELECT id, name, job, email FROM contacts")
22        while query.next():
23            rows = self.view.rowCount()
24            self.view.setRowCount(rows + 1)
25            self.view.setItem(rows, 0, QTableWidgetItem(str(query.value(0))))
26            self.view.setItem(rows, 1, QTableWidgetItem(query.value(1)))
27            self.view.setItem(rows, 2, QTableWidgetItem(query.value(2)))
28            self.view.setItem(rows, 3, QTableWidgetItem(query.value(3)))
29        self.view.resizeColumnsToContents()
30        self.setCentralWidget(self.view)
31
32def createConnection():
33    con = QSqlDatabase.addDatabase("QSQLITE")
34    con.setDatabaseName("contacts.sqlite")
35    if not con.open():
36        QMessageBox.critical(
37            None,
38            "QTableView Example - Error!",
39            "Database Error: %s" % con.lastError().databaseText(),
40        )
41        return False
42    return True
43
44app = QApplication(sys.argv)
45if not createConnection():
46    sys.exit(1)
47win = Contacts()
48win.show()
49sys.exit(app.exec_())
Here’s what’s happening in this example:
- Lines 18 to 20 create a
QTableWidgetobject, set the number of columns to4, and set user-friendly labels for each column’s header. - Line 21 creates and executes a
SELECTSQL query on your database to get all the data in thecontactstable. - Line 22 starts a
whileloop to navigate the records in the query result using.next(). - Line 24 increments the number of rows in the table by
1using.setRowCount(). - Lines 25 to 28 add items of data to your table using
.setItem(). Note that since the values in theidcolumns are integer numbers, you need to convert them into strings to be able to store them in aQTableWidgetItemobject.
.setItem() takes three arguments:
rowholds a zero-based integer that represents the index of a given row in the table.columnholds a zero-based integer that represents the index of a given column in the table.itemholds theQTableWidgetItemobject that you need to place at a given cell in the table.
Finally, you call .resizeColumnsToContents() on your view to adjust the size of the columns to their content and provide a better rendering of the data.
Displaying and editing database tables using standard widgets can become a challenging task. That’s because you’ll have two copies of the same data. In other words you’ll have a copy of the data in two locations:
- Outside the widget, in your database
- Inside the widget, in the widget’s internal containers
You’re responsible for synchronizing both copies of your data manually, which can be an annoying and error-prone operation. Luckily, you can use PyQt’s Model-View architecture to avoid most of these problems, as you’ll see in the following section.
Using View and Model Classes
PyQt’s Model-View classes eliminate the problems of data duplication and synchronization that may occur when you use standard widget classes to build database applications. The Model-View architecture allows you to use several views to display the same data because you can pass one model to many views.
Model classes provide an application programming interface (API) that you can use to manipulate data. View classes provide convenient delegate objects that you can use to edit data in the view directly. To connect a view with a given module, you need to call .setModel() on the view object.
PyQt offers a set of view classes that support the Model-View architecture:
| View Class | Displays |
|---|---|
QListView | A list of items that take values directly from a model class |
QTreeView | A hierarchical tree of items that take values directly from a model class |
QTableView | A table of items that take values directly from a model class |
You can use these view classes along with model classes to create your database applications. This will make your applications more robust, faster to code, and less error-prone.
Here are some of the model classes that PyQt provides for working with SQL databases:
| Model Class | Descrizione |
|---|---|
QSqlQueryModel | A read-only data model for SQL queries |
QSqlTableModel | An editable data model for reading and writing records in a single table |
QSqlRelationalTableModel | An editable data model for reading and writing records in a relational table |
Once you’ve connected one of these models to a physical database table or query, you can use them to populate your views. Views provide delegate objects that allow you to modify the data directly in the view. The model connected to the view will update the data in your database to reflect any change in the view. Note that you don’t have to update the data in the database manually. The model will do that for you.
Here’s an example that shows the basics of how to use a QTableView object and a QSqlTableModel object together to build a database application using PyQt’s Model-View architecture:
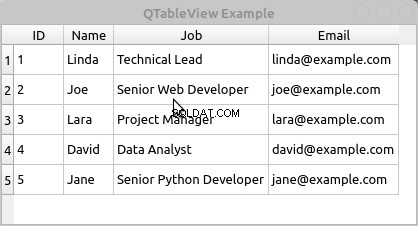
To edit the data in a cell of the table, you can double-click the cell. A convenient delegate widget will show in the cell, allowing you to edit its content. Then you can hit Enter to save the changes.
The ability to automatically handle and save changes in the data is one of the more important advantages of using PyQt’s Model-View classes. The Model-View architecture will improve your productivity and reduce the errors that can appear when you have to write data manipulation code by yourself.
Here’s the code to create the application:
 1import sys
 2
 3from PyQt5.QtCore import Qt
 4from PyQt5.QtSql import QSqlDatabase, QSqlTableModel
 5from PyQt5.QtWidgets import (
 6    QApplication,
 7    QMainWindow,
 8    QMessageBox,
 9    QTableView,
10)
11
12class Contacts(QMainWindow):
13    def __init__(self, parent=None):
14        super().__init__(parent)
15        self.setWindowTitle("QTableView Example")
16        self.resize(415, 200)
17        # Set up the model
18        self.model = QSqlTableModel(self)
19        self.model.setTable("contacts")
20        self.model.setEditStrategy(QSqlTableModel.OnFieldChange)
21        self.model.setHeaderData(0, Qt.Horizontal, "ID")
22        self.model.setHeaderData(1, Qt.Horizontal, "Name")
23        self.model.setHeaderData(2, Qt.Horizontal, "Job")
24        self.model.setHeaderData(3, Qt.Horizontal, "Email")
25        self.model.select()
26        # Set up the view
27        self.view = QTableView()
28        self.view.setModel(self.model)
29        self.view.resizeColumnsToContents()
30        self.setCentralWidget(self.view)
31
32def createConnection():
33    con = QSqlDatabase.addDatabase("QSQLITE")
34    con.setDatabaseName("contacts.sqlite")
35    if not con.open():
36        QMessageBox.critical(
37            None,
38            "QTableView Example - Error!",
39            "Database Error: %s" % con.lastError().databaseText(),
40        )
41        return False
42    return True
43
44app = QApplication(sys.argv)
45if not createConnection():
46    sys.exit(1)
47win = Contacts()
48win.show()
49sys.exit(app.exec_())
Here’s what’s happening in this code:
- Line 18 creates an editable
QSqlTableModelobject. - Line 19 connects your model with the
contactstable in your database using.setTable(). - Line 20 sets the edit strategy of the model to
OnFieldChange. This strategy allows the model to automatically update the data in your database if the user modifies any of the data directly in the view. - Lines 21 to 24 set some user-friendly labels to the horizontal headers of the model using
.setHeaderData(). - Line 25 loads the data from your database and populates the model by calling
.select(). - Line 27 creates the table view object to display the data contained in the model.
- Line 28 connects the view with the model by calling
.setModel()on the view with your data model as an argument. - Line 29 calls
.resizeColumnsToContents()on the view object to adjust the table to its content.
Questo è tutto! You now have a fully-functional database application.
Using SQL Databases in PyQt:Best Practices
When it comes to using PyQt’s SQL support effectively, there are some best practices that you might want to use in your applications:
-
Favor PyQt’s SQL support over Python standard library or third-party libraries to take advantage of the natural integration of these classes with the rest of PyQt’s classes and infrastructure, mostly with the Model-View architecture.
-
Use previously prepared dynamic queries with placeholders for parameters and bind values to those parameters using
.addBindValue()and.bindValue(). This will help prevent SQL injection attacks. -
Handle errors that can occur when opening a database connection to avoid unexpected behaviors and application crashes.
-
Close and remove unneeded database connections and queries to free any acquired system resources.
-
Minimize the use of
SELECT *queries to avoid problems when retrieving data with.value(). -
Pass your passwords to
.open()instead of to.setPassword()to avoid the risk of compromising your security. -
Take advantage of PyQt’s Model-View architecture and its integration with PyQt’s SQL support to make your applications more robust.
This list isn’t complete, but it’ll help you make better use of PyQt’s SQL support when developing your database applications.
Conclusione
Using PyQt’s built-in support to work with SQL databases is an important skill for any Python developer who’s creating PyQt GUI applications and needs to connect them to a database. PyQt provides a consistent set of classes for managing SQL databases.
These classes fully integrate with PyQt’s Model-View architecture, allowing you to develop GUI applications that can manage databases in a user-friendly way.
In this tutorial, you’ve learned how to:
- Use PyQt’s SQL support to connect to a database
- Execute SQL queries on a database with PyQt
- Build database applications using PyQt’s Model-View architecture
- Display and edit data from a database using PyQt widgets
With this knowledge, you can improve your productivity when creating nontrivial database applications and make your GUI applications more robust.