Introduzione
Prima o poi, qualsiasi sistema informativo ottiene un database, spesso, più di uno. Con il tempo, quel database raccoglie moltissimi dati, da diversi GB a decine di TB. Per capire come funzioneranno i funzionali con l'aumento dei volumi di dati, dobbiamo generare i dati per riempire quel database.

Tutti gli script presentati e implementati verranno eseguiti su JobEmplDB banca dati di un servizio di reclutamento. La realizzazione del database è disponibile qui.
Approcci alla compilazione dei dati nei database per test e sviluppo
Lo sviluppo e il test del database implicano due approcci principali alla compilazione dei dati:
- Copiare l'intero database dall'ambiente di produzione con dati personali e altri dati sensibili modificati. In questo modo, garantisci i dati e cancelli i dati riservati.
- Per generare dati sintetici. Significa generare i dati di test simili ai dati reali nell'aspetto, nelle proprietà e nelle interconnessioni.
Il vantaggio dell'Approccio 1 è che approssima i dati e la loro distribuzione secondo criteri diversi al database di produzione. Ci permette di analizzare tutto con precisione e, quindi, di trarre conclusioni e prognosi di conseguenza.
Tuttavia, questo approccio non consente di aumentare il database stesso molte volte. Diventa problematico prevedere in futuro i cambiamenti nella funzionalità dell'intero sistema informativo.
Dall'altro lato è possibile analizzare i dati impersonali sanificati prelevati dal database di produzione. Sulla base di essi, puoi definire come generare i dati di test che sarebbero come i dati reali per aspetto, proprietà e interrelazioni. In questo modo, l'Approccio 1 produce l'Approccio 2.
Ora, esaminiamo in dettaglio entrambi gli approcci alla compilazione dei dati nei database per il test e lo sviluppo.
Copia e modifica dei dati in un database di produzione
Per prima cosa, definiamo l'algoritmo generale di copia e modifica dei dati dall'ambiente di produzione.
L'algoritmo generale
L'algoritmo generale è il seguente:
- Crea un nuovo database vuoto.
- Crea uno schema nel database appena creato, lo stesso sistema del database di produzione.
- Copia i dati necessari dal database di produzione nel database appena creato.
- Disinfetta e modifica i dati segreti nel nuovo database.
- Esegui un backup del database appena creato.
- Consegna e ripristina il backup nell'ambiente necessario.
Tuttavia, l'algoritmo diventa più complicato dopo il passaggio 5. Ad esempio, il passaggio 6 richiede un ambiente protetto specifico per i test preliminari. Questa fase deve garantire che tutti i dati siano impersonali e che i dati segreti vengano modificati.
Dopo tale fase, è possibile tornare nuovamente al passaggio 5 per il database testato nell'ambiente protetto non di produzione. Quindi, inoltra il backup testato agli ambienti necessari per ripristinarlo e utilizzarlo per lo sviluppo e il test.
Abbiamo presentato l'algoritmo generale di copia e modifica dei dati del database di produzione. Descriviamo come implementarlo.
Realizzazione dell'algoritmo generale
Una nuova creazione di un database vuoto
Puoi creare un database vuoto con l'aiuto della costruzione CREATE DATABASE come qui.
Il database è denominato JobEmplDB_Test . Ha tre filegroup:
- PRIMARIO – è il filegroup principale per impostazione predefinita. Definisce due file:JobEmplDB_Test1(percorso D:\DBData\JobEmplDB_Test1.mdf) e JobEmplDB_Test2 (percorso D:\DBData\JobEmplDB_Test2.ndf) . La dimensione iniziale di ogni file è di 64 Mb e la fase di crescita è di 8 Mb per ciascun file.
- DBTableGroup – un filegroup personalizzato che determina due file:JobEmplDB_TestTableGroup1 (percorso D:\DBData\JobEmplDB_TestTableGroup1.ndf) e JobEmplDB_TestTableGroup2 (percorso D:\DBData\JobEmplDB_TestTableGroup2.ndf) . La dimensione iniziale di ogni file è 8 Gb e il passo di crescita è 1 Gb per ogni file.
- Gruppo DBIndex – un filegroup personalizzato che determina due file:JobEmplDB_TestIndexGroup1 (percorso D:\DBData\JobEmplDB_TestIndexGroup1.ndf) e JobEmplDB_TestIndexGroup2 (percorso D:\DBData\JobEmplDB_TestIndexGroup2.ndf) . La dimensione iniziale è di 16 Gb per ogni file e il passo di crescita è di 1 Gb per ogni file.
Inoltre, questo database include un giornale di registrazione delle transazioni:JobEmplDB_Testlog , percorso E:\DBLog\JobEmplDB_Testlog.ldf . La dimensione iniziale del file è 8 Gb e il passo di crescita è 1 Gb.
Copia dello schema e dei dati necessari dal database di produzione in un database appena creato
Per copiare lo schema ei dati necessari dal database di produzione in quello nuovo, è possibile utilizzare diversi strumenti. Innanzitutto, è Visual Studio (SSDT). Oppure puoi utilizzare utilità di terze parti come:
- Confronto schema DbForge e confronto dati DbForge
- Differenza ApexSQL e Differenza dati Apex
- Strumento di confronto SQL e strumento di confronto dei dati SQL
Creazione di script per le modifiche ai dati
Requisiti essenziali per gli script di modifica dei dati
1. Deve essere impossibile ripristinare i dati reali utilizzando quello script.
ad esempio, l'inversione delle linee non si adatta, in quanto ci consente di ripristinare i dati reali. Di solito, il metodo consiste nel sostituire ogni carattere o byte con un carattere o byte pseudocasuale. Lo stesso vale per la data e l'ora.
2. La modifica dei dati non deve alterare la selettività dei loro valori.
Non funzionerà per assegnare NULL al campo della tabella. Invece, devi assicurarti che gli stessi valori nei dati reali rimangano gli stessi nei dati modificati. Ad esempio, nei dati reali, hai un valore di 103785 trovato 12 volte nella tabella. Quando modifichi questo valore nei dati modificati, il nuovo valore deve rimanere 12 volte negli stessi campi della tabella.
3. La dimensione e la lunghezza dei valori non devono differire in modo significativo nei dati modificati. Ad esempio, sostituisci ogni byte o carattere con un byte o carattere pseudocasuale. La stringa iniziale rimane la stessa per dimensione e lunghezza.
4. Le interrelazioni nei dati non devono essere interrotte dopo le modifiche. Riguarda le chiavi esterne e tutti gli altri casi in cui si fa riferimento ai dati alterati. I dati modificati devono rimanere nelle stesse relazioni dei dati reali.
Implementazione degli script di modifica dei dati
Ora, esaminiamo il caso particolare della modifica dei dati per spersonalizzare e nascondere le informazioni segrete. Il campione è il database delle assunzioni.
Il database di esempio include i seguenti dati personali che devi depersonalizzare:
- Cognome e nome;
- Data di nascita;
- La data di emissione della carta d'identità;
- Il certificato di accesso remoto come sequenza di byte;
- Il costo del servizio per la promozione del curriculum.
Per prima cosa, controlleremo semplici esempi per ogni tipo di dati modificati:
- Cambiamento di data e ora;
- Variazione del valore numerico;
- Cambiare le sequenze di byte;
- Cambiamento dei dati del personaggio.
Cambiamento di data e ora
Puoi ottenere una data e un'ora casuali utilizzando il seguente script:
DECLARE @dt DATETIME;

SET @dt = CAST(CAST(@StartDate AS FLOAT) + (CAST(@FinishDate AS FLOAT) - CAST(@StartDate AS FLOAT)) * RAND(CHECKSUM(NEWID())) AS DATETIME);
Qui, @StartDate e @FinishDate sono i valori di inizio e fine dell'intervallo. Si correlano rispettivamente per la data pseudocasuale e la generazione dell'ora.
Per generare questi dati, utilizzare le funzioni di sistema RAND, CHECKSUM e NEWID.
UPDATE [dbo].[Employee]
SET [DocDate] = CAST(CAST(CAST(CAST([BirthDate] AS DATETIME) AS FLOAT) + (CAST(GETDATE() AS FLOAT) - CAST(CAST([BirthDate] AS DATETIME) AS FLOAT)) * RAND(CHECKSUM(NEWID())) AS DATETIME) AS DATE);
Il campo [DocDate] sta per la data di emissione del documento. La sostituiamo con una data pseudocasuale, tenendo presente gli intervalli di date e i loro limiti.
Il limite "inferiore" è la data di nascita del candidato. Il bordo "superiore" è la data corrente. Non abbiamo bisogno del tempo qui, quindi la trasformazione del formato dell'ora e della data nella data necessaria arriva alla fine. Puoi ottenere valori pseudocasuali per qualsiasi parte della data e dell'ora allo stesso modo.
Cambiamento del valore numerico
Puoi ottenere un numero intero casuale con l'aiuto del seguente script:
DECLARE @Int INT;

SET @Int = CAST(((@MaxVal + 1) - @MinVal) *
    RAND(CHECKSUM(NEWID())) + @MinVal AS INT);
@MinVal è @MaxVal sono i valori di inizio e fine dell'intervallo per la generazione di numeri pseudocasuali. Lo generiamo utilizzando le funzioni di sistema RAND, CHECKSUM e NEWID.
UPDATE [dbo].[Employee]
SET [CountRequest] = CAST(((@MaxVal + 1) - @MinVal) *
    RAND(CHECKSUM(NEWID())) + @MinVal AS INT);
Il campo [CountRequest] indica il numero di richieste che le aziende fanno per il curriculum di questo candidato.
Allo stesso modo, puoi ottenere valori pseudocasuali per qualsiasi valore numerico. Ad esempio, dai un'occhiata al numero casuale della generazione di tipo decimale (18,2):
DECLARE @Dec DECIMAL(18,2);

SET @Dec=CAST(((@MaxVal + 1) - @MinVal) *
    RAND(CHECKSUM(NEWID())) + @MinVal AS DECIMAL(18,2));
Pertanto, puoi aggiornare la tariffa del servizio di promozione del curriculum nel modo seguente:
UPDATE [dbo].[Employee]
SET [PaymentAmount] = CAST(((@MaxVal + 1) - @MinVal) *
    RAND(CHECKSUM(NEWID())) + @MinVal AS DECIMAL(18,2));
Modifica delle sequenze di byte
Puoi ottenere una sequenza di byte casuale usando il seguente script:
DECLARE @res VARBINARY(MAX);

SET @res = CRYPT_GEN_RANDOM(@Length, CAST(NEWID() AS VARBINARY(16)));
@Lunghezza sta per la lunghezza della sequenza. Definisce il numero di byte restituiti. Qui, @Length non deve essere maggiore di 16.
La generazione avviene con l'ausilio delle funzioni di sistema CRYPT_GEN_RANDOM e NEWID.
Ad esempio, puoi aggiornare il certificato di accesso remoto per ogni candidato nel modo seguente:
UPDATE [dbo].[Employee]
SET [RemoteAccessCertificate] = CRYPT_GEN_RANDOM(CAST(LEN([RemoteAccessCertificate]) AS INT), CAST(NEWID() AS VARBINARY(16)));
Generiamo una sequenza di byte pseudocasuali della stessa lunghezza presente nel campo [RemoteAccessCertificate] al momento della modifica. Supponiamo che la lunghezza della sequenza di byte non superi 16.
Allo stesso modo, possiamo creare la nostra funzione che restituirà sequenze di byte pseudocasuali di qualsiasi lunghezza. Metterà insieme i risultati della funzione di sistema CRYPT_GEN_RANDOM usando il semplice operatore di addizione “+”. Ma 16 byte di solito sono sufficienti in pratica.
Realizziamo una funzione di esempio restituendo la sequenza di byte pseudocasuali della lunghezza definita, dove sarà possibile impostare la lunghezza superiore a 16 byte. Per questo, fai la seguente presentazione:
CREATE VIEW [test].[GetNewID]
AS
SELECT NEWID() AS [NewID];
GO
Ne abbiamo bisogno per eludere la limitazione che ci vieta di utilizzare NEWID all'interno della funzione.
Allo stesso modo, crea la presentazione successiva per lo stesso scopo:
CREATE VIEW [test].[GetRand]
AS
SELECT RAND(CHECKSUM((SELECT TOP(1) [NewID] FROM [test].[GetNewID]))) AS [Value];
GO
Crea un'altra presentazione:
CREATE VIEW [test].[GetRandVarbinary16]
AS
SELECT CRYPT_GEN_RANDOM(16, CAST((SELECT TOP(1) [NewID] FROM [test].[GetNewID]) AS VARBINARY(16))) AS [Value];
GO
Tutte e tre le definizioni delle funzioni sono qui. Ed ecco l'implementazione della funzione che restituisce una sequenza di byte pseudocasuale di lunghezza definita.
Innanzitutto, definiamo se è presente la funzione necessaria. In caso contrario, creiamo prima uno stallo. In ogni caso, il codice prevede di modificare opportunamente la definizione della funzione. Alla fine, aggiungiamo la descrizione della funzione tramite le proprietà estese. Maggiori dettagli sulla documentazione del database sono in questo articolo.
Per aggiornare il certificato di accesso remoto per ogni candidato, puoi fare come segue:
UPDATE [dbo].[Employee]
SET [RemoteAccessCertificate] = [test].[GetRandVarbinary](CAST(LEN([RemoteAccessCertificate]) AS INT));
Come puoi vedere, qui non ci sono limitazioni alla lunghezza della sequenza di byte.
Modifica dati – Modifica dati carattere
Qui prendiamo un esempio per gli alfabeti inglese e russo, ma puoi farlo per qualsiasi altro alfabeto. L'unica condizione è che i suoi caratteri debbano essere presenti nei tipi NCHAR.
Dobbiamo creare una funzione che accetti la riga, sostituisca ogni carattere con un carattere pseudocasuale, quindi metta insieme il risultato e lo restituisca.
Tuttavia, dobbiamo prima capire di quali personaggi abbiamo bisogno. Per questo, possiamo eseguire il seguente script:
DECLARE @tbl TABLE ([ValueInt] INT, [ValueNChar] NCHAR(1), [ValueChar] CHAR(1));

DECLARE @ind int=0;
DECLARE @count INT=65535;

WHILE(@count>=0)
BEGIN
	INSERT INTO @tbl ([ValueInt], [ValueNChar], [ValueChar])
	SELECT @ind, NCHAR(@ind), CHAR(@ind)

	SET @ind+=1;
	SET @count-=1;
END

SELECT *
INTO [test].[TblCharactersCode]
FROM @tbl;
Stiamo realizzando la tabella [test].[TblCharacterCode] che include i seguenti campi:
- ValueInt – il valore numerico del carattere;
- ValueNChar – il carattere di tipo NCHAR;
- ValueChar – il carattere di tipo CHAR.
Esaminiamo il contenuto di questa tabella. Abbiamo bisogno della seguente richiesta:
SELECT [ValueInt]
      ,[ValueNChar]
      ,[ValueChar]
  FROM [test].[TblCharactersCode];
I numeri sono compresi tra 48 e 57:
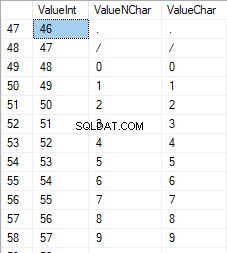
I caratteri latini in maiuscolo sono compresi tra 65 e 90:

I caratteri latini nella parte inferiore sono compresi tra 97 e 122:
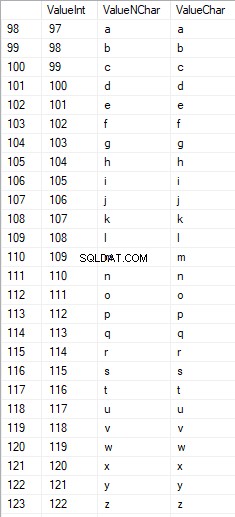
I caratteri russi in maiuscolo sono compresi tra 1040 e 1071:

I caratteri russi in minuscolo sono compresi tra 1072 e 1103:


E caratteri compresi tra 58 e 64:

Selezioniamo i caratteri necessari e li inseriamo nella tabella [test].[SelectCharactersCode] nel modo seguente:
SELECT
	[ValueInt]
   ,[ValueNChar]
   ,[ValueChar]
   ,CASE
		WHEN ([ValueInt] BETWEEN 48 AND 57) THEN 1
		ELSE 0
	END AS [IsNumeral]
   ,CASE
		WHEN (([ValueInt] BETWEEN 65 AND 90) OR
			([ValueInt] BETWEEN 1040 AND 1071)) THEN 1
		ELSE 0
	END AS [IsUpperCase]
   ,CASE
		WHEN (([ValueInt] BETWEEN 65 AND 90) OR
			([ValueInt] BETWEEN 97 AND 122)) THEN 1
		ELSE 0
	END AS [IsLatin]
   ,CASE
		WHEN (([ValueInt] BETWEEN 1040 AND 1071) OR
			([ValueInt] BETWEEN 1072 AND 1103)) THEN 1
		ELSE 0
	END AS [IsRus]
   ,CASE
		WHEN (([ValueInt] BETWEEN 33 AND 47) OR
			([ValueInt] BETWEEN 58 AND 64)) THEN 1
		ELSE 0
	END AS [IsExtra]
INTO [test].[SelectCharactersCode]
FROM [test].[TblCharactersCode]
WHERE ([ValueInt] BETWEEN 48 AND 57)
OR ([ValueInt] BETWEEN 65 AND 90)
OR ([ValueInt] BETWEEN 97 AND 122)
OR ([ValueInt] BETWEEN 1040 AND 1071)
OR ([ValueInt] BETWEEN 1072 AND 1103)
OR ([ValueInt] BETWEEN 33 AND 47)
OR ([ValueInt] BETWEEN 58 AND 64);
Ora, esaminiamo il contenuto di questa tabella utilizzando il seguente script:
SELECT [ValueInt]
      ,[ValueNChar]
      ,[ValueChar]
      ,[IsNumeral]
      ,[IsUpperCase]
      ,[IsLatin]
      ,[IsRus]
      ,[IsExtra]
  FROM [test].[SelectCharactersCode];
Riceviamo il seguente risultato:

In questo modo, abbiamo il [test].[SelectCharactersCode] tabella, dove:
- ValoreInt – il valore numerico del carattere
- ValueNCChar – il carattere di tipo NCHAR
- ValoreChar – il carattere di tipo CHAR
- ÈNumerale – il criterio per cui un carattere è una cifra
- ÈMaiuscolo – il criterio di un carattere in maiuscolo
- È latino – il criterio per cui un carattere è un carattere latino;
- IsRus – il criterio per cui un carattere è un carattere russo
- È Extra – il criterio per cui un carattere è un carattere aggiuntivo
Ora possiamo ottenere il codice per l'inserimento dei caratteri necessari. Ad esempio, ecco come farlo per i caratteri latini in minuscolo:
SELECT 'SELECT '+CAST([ValueInt] AS NVARCHAR(255))+' AS [ValueInt], '+''''+[ValueNChar]+''''+' AS [ValueNChar], '+''''+[ValueChar]+''''+' AS [ValueChar] UNION ALL'
  FROM [test].[SelectCharactersCode]
  WHERE [IsUpperCase]=0
    AND [IsLatin]=1;
Riceviamo il seguente risultato:

È lo stesso per i caratteri russi in minuscolo:
SELECT 'SELECT '+CAST([ValueInt] AS NVARCHAR(255))+' AS [ValueInt], '+''''+[ValueNChar]+''''+' AS [ValueNChar], '+COALESCE(''''+[ValueChar]+'''', 'NULL')+' AS [ValueChar] UNION ALL'
  FROM [test].[SelectCharactersCode]
  WHERE [IsUpperCase]=0
    AND [IsRus]=1;
Otteniamo il seguente risultato:

Lo stesso vale per i personaggi:
SELECT 'SELECT '+CAST([ValueInt] AS NVARCHAR(255))+' AS [ValueInt], '+''''+[ValueNChar]+''''+' AS [ValueNChar], '+''''+[ValueChar]+''''+' AS [ValueChar] UNION ALL'
  FROM [test].[SelectCharactersCode]
  WHERE [IsNumeral]=1;
Il risultato è il seguente:

Quindi, abbiamo i codici per inserire separatamente i seguenti dati:
- I caratteri latini in minuscolo.
- I caratteri russi in minuscolo.
- Le cifre.
Funziona con entrambi i tipi NCHAR e CHAR.
Allo stesso modo, possiamo preparare uno script di inserimento per qualsiasi set di caratteri. Inoltre, ogni set avrà la propria funzione di tabulazione.
Per essere semplici, implementiamo la funzione di tabulazione comune che restituirà il set di dati necessario per i dati precedentemente selezionati nel modo seguente:
SELECT
	'SELECT ' + CAST([ValueInt] AS NVARCHAR(255)) + ' AS [ValueInt], '
	+ '''' + [ValueNChar] + '''' + ' AS [ValueNChar], '
	+ COALESCE('''' + [ValueChar] + '''', ‘NULL’) + ' AS [ValueChar], '
	+ CAST([IsNumeral] AS NCHAR(1)) + ' AS [IsNumeral], ' +
	+CAST([IsUpperCase] AS NCHAR(1)) + ' AS [IsUpperCase], ' +
	+CAST([IsLatin] AS NCHAR(1)) + ' AS [IsLatin], ' +
	+CAST([IsRus] AS NCHAR(1)) + ' AS [IsRus], ' +
	+CAST([IsExtra] AS NCHAR(1)) + ' AS [IsExtra]' +
	+' UNION ALL'
FROM [test].[SelectCharactersCode];
Il risultato finale è il seguente:

Lo script pronto è racchiuso nella funzione di tabulazione [test].[GetSelectCharacters].
È importante rimuovere un UNION ALL in più alla fine dello script generato e, in [ValueInt]=39, è necessario modificare ”’ in ””:
SELECT 39 AS [ValueInt], '''' AS [ValueNChar], '''' AS [ValueChar], 0 AS [IsNumeral], 0 AS [IsUpperCase], 0 AS [IsLatin], 0 AS [IsRus], 1 AS [IsExtra] UNION ALLQuesta funzione di tabulazione restituisce il seguente insieme di campi:
- Numero – il numero di riga nel set di dati restituito;
- ValoreInt – il valore numerico del carattere;
- ValueNCChar – il carattere di tipo NCHAR;
- ValoreChar – il carattere di tipo CHAR;
- ÈNumerale – il criterio del carattere è una cifra;
- ÈMaiuscolo – il criterio che definisce che il carattere sia in maiuscolo;
- È latino – il criterio che definisce che il carattere è un carattere latino;
- IsRus – il criterio che definisce che il carattere è un carattere russo;
- È Extra – il criterio che definisce che il personaggio è un personaggio in più.
Per l'input, hai i seguenti parametri:
- @Numerale – se deve restituire i numeri;
- @IsUpperCase :
- 0 – deve restituire solo il minuscolo per le lettere;
- 1 – deve restituire solo le lettere maiuscole;
- NULL – deve restituire lettere in tutti i casi.
- @IsLatin – deve restituire i caratteri latini
- @IsRus – deve restituire i caratteri russi
- @IsExtra – deve restituire caratteri aggiuntivi.
Tutti i flag vengono utilizzati in base all'OR logico. Ad esempio, se devi riportare cifre e caratteri latini in minuscolo, chiama la funzione di tabulazione nel modo seguente:
Otteniamo il seguente risultato:
declare
@IsNumeral BIT=1
   ,@IsUpperCase BIT=0
   ,@IsLatin BIT=1
   ,@IsRus BIT=0
   ,@IsExtra BIT=0;

SELECT *
FROM [test].[GetSelectCharacters](@IsNumeral, @IsUpperCase, @IsLatin, @IsRus, @IsExtra);
Otteniamo il seguente risultato:

Implementiamo la funzione [test].[GetRandString] che sostituirà la riga con caratteri pseudocasuali, mantenendo la lunghezza della stringa iniziale. Questa funzione deve includere la possibilità di azionare solo quei caratteri che sono cifre. Ad esempio, può essere utile quando modifichi la serie e il numero della carta d'identità.
Quando implementiamo la funzione [test].[GetRandString], otteniamo prima l'insieme di caratteri necessario per generare una riga pseudocasuale della lunghezza specificata nel parametro di input @Length. Il resto dei parametri funziona come descritto sopra.
Quindi, inseriamo il set di dati ricevuto nella variabile di tabulazione @tbl . Questa tabella salva i campi [ID] - il numero d'ordine nella tabella di caratteri risultante e [Valore] - la presentazione del carattere nel tipo NCHAR.
Dopodiché, in un ciclo, genera un numero pseudocasuale nell'intervallo da 1 alla cardinalità dei caratteri @tbl ricevuti in precedenza. Inseriamo questo numero nell'[ID] della variabile di tabulazione @tbl per la ricerca. Quando la ricerca restituisce la riga, prendiamo il carattere [Valore] e lo "incolliamo" alla riga risultante @res.
Quando il lavoro del ciclo finisce, la riga ricevuta ritorna tramite la variabile @res.
Puoi modificare sia il nome che il cognome del candidato nel modo seguente:
UPDATE [dbo].[Employee]
SET [FirstName] = [test].[GetRandString](LEN([FirstName])),
        [LastName] = [test].[GetRandString](LEN([LastName]));
Pertanto, abbiamo esaminato l'implementazione della funzione e il suo utilizzo per i tipi NCHAR e NVARCHAR. Possiamo fare lo stesso facilmente per i tipi CHAR e VARCHAR.
A volte, tuttavia, è necessario generare una riga in base ai caratteri impostati, non ai caratteri alfabetici o ai numeri. In questo modo, dobbiamo prima utilizzare la seguente funzione multi-operatore [test].[GetListCharacters].
La funzione [test].[GetListCharacters] ottiene i due parametri seguenti per l'input:
- @str – la riga di caratteri stessa;
- @IsGroupUnique – definisce se è necessario raggruppare caratteri univoci nella riga.
Con il CTE ricorsivo, la riga di input @str viene trasformata nella tabella di caratteri – @ListCharacters. Quella tabella contiene i seguenti campi:
- ID – il numero d'ordine della riga nella tabella dei caratteri risultante;
- Personaggio – la presentazione del personaggio in NCHAR(1)
- Conte – il numero di ripetizioni del carattere nella riga (è sempre 1 se il parametro @IsGroupUnique=0)
Prendiamo due esempi di utilizzo di questa funzione per comprenderne meglio il funzionamento:
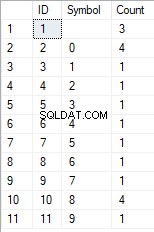
- Trasformazione della riga nell'elenco dei caratteri non univoci:
SELECT *
FROM [test].[GetListCharacters]('123456888  789 0000', 0);
Otteniamo il risultato:

Questo esempio mostra che la riga viene trasformata nell'elenco di caratteri "così com'è", senza raggrupparla in base all'unicità dei caratteri (il campo [Conteggio] contiene sempre 1).
- La trasformazione della riga nell'elenco dei caratteri univoci
SELECT *
FROM [test].[GetListCharacters]('123456888  789 0000', 1);
Il risultato è il seguente:
Questo esempio mostra che la riga viene trasformata nell'elenco di caratteri raggruppati in base alla loro unicità. Il campo [Conteggio] mostra il numero di risultati di ciascun carattere nella riga di input.
Basandoci sulla funzione multi-operatore [test].[GetListCharacters], creiamo una funzione scalare [test].[GetRandString2].
La definizione della nuova funzione scalare mostra la sua somiglianza con la funzione scalare [test].[GetRandString]. L'unica differenza è che utilizza la funzione multi-operatore [test].[GetListCharacters] invece della funzione di tabulazione [test].[GetSelectCharacters].
Qui, esaminiamo due esempi dell'utilizzo della funzione scalare implementata :
Generiamo una riga pseudocasuale di 12 caratteri dalla riga di input di caratteri non raggruppati per unicità:
SELECT [test].[GetRandString2](12, '123456789!!!!!!!!0!!!', DEFAULT);Il risultato è:
64017!!5!!!7
La parola chiave è PREDEFINITO. Afferma che il valore predefinito imposta il parametro. Qui è zero (0).
Oppure
Generiamo una riga pseudocasuale di 12 caratteri dalla riga di input di caratteri raggruppati per unicità:
SELECT [test].[GetRandString2](12, '123456789!!!!!!!!0!!!', 1);Il risultato è:
35792!428273
Implementazione dello script generale per la sanificazione dei dati e le modifiche ai dati segreti
Abbiamo esaminato semplici esempi per ogni tipo di dati alterati:
- Cambiare la data e l'ora;
- Cambiare il valore numerico;
- Cambiare la sequenza di byte;
- Cambiare i dati dei personaggi.
Tuttavia, questi esempi non soddisfano i criteri 2 e 3 per gli script di alterazione dei dati:
- Criterio 2 :la selettività dei valori non cambierà significativamente nei dati alterati. Non puoi usare NULL per il campo della tabella. Invece, devi assicurarti che gli stessi valori di dati reali rimangano gli stessi nei dati modificati. Ad esempio, se i dati reali contengono il valore 103785 12 volte nel campo di una tabella soggetto a modifiche, i dati modificati devono includere un valore diverso (modificato) trovato 12 volte nello stesso campo della tabella.
- Criterio 3 :la lunghezza e la dimensione dei valori non devono essere modificate in modo significativo nei dati modificati. Ad esempio, sostituisci ogni carattere/byte con un carattere/byte pseudocasuale.
Pertanto, dobbiamo creare uno script che tenga conto della selettività dei valori nei campi della tabella.
Diamo un'occhiata al nostro database per il servizio di recruiting. Come si vede, i dati personali sono presenti solo nella tabella dei candidati [dbo].[Dipendente].
Si supponga che la tabella includa i seguenti campi:
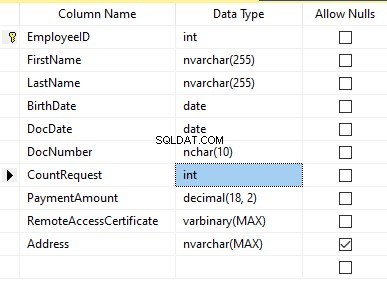
Descrizioni:
- Nome – nome, riga NVARCHAR(255)
- Cognome – cognome, riga NVARCHAR(255)
- Data di nascita – data di nascita, DATA
- Numero documento – il numero della carta d'identità con due cifre all'inizio per la serie del passaporto e le successive sette cifre sono il numero del documento. Tra di loro, abbiamo un trattino come la riga NCHAR(10).
- DocDate – la data di emissione della carta d'identità, DATA
- Richiesta di conteggio – il numero di richieste per quel candidato durante la ricerca del curriculum, il numero intero INT
- Importo di pagamento – il canone del servizio di promozione del curriculum ricevuto, il numero decimale (18,2)
- Certificato di accesso remoto – il certificato di accesso remoto, sequenza di byte VARBINARY
- Indirizzo – l'indirizzo di residenza o l'indirizzo di registrazione, riga NVARCHAR(MAX)
Quindi, per mantenere la selettività iniziale, dobbiamo implementare il seguente algoritmo:
- Estrai tutti i valori univoci per ogni campo e conserva i risultati in tabelle temporanee o variabili di tabulazione;
- Genera un valore pseudocasuale per ogni valore univoco. Questo valore pseudocasuale non deve differire significativamente in lunghezza e dimensioni dal valore originale. Salva il risultato nello stesso punto in cui abbiamo salvato i risultati del punto 1. Ogni nuovo valore generato deve avere un valore corrente univoco correlato.
- Sostituisci tutti i valori nella tabella con i nuovi valori dal punto 2.
All'inizio, spersonalizziamo il nome e il cognome dei candidati. Assumiamo che il cognome e il nome siano sempre presenti e che non siano lunghi meno di due caratteri in ogni campo.
Innanzitutto, selezioniamo nomi univoci. Quindi, genera una riga pseudocasuale per ogni nome. La lunghezza del nome rimane la stessa; il primo carattere è in maiuscolo e gli altri caratteri in minuscolo. Usiamo la funzione scalare [test].[GetRandString] precedentemente creata per generare una linea pseudocasuale della lunghezza specifica secondo i criteri dei caratteri definiti.
Quindi, aggiorniamo i nomi nella tabella dei candidati in base ai loro valori univoci. Lo stesso vale per i cognomi.
Depersonalizziamo il campo DocNumber. È il numero della carta d'identità (passaporto). I primi due caratteri rappresentano la serie del documento e le ultime sette cifre sono il numero del documento. Il trattino è tra di loro. Quindi eseguiamo l'operazione di sanificazione.
Raccogliamo tutti i numeri di documenti univoci e generiamo una linea pseudocasuale per ciascuno. Il formato della linea è "XX-XXXXXXXX", dove X è la cifra nell'intervallo da 0 a 9. Qui, utilizziamo la funzione scalare [test].[GetRandString] creata in precedenza per generare una riga pseudocasuale della lunghezza specificata in base a i parametri dei personaggi impostati.
Successivamente, il campo [DocNumber] viene aggiornato nella tabella dei candidati [dbo].[Employee].
We depersonalize the DocDate field (the ID-card issue date) and the BirthDate field (the candidate’s date of birth).
First, we select all the unique pairs made of “date of birth &date of the ID-card issue.” For each such pair, we create a pseudorandom date for the date of birth. The pseudorandom date of the ID-card issue is made according to that “date of birth” – the date of the document’s issue must not be earlier than the date of birth.
After that, these data are updated in the respective fields of the candidates’ table [dbo].[Employee].
And, we update the remaining fields of the table.
The CountRequest value stands for the number of requests made for that candidate by companies during the resume search.
The PaymentAmount is the final amount of the resume promotion service fee paid. We calculate these numbers similarly to the previous fields.
Note that it generates a pseudorandom integer for the first case and a pseudorandom decimal for the second case. In both cases, the pseudorandom number generation occurs in the range of “two times less than original” to “two times more than original.” The selectivity of values in the fields is not changed too much.
After that, it writes the values into the fields of the candidates’ table [dbo].[Employee].
Further, we collect unique values of the RemoteAccessCertificate field for the remote access certificate. We generate a pseudorandom byte sequence for each such value. The length of the sequence must be the same as the original. Here, we use the previously created [test].[GetRandVarbinary] scalar function to generate the pseudorandom byte sequence of the specified length.
Then recording into the respective field [RemoteAccessCertificate] of the [dbo].[Employee] candidates’ table takes place.
The last step is the collection of the unique addresses from the [Address] field. For each value, we generate a pseudorandom line of the same length as the original. Note that if it was NULL originally, it must be NULL in the generated field. It allows you to keep NULL and don’t replace it with an empty line. It minimizes the selectivity values’ mismatch in this field between the production database and the altered data.
We use the previously created [test].[GetRandString] scalar function to generate the pseudorandom line of the specified length according to the characters’ parameters defined.
It then records the data into the respective [Address] field of the candidates’ table [dbo].[Employee].
This way, we get the full script for depersonalization and altering of the confidential data.
Finally, we get the database with altered personal and confidential data. The algorithms we used make it impossible to restore the original data from the altered data. Also, the values’ selectivity, length, and size aren’t changed significantly. So, the three criteria for the personal and secret data altering scripts are ensured.
We won’t review the criterion 4 separately here. Our database contains all the data subject to change in one candidates’ table [dbo].[Employee]. The data conformity is needed within this table only. Thus, criterion 4 is also here. However, we need to remember this criterion 4 claiming that all interrelations must remain the same in the altered data.
We often see other conditions for personal and confidential data altering algorithms, but we won’t review them here. Besides, the four criteria described above are always present. In many cases, it is enough to estimate the functionality of the algorithm suitable to use it.
Now, we need to make a backup of the created database, check it by restoring on another instance, and transfer that copy into the necessary environment for development and testing. For this, we examine the full database backup creation.
Full database backup creation
We can make a database backup with construction BACKUP DATABASE as in our example.
Make a compressed full backup of the database JobEmplDB_Test. The checksum calculation takes place in the file E:\Backup\JobEmplDB_Test.bak. Further, we check the backup created.
Then, we check the backup created by restoring the database for it. Let’s examine the database restoring.
Restoring the database
You can restore the database with the help of RESTORE DATABASE construction in the following way:
USE [master]
RESTORE DATABASE [JobEmplDB_Test]
FROM  DISK = N'E:\Backup\JobEmplDB_Test.bak' WITH  FILE = 1,
MOVE N'JobEmplDB' TO N'E:\DBData\JobEmplDB.mdf',
MOVE N'JobEmplDB_log' TO N'F:\DBLog\JobEmplDB_log.ldf',
NOUNLOAD,
REPLACE,
STATS = 5;
GO
We restore the JobEmplDB_Test database of the E:\Backup\JobEmplDB_Test.bak backup. The files will be overwritten, and the data file will be transferred into the file E:\DBData\JobEmplDB.mdf , while the transactions log file will be moved into F:\DBLog\JobEmplDB_log.ldf .
After we successfully check how the database is restored from the backup, we forward the backup to the development and testing environments. It will be restored again with the same method as described above.
We’ve examined the first approach to the data populating into the database for testing and development. This approach implies copying and altering the data from the production database. Now, we’ll examine the second approach – the synthetic data generation.
Synthetic data generation
The General algorithm for the synthetic data generation is following:
- Make a new empty database or clear a previously created database by purging all data.
- Create or renew a scheme in the newly created database – the same as that of the production databases.
- Copy of renew guidelines and regulations from the production database and transfer them into the new database.
- Generate synthetic data into the necessary tables of the new database.
- Make a backup of a new database.
- Deliver and restore the new backup in the necessary environment.
We already have the JobEmplDB_Test database to practice, and we have reviewed the means of creating a schema in the new database. Let’s focus on the tasks that are specific to this approach.
Clean up the database with the data purge
To clear the database off all its data, we need to do the following:
- Keep the definitions of all external keys.
- Disable all limitations and triggers.
- Delete all external keys.
- Clear the tables using the TRUNCATE construction.
- Restore all the external keys deleted in point 3.
- Enable all the limitations disabled in point 2.
You can save the definitions of all external keys with the following script:
1. The external keys’ definitions are saved in the tabulation variable @tbl_create_FK
2. You can disable the limitations and triggers with the following script:
EXEC sp_MSforeachtable "ALTER TABLE ? NOCHECK CONSTRAINT ALL";
EXEC sp_MSforeachtable "ALTER TABLE ? DISABLE TRIGGER ALL";
To enable the limitations and triggers, you can use the following script:
EXEC sp_MSforeachtable "ALTER TABLE ? WITH CHECK CHECK CONSTRAINT ALL";
EXEC sp_MSforeachtable "ALTER TABLE ? ENABLE TRIGGER ALL";
Here, we use the saved procedure sp_MSforeachtable that applies the construction to all the database’s tables.
3. To delete external keys, use the special script. Here, we receive the information about the external keys through the INFORMATION_SCHEMA.TABLE_CONSTRAINTS system presentation. We delete external keys through the cursor, one by one, using the formed dynamic script T-SQL, transferring the request into the system saved procedure sp_executesql .
4. To clear the tables with the TRUNCATE construction, use the dedicated script. The script works in the same way as above, but it receives the data for tables, and then it clears the tables one by one through the cursor, using the TRUNCATE construction.
5. Restoring the external keys is possible with the below script (earlier, we saved the external keys’ definitions in the tabulation variable @tbl_create_FK):
DECLARE @tsql NVARCHAR(4000);

DECLARE FK_Create CURSOR LOCAL FOR SELECT
	[Script]
FROM @tbl_create_FK;

OPEN FK_Create;

FETCH NEXT FROM FK_Create INTO @tsql;

WHILE (@@fetch_status = 0)
BEGIN
	EXEC sp_executesql @tsql = @tsql;
	FETCH NEXT FROM FK_Create INTO @tsql;
END

CLOSE FK_Create;
DEALLOCATE FK_Create;
The script works in the same way as the two other scripts we mentioned above. But it restores the external keys’ definitions through the cursor, one for each iteration.
A particular case of data purging in the database is the current script. To get this output, we need the below construction in the scripts:
EXEC sp_executesql @tsql = @tsql;Before this construction, or instead of it, we need to write the generated construction output. It is necessary to call it manually or via the dynamic T-SQL query. We do it via the system saved procedure sp_executesql.
Instead of the below code fragment in all cases:
WHILE (@@fetch_status = 0)
BEGIN
	EXEC sp_executesql @tsql = @tsql;
...

We write:

WHILE (@@fetch_status = 0)
BEGIN
	PRINT @tsql;

	EXEC sp_executesql @tsql = @tsql;
...
Or:
WHILE (@@fetch_status = 0)
BEGIN
	PRINT @tsql;
...
The first case implies both the output of constructions and their execution. The second case if for the output only – it is helpful for the scripts’ debugging.
Thus, we get the general database cleaning script.
Copy guidelines and references from the production database to the new one
Here you can use the T-SQL scripts. Our example database of the recruitment service includes 5 guidelines:
- [dbo].[Company] – companies
- [dbo].[Skill] – skills
- [dbo].[Position] – positions (occupation)
- [dbo].[Project] – projects
- [dbo].[ProjectSkill] – project and skills’ correlations
The “skills” table [dbo].[Skill] serves to show how to make a script for the data insertion from the production database into the test database.
We form the following script:
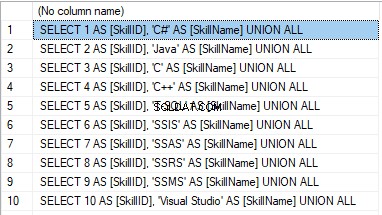
SELECT 'SELECT '+CAST([SkillID] AS NVARCHAR(255))+' AS [SkillID], '+''''+[SkillName]+''''+' AS [SkillName] UNION ALL'
  FROM [dbo].[Skill]
ORDER BY [SkillID];
We execute it in a copy of the production database that is usually available in read-only mode. It is a replica of the production database.
The result is:
Now, wrap the result up into the script for the data adding as here. We have a script for the skills’ guideline compilation. The scripts for other guidelines are made in the same way.
However, it is much easier to copy the guidelines’ data through the data export and import in SSMS. Or, you can use the data import and export wizard.
Generate synthetic data
We’ve determined the pseudorandom values’ generation for lines, numbers, and byte sequences. It took place when we examined the implementation of the data sanitization and the confidential data altering algorithms for approach 1. Those implemented functions and scripts are also used for the synthetic data generation.
The recruitment service database requires us to fill the synthetic data in two tables only:
- [dbo].[Employee] – candidates
- [dbo].[JobHistory] – a candidate’s work history (experience), the resume itself
We can fill the candidates’ table [dbo].[Employee] with synthetic data using this script.
At the beginning of the script, we set the following parameters:
- @count – the number of lines to be generated
- @LengthFirstName – the name’s length
- @LengthLastName – the last name’s length
- @StartBirthDate – the lower limit of the date for the date of birth
- @FinishBirthDate – the upper limit of the date for the date of birth
- @StartCountRequest – the lower limit for the field [CountRequest]
- @FinishCountRequest – the upper limit for the field [CountRequest]
- @StartPaymentAmount – the lower limit for the field [PaymentAmount]
- @FinishPaymentAmount – the upper limit for the field [PaymentAmount]
- @LengthRemoteAccessCertificate – the byte sequence’s length for the certificate
- @LengthAddress – the length for the field [Address]
- @count_get_unique_DocNumber – the number of attempts to generate the unique document’s number [DocNumber]
The script complies with the uniqueness of the [DocNumber] field’s value.
Now, let’s fill the [dbo].[JobHistory] table with synthetic data as follows.
The start date of work [StartDate] is later than the issuing date of the candidate’s document [DocDate]. The end date of work [FinishDate] is later than the start date of work [StartDate].
It is important to note that the current script is simplified, as it does not deal with parameters of the generated data selectivity configuration.
Make a full database backup
We can make a database backup with the construction BACKUP DATABASE, using our script.
We create a full compressed backup of the database JobEmplDB_Test. The checksum is calculated into the file E:\Backup\JobEmplDB_Test.bak. It also ensures further testing of the backup.
Let’s check the backup by restoring the database from it. We need to examine the database restoring then.
Restore the database
You can restore the database with the help of the RESTORE DATABASE construction, as shown below:
USE [master]
RESTORE DATABASE [JobEmplDB_Test]
FROM  DISK = N'E:\Backup\JobEmplDB_Test.bak' WITH  FILE = 1,
MOVE N'JobEmplDB' TO N'E:\DBData\JobEmplDB.mdf',
MOVE N'JobEmplDB_log' TO N'F:\DBLog\JobEmplDB_log.ldf',
NOUNLOAD,
REPLACE,
STATS = 5;
GO
We restore the database JobEmplDB_Test from the backup E:\Backup\JobEmplDB_Test.bak. The files are overwritten, and the data file is transferred to the file E:\DBData\JobEmplDB.mdf. The transaction log file is transferred to file F:\DBLog\JobEmplDB_log.ldf.
After checking the database restoring from the backup successfully, we transfer the backup to the necessary environments. It will be used for testing and development, and further deployment through the database restoring, as described above.
This way, we’ve examined the second approach to filling the database in with data for testing and development purposes. It is the synthetic data generation approach.
Data generation tools (for external resources)
When we have a job to fill in the database with data for testing and development purposes, it can be much faster and easier with the help of specialized tools. Let’s review the most popular and powerful data generation tools and explore their practical usage.
Full list of tools
DATPROF
IRI RowGen
Data Generator for SQL Server
Redgate SQL Data Generator
DTM Data Generator
Datanamic Data Generator MultiDB
Now, let’s examine one of these tools more precisely.
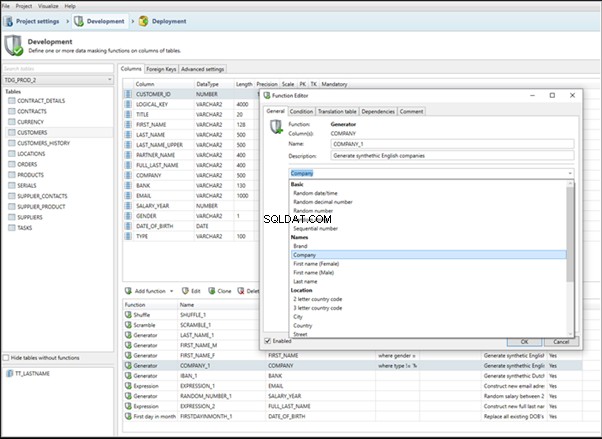
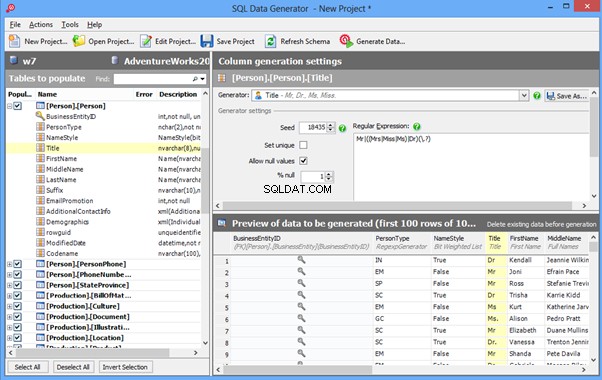
An overview of the employees’ generation by the Data Generator for SQL Server
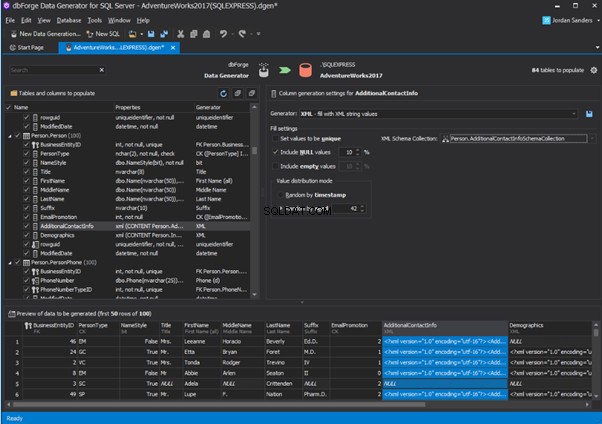
The Data Generator for SQL Server utility is embedded in SSMS, and also it is a part of dbForge Studio. We reviewed this utility here. Let’s now examine how it works for synthetic data generation. As examples, we use the [dbo].[Employee] and the [dbo].[JobHistory] tables.
This generator can quickly generate first and last names of candidates for the [FirstName] and [LastName] fields respectively:
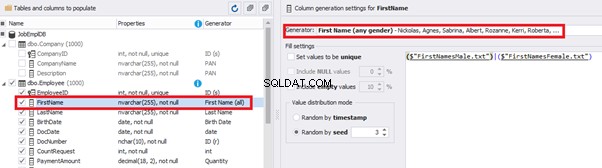
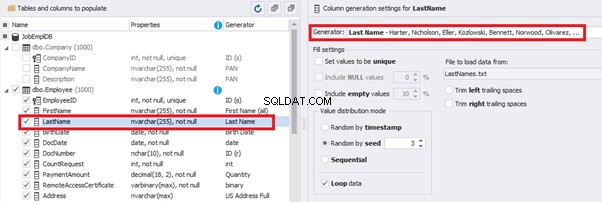
Note that FirstName requires choosing the “First Name” value in the “Generator” section. For LastName, you need to select the “Last Name” value from the “Generator” section.
It is important to note that the generator automatically determines which generation type it needs to apply to every field. The settings above were set by the generator itself, without manual correction.
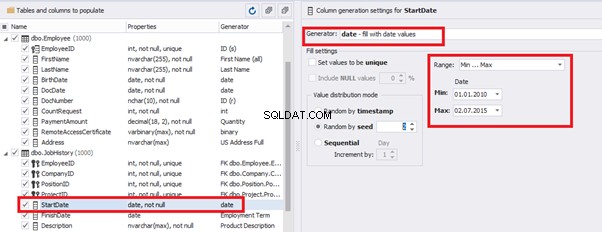
You can configure distribution of values for the date of birth [BirthDate]:
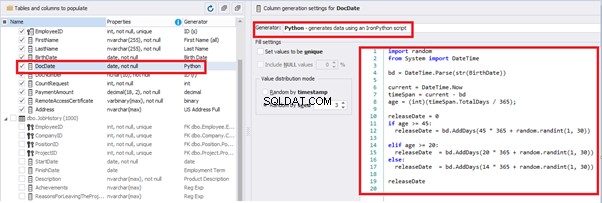
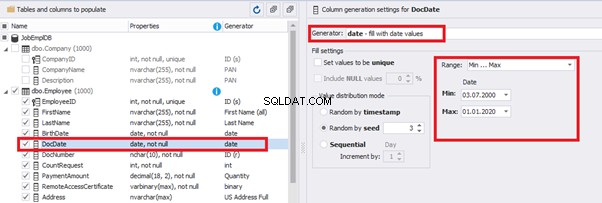
Set the distribution for the document’s date of issue [DocDate] through the Phyton generator using the below script:
import random
from System import DateTime
# receive the value from the Birthday field
bd = DateTime.Parse(str(BirthDate))
# receive the current date
current = DateTime.Now
# calculate the age in years
timeSpan = current - bd
age = (int)(timeSpan.TotalDays / 365);
# passport’s date of issue
releaseDate = 0
if age >= 45:
releaseDate = bd.AddDays(45 * 365 + random.randint(1, 30))
# randomize the issue during the month
elif age >= 20:
  releaseDate  = bd.AddDays(20 * 365 + random.randint(1, 30))
 # randomize the issue during the month
else:
  releaseDate  = bd.AddDays(14 * 365 + random.randint(1, 30))
# randomize the issue during the month
releaseDate
This way, the [DocDate] configuration will look as follows:
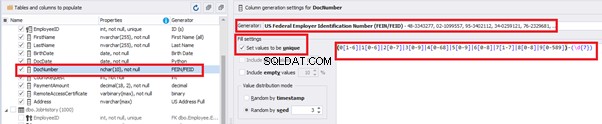
For the document’s number [DocNumber], we can select the necessary type of unique data generation, and edit the generated data format, if needed:
E.g., instead of the format
(0[1-6]|1[0-6]|2[0-7]|3[0-9]|4[0-68]|5[0-9]|6[0-8]|7[1-7]|8[0-8]|9[0-589])-(\d{7})We can set the following format:
(\d{2})-(\d{7})This format means that the line will be generated in format XX-XXXXXXX (X – is a digit in the range of 0 to 9).
We set up the generator for [CountRequest] and [PaymentAmount] fields in the same way, according to the generated data type:
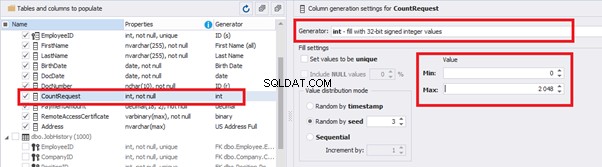
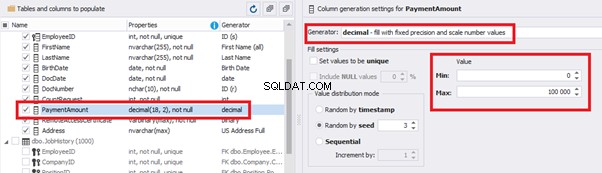
In the first case, we set the values’ range of 0 to 2048 for [CountRequest]. In the second case, it is the range of 0 to 100000 for [PaymentAmount].
We configure generation for [RemoteAccessCertificate] and [Address] fields in the same way:
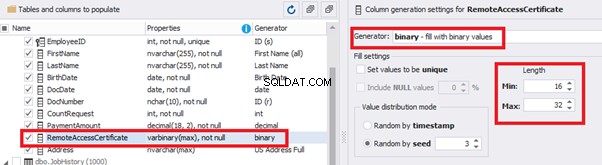
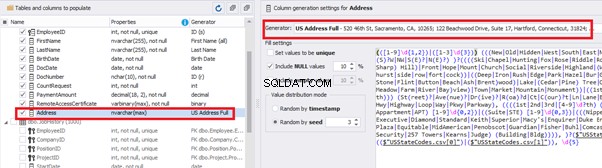
In the first case, we limit the byte sequence [RemoteAccessCertificate] with the range of lengths of 16 to 32. In the second case, we select values for [Address] as real addresses. It makes the generated values looking like the real ones.
This way, we’ve configured the synthetic data generation settings for the candidates’ table [dbo].[Employee]. Let’s now set up the synthetic data generation for the [dbo].[JobHistory] table.
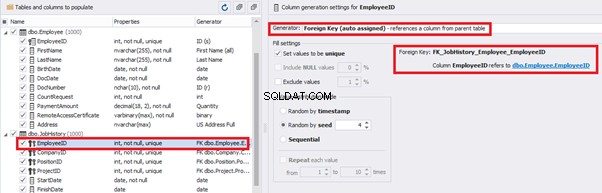
We set it to take the data for the [EmployeeID] field from the candidates’ table [dbo].[Employee] in the following way:
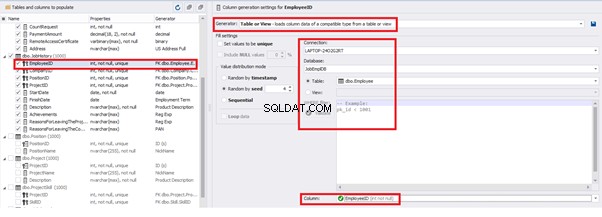
We select the generator’s type from the table or presentation. We then define the sample of MS SQL Server, the database, and the table to take the data from. We can also configure filters in the “WHERE filter” section, and select the [EmployeeID] field.
Here we suppose that we generate the “employees” first, and then we generate the data for the [dbo].[JobHistory] table, basing on the filled [dbo].[Employee] reference.
However, if we need to generate the data for both [dbo].[Employee] and [dbo].[JobHistory] at the same time, we need to select “Foreign Key (manually assigned) – references a column from the parent table,” referring to the [dbo].[Employee].[EmployeeID] column:
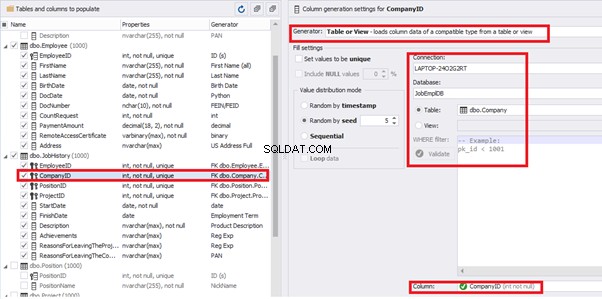
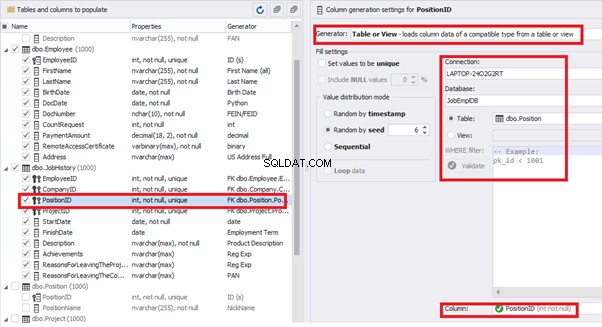
Similarly, we set up the data generation for the following fields.
[CompanyID] – from [dbo].[Company], the “companies” table:
[PositionID] – from the table of positions [dbo].[Position]:
[ProjectID] – from the table of projects [dbo].[Project]:

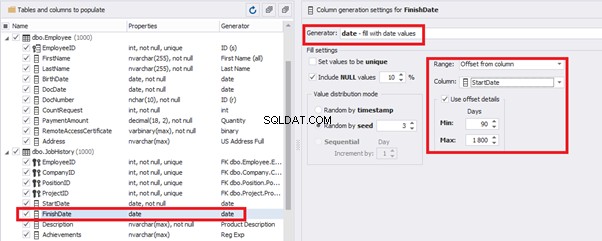
The tool cannot link the columns from different tables and shift them in some way. However, the generator can shift the date within one table – the “date” generator – fill with date values with Range – Offset from the column. Also, it can use data from a different table, but without any transformation (Table or View, SQL query, Foreign key generators).
That’s why we resolve the dates’ problem (BirthDate
E.g., we limit the BirthDate with the 40-50 years’ interval. Then, we restrict the DocDate with 20-40 years’ interval. The StartDate is, respectively, limited with 25-35 years’ interval, and we set up the FinishDate with the offset from StartDate.
We set up the date of birth:
Set up the date of the document’s issue
Then, the StartDate will match the age from 35 to 45:
The simple offset generator sets FinishDate:
The result is, a person has worked for three months till the current date.
Also, to configure the date of the working end, we can use a small Python script:
This way, we receive the below configuration for the dates of work end [FinishDate] data generation:
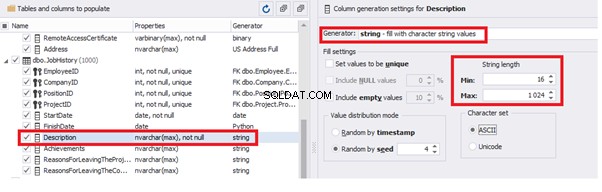
Similarly, we fill in the rest of fields. We set the generator type – string, and set the range for generated lines’ lengths:
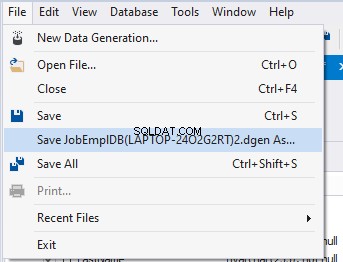
Also, you can save the data generation project as dgen-file consisting of:
We can save all these settings:it is enough to keep the project’s file and work with the database further, using that file:
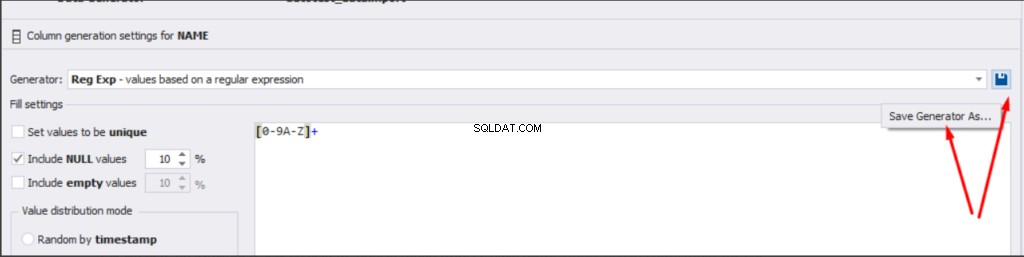
There is also the possibility to both save the new generators from scratch and save the custom settings in a new generator:
Thus, we’ve configured the synthetic data generation settings used for the jobs’ history table [dbo].[JobHistory].
We have examined two approaches to filling the data in the database for testing and development:
We’ve defied the objects for each approach and each script implementation. These objects are here. We’ve also provided scripts for changing the data from the production database and synthetic data generation. An example is the database of recruitment services. In the end, we’ve examined popular data generation tools and explored one of these tools in detail.
SQL SERVER – How to Disable and Enable All Constraint for Table and Database 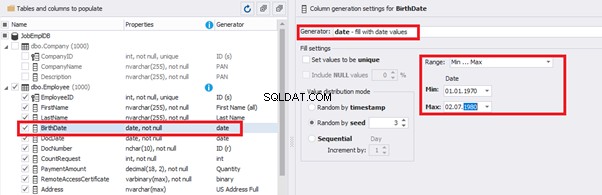
import random
from System import DateTime

bd = DateTime.Parse(str(StartDate))

releaseDate = bd.AddDays(random.randint(1, 30))

releaseDate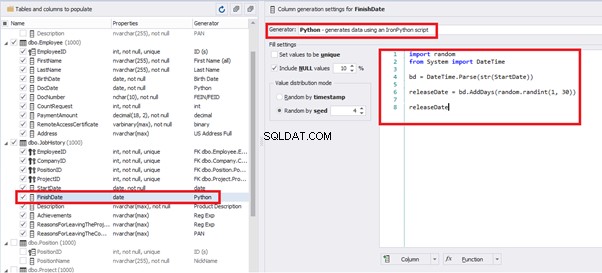
Conclusion
References
Microsoft TechNet Wiki
Top 10 Best Test Data Generation Tools In 2020
SQL Server Documentation